![]()
Reference Guide
|
|
Index |
|
Search |
|
Glossary | |||||
|
|
Contents |
|
Help |
|
||||||
|
|
|
|||||||||||||||||||||||||||||||||
Problem Solver
Printer stops printing unexpectedly
Check to see if the Pause light is flashing. If so, the printer is in the process of head cleaning, ink charging or ink drying. During head cleaning, ink charging, and ink drying, PLEASE WAIT appears on the LCD. Wait until the printer resumes printing.
Many common printer problems can be identified by the messages on the LCD.
You can also check the lights on the control panel for errors. See Lights.
For other messages not included in the following table, see Messages.
|
Message |
Description |
What to do |
|
UNABLE TO PRINT |
An error may be occurring when you try to print patterns such as nozzle check or head alignment. |
End the TEST PRINT MENU first, and solve the error displayed on the LCD. Then try to print patterns again. |
|
MNT TK NEAR FULL |
The maintenance tank is almost full. |
Replace the maintenance tank with a new one. See Replacing the Maintenance Tank. |
|
INK LOW |
Ink cartridge is nearly empty. |
Replacement of ink cartridge is nearly needed. |
|
MNT REQ nnnn |
A part used in the printer has nearly reached the end of its life. "nnnn" shows the code of the part. |
Note the code and contact your dealer. See Contacting Customer Support. |
|
REMOVE PAPER |
Cleaning cannot be executed because thick paper is loaded. |
Remove the thick paper, and move the paper lever to the secured position. |
|
The printer could not feed the printout. |
Remove the printout. |
|
|
NOZZLES STILL CLOGGED |
The nozzles are still clogged. |
Run the Head Cleaning utility. For Windows, see Cleaning the print head. For Mac OS 9.x, see Cleaning the print head. For Mac OS X, see Cleaning the print head. |
|
CHANGE PAPER TYPE |
The loaded paper does not match the paper type selected. |
Match the loaded paper to the paper type. See Buttons. |
|
WRONG PAPER SIZE |
The loaded paper size does not match the data size. |
Match the loaded paper size to the data size. |
|
PAPER OUT |
No paper is loaded in the printer. |
Load paper correctly. |
|
Roll paper is out while printing is in progress. |
Load a new roll paper. |
|
|
NO BORDERLESS WITH THIS SIZE RELOAD PAPER
Note: |
A2 size cut sheet media has been installed for borderless printing. |
Install a different size of cut sheet media or roll paper. See Making the Borderless setting for Windows, Making the Borderless setting for Mac OS 9.x, or Performing Borderless Printing for Mac OS X. |
|
RELOAD PAPER |
The printer cannot detect the loaded cut sheet media, because it is wavy or curled. |
Flatten the cut sheet media. |
|
The printer cannot detect the loaded paper. |
Move the paper lever. |
|
|
RELOAD PAPER INSERT DEEPLY |
Cut sheet media inserted from the front manual feed slot is not inserted deep enough. |
Insert the paper deeper. See Loading paper into the front manual feed slot. |
|
NOT STRAIGHT RELOAD |
Cut sheet media is not loaded straight, and needs to be aligned. |
Load the cut sheet media correctly. See Loading cut-sheet media. |
|
PAPER NOT STRAIGHT |
The paper is not loaded straight. |
Load paper straight. |
|
PAPER NOT CUT |
Paper is not cut correctly when Roll Auto Cut On |
Open the top cover and remove the uncut paper. If RELOAD PAPER appears on the LCD, reload paper. |
|
The paper cutter may not be installed correctly. See Replacing the Paper Cutter. |
||
|
Paper cutter may be blunt. Replace the paper cutter. See Replacing the Paper Cutter. |
||
|
COMMAND ERROR |
Damaged data is sent to the printer. |
Stop printing, and press the Pause button for 3 seconds. |
|
The printer receives data with a wrong command. |
||
|
The installed printer driver is not correct for the printer. |
Stop printing, and press the Pause button for 3 seconds. Then make sure that the installed printer driver is correct for the printer. |
|
|
DRIVER INK SET SETTING IS WRONG MISMATCH ERROR
Note: |
The cartridge option of the printer driver has not been changed yet. |
Stop printing, and then press and hold the Pause button for 3 seconds. Finally, select the correct ink cartridge in the printer driver according to the actual ink cartridge set on the printer. See Updating the printer driver information. If you want to continue printing, press the Pause button. |
|
Non-Epson genuine ink cartridge is installed. |
Press the Pause button for 3 seconds to cancel printing. If you want to continue printing, press the Pause button. |
|
|
LOAD ROLL PAPER |
The roll paper is not set correctly. |
Load the roll paper correctly, and select Roll Auto Cut On |
|
LOAD SHEET PAPER IN P. TRAY |
The cut sheet media is not set correctly in the paper tray. |
Set the cut sheet media in the paper tray correctly, and select Sheet |
|
FEED SHEET PAPER |
The cut sheet media needs to be loaded manually. |
Load the cut sheet media. |
|
FORBIDDEN MEDIA FROM P. TRAY |
Cut sheet media, which is to be loaded from the front or rear manual feed slot, is being loaded from the paper tray. |
Remove the cut sheet media from the paper tray, and load it from the proper paper feed slot. See Checking the paper path. |
|
FEED SHEET PAPER MANUALLY |
The cut sheet media needs to be loaded manually. |
Load the cut sheet media manually from the front or rear manual feed slot. See Checking the paper path. |
|
TIMES REMAINING |
The conversion cartridge needs to be replaced soon. (The remaining times of the conversion cartridge appears on the LCD.) |
Replacement of conversion cartridge is nearly needed. Press the Pause button. |
|
REPLACE CNVRSION CRTG |
The conversion cartridge needs to be replaced. |
Replace the conversion cartridge with a new one. Or, complete the replacement of the K ink by pressing the Pause button. |
|
INK OUT |
Ink cartridge is empty. |
Replace the empty ink cartridge with a new one. See Replacing Ink Cartridges. |
|
INVALID INK CRTG |
Ink cartridge with the wrong product code is installed. |
Remove the ink cartridge, and install the ink cartridge with the correct product code. See Consumable Products. |
|
WRONG INK CRTG |
Ink cartridge that cannot be used with this printer is installed. |
Remove the ink cartridge, and install the ink cartridge that can be used with this printer. See Consumable Products. |
|
SET INK CRTG |
CSIC error has occurred. |
Remove the ink cartridge and reinstall it. If this message appears after reinstalling the ink cartridge, replace it. See Replacing Ink Cartridges. |
|
NO INK CRTG |
Ink cartridge is not installed, or ink lever is raised to the released position. |
Install ink cartridge, or lower the ink lever to the secured position. |
|
MNT TNK FULL |
The maintenance tank is full. |
Replace the maintenance tank with a new one. See Replacing the Maintenance Tank. |
|
LOWER INK LEVERS |
Both ink levers have been raised. |
Lower the ink levers. |
|
LOWER L INK LVR |
The ink lever on the left ink compartment has been raised. |
Lower the ink lever on the left ink compartment. |
|
LOWER R INK LVR |
The ink lever on the right ink compartment has been raised. |
Lower the ink lever on the right ink compartment. |
|
TOP COVER OPEN |
Top cover is open. |
Close the top cover. |
|
LOAD PAPER |
The paper lever is in the released position. |
Move the paper lever to the secured position. |
|
SET PAPER LEVER |
Paper lever is in the released position. |
Move the paper lever to the secured position. |
|
RELEASE LEVER |
Paper is jammed in the printer. |
Release the paper lever first. Then, open the top cover if necessary and remove the jammed paper. If TURN PRINTER PWR OFF AND THEN ON appears on the LCD, turn the printer off, leave it for a while, and then turn it on again. See Clearing paper jams. |
|
NO MNT TNK |
The maintenance tank is not set in the printer. |
Install the maintenance tank. |
|
REAR COVER OPEN |
The rear cover is open. |
Close the rear cover. |
|
UPDATE FAILED |
The printer failed to update the FirmWare. |
Update the FirmWare again. |
|
OPTION I/F ERROR |
The installed interface cannot be used with this printer. |
Remove the interface card, and install the interface card that can be used with this printer. See Options. |
|
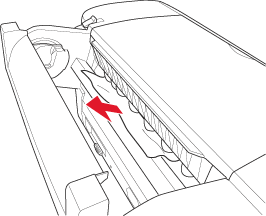
UNLOCK PRINT HEAD |
Print head is locked. |
Pull the green tab on the left side of the print head to release the print head. |
|
SERVICE REQ nnnnnnnn |
Print head is locked. |
Pull the green tab on the left side of the print head to release the print head. |
|
A fatal error has occurred. |
Turn the printer off, leave it for a while, and turn the printer on again. If this message appears on the LCD again, note the code and contact your dealer. See Contacting Customer Support. |
When the Pause light does not come on and mechanism initialization does not start even when the Power  button is pressed to turn on the printer, try the following solutions for the problem.
| Caution: |
|
Try one or more of these solutions:
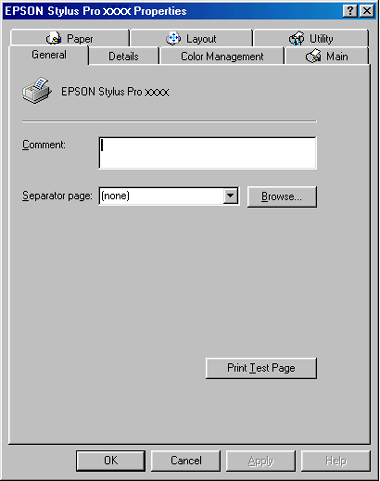
Install the printer driver if it is not installed yet, and follow the steps below to select your Epson printer as the default printer.
 | Click the Start button, and Printer and Faxes. |
 | Right-click EPSON Stylus Pro 4400 or EPSON Stylus Pro 4800. |
 | Select Set As Default Printer, then close the window. |
|
| Click the Start button, point to Settings and select Printers. |
|
| Right-click EPSON Stylus Pro 4400 or EPSON Stylus Pro 4800 in the Printers window. |
|
| Select Set As Default, then close the Printers window. |
|
| Click the Apple menu and select Chooser. If the SPro 4400 or SPro 4800 printer icon can be seen, the printer driver is correctly installed. |
|
| Make sure the EPSON Stylus Pro 4400 or EPSON Stylus Pro 4800 is selected for the printer port. |
Make sure that the printer driver Stylus Pro 4400 or Stylus Pro 4800 is correctly added to the Print Center (for Mac OS X 10.2.x) or Printer Setup Utility (for Mac OS X 10.3), and the correct one is selected in the Print Center or the Printer Setup Utility.
To select the printer port, follow the steps below.
|
| Click Start, click Control Panel, click Printers and Other Hardware, and then click Printers and Faxes. |
|
| Right-click EPSON Stylus Pro 4400 or EPSON Stylus Pro 4800, then select Properties. |
|
| Click the Ports tab. |
 | Make sure that your printer port is selected. |
|
| Click Start, point to Settings, and then select Printers. |
|
| Right-click EPSON Stylus Pro 4400 or EPSON Stylus Pro 4800 in the Printers window, then select Properties. |
|
| Click the Details tab. |
|
| Make sure that your printer driver is selected in the Print using the following driver list. Then select the port to which your printer is connected in the Print to following port list. |
|
| Click Start, point to Settings, and then select Printers. |
|
| Right-click EPSON Stylus Pro 4400 or EPSON Stylus Pro 4800 in the Printers window, then select Properties. |
|
| Click the Ports tab. |
|
| Make sure that your printer port is selected. |
If you canceled the plug-and-play driver installation in Windows Me or 98 before the procedure was complete, the USB printer device driver or the printer software may be incorrectly installed.
To ensure that the driver and printer software are installed correctly, follow the steps below.
| Note: |
|
|
| Click the Start button, point to Settings, and then click Printers. Make sure that the icon for your printer appears in the Printers window. |
|
| Select the icon of your printer, and click Properties on the File menu. |
|
| Click the Details tab. |
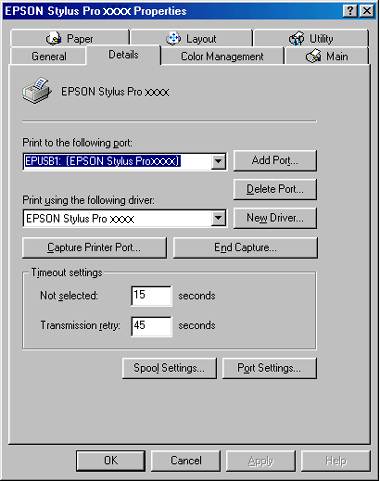
If EPUSBX: (EPSON Stylus Pro 4400) or EPUSBX: (EPSON Stylus Pro 4800) appears in the Print to the following port list, then the USB printer device driver and printer software are installed correctly.
If the correct port is not displayed, proceed to the next step.
|
| Click the Device Manager tab. |

If your drivers are correctly installed, EPSON USB Printer Device should appear on the Device Manager menu.
If EPSON USB Printer Devices does not appear on the Device Management menu, click the plus (+) sign beside Other devices to view the installed devices.

If USB Printer, EPSON Stylus Pro 4400, or EPSON Stylus Pro 4800 appears under Other devices, the printer software is not installed correctly. Proceed to step 5.
If neither USB Printer nor EPSON Stylus Pro 4400/EPSON Stylus Pro 4800 appears under Other devices, click Refresh or unplug the USB cable from the printer, and then plug it into the printer again. Once you have confirmed that these items appear, proceed to step 5.
 | Under Other devices, select USB Printer, EPSON Stylus Pro 4400, or EPSON Stylus Pro 4800, and click Remove. Then click OK. |

When the following dialog appears, click OK.
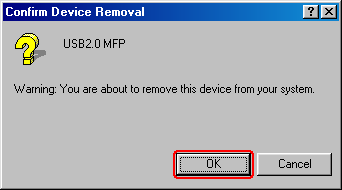
 | Click OK to close the System Properties dialog. |
 | Uninstall the printer software. See Uninstalling the printer driver. |
To increase the available memory in your Macintosh, select Control Panel from the Apple menu and double-click the Memory icon. You can increase the size of RAM cache or virtual memory to increase total available memory. Also quit all unnecessary applications.
Try one or more of these solutions:
Try one or more of these solutions:
For Mac OS 9.x, clear any stalled print jobs from the EPSON Monitor IV. See Managing print jobs using EPSON Monitor IV.
Try one or more of these solutions:
For Mac OS 9.x, check the Borderless setting in the Page Setup dialog. Make sure they are correct for the paper size you are using. See Making Settings in the Page Setup Dialog.
For Windows, turn off the Flip Horizontal setting in the Advanced menu. See Making Advanced setting.
For Mac OS 9.x, turn off the Flip Horizontal setting in the Advanced dialog. See Making Advanced setting.
For Mac OS X, turn off the Flip Horizontal setting in the Advanced Settings selected in the Print Settings selected in the Print dialog. See Advanced Settings.
Try one or more of these solutions:
For Mac OS 9.x, select ColorSync to color match your system in the Advanced dialog. See Making Advanced setting.
For Mac OS X, select ColorSync to color match your system in the Printer Color Management selected in the Print dialog. See Printer Color Management.
For Windows, select PhotoEnhance in the Advanced menu. See Making Advanced setting.
For Mac OS 9.x, select PhotoEnhance in the Advanced dialog. See Making Advanced setting.
Mac OS 9.x, select Color Controls in the Advanced dialog, and adjust color, brightness, etc. as required. See Making Advanced setting.
For Mac OS X, select Color Controls in the Printer Color Management selected in the Print dialog. See Printer Color Management.
Perform the print head alignment. For Windows, see Aligning the print head. Mac OS 9.x, see Aligning the print head. For Mac OS X, see Aligning the print head.
If the problem persists, perform the print head cleaning. For Windows, see Cleaning the print head. For Mac OS 9.x, see Cleaning the print head. For Mac OS X, see Cleaning the print head.
Try one or more of these solutions:
For Mac OS 9.x, if you use Epson special media, check the Media Type setting in the Print dialog. See Making Settings in the Print Dialog.
For Mac OS X, if you use Epson special media, check the Media Type setting in the Print Settings selected in the Print dialog. See Page Setup.
For paper other than Epson's, register and select paper thickness in the SelecType mode. Make sure it is correct for the paper you are using. See Making the paper settings.
Click the caption under the illustration that best resembles your printout.
 |
 |
 |
 |
 |
|
If you are having print quality problems, try the solutions offered here.
Try one or more of these solutions:
For Mac OS 9.x, check the Media Type setting in the Print dialog. Make sure it is correct for the paper you are using. See Making Settings in the Print Dialog.
For Mac OS X, check the Media Type setting in the Print Settings selected in the Print dialog. Make sure it is correct for the paper you are using, see Page Setup.
You can also clean the print head nozzles using the control panel. To clean the print head nozzles, press the Menubutton for 3 seconds.
Try one or more of these solutions:
For Mac OS 9.x, turn off the High Speed setting in the Advanced dialog. See Making Advanced setting.
For Mac OS X, turn off the High Speed setting in the Advanced Settings is selected in the Print Settings selected in the Print dialog. See Advanced Settings.
Try one or more of these solutions:
For Mac OS 9.x, check the Media Type setting in the Print dialog. Make sure it is correct for the paper you are using. See Making Settings in the Print Dialog.
For Mac OS X, check the Media Type setting in the Print Settings selected in the Print dialog. Make sure it is correct for the paper you are using. See Page Setup.
You can also clean the print head nozzles using the control panel. To clean the print head nozzles, press the Menu
Try one or more of these solutions:
For Mac OS 9.x, make sure Color or Color/B&W Photo is set in the Print dialog. See Making Settings in the Print Dialog.
For Mac OS X, make sure Color or Color/B&W Photo is set in the Print Settings selected in the Print dialog. See Color.
Try one or more of these solutions:
For Mac OS 9.x, select the Automatic mode and move the slider towards Speed in the Print dialog to increase print speed. See Making Settings in the Print Dialog.
For Mac OS X, select Automatic mode and move the slider towards Speed in the Print Settings selected in the Print dialog to increase print speed. See Mode.
| Note: |
|
|
|
| Note for Windows: |
|
Try one or more of these solutions:
 is selected as the Paper Source on the LCD. Press the Paper Source
  button if necessary. Then press and hold the Paper Source button for 3 seconds. The printer cuts the roll paper.
| Note: |
|
Try one or more of these solutions:
To adjust the paper suction using the printer driver, see Paper Configuration for Windows, see Paper Configuration for Mac OS 9.x, or see Paper Configuration for Mac OS X.
To adjust the paper suction using the control panel, see CUSTOM PAPER.
For Mac OS 9.x, check the Media Type setting in the Print dialog. Make sure it is correct for the paper you are using. See Making Settings in the Print Dialog.
For Mac OS X, check the Media Type setting in the Print Settings selected in the Print dialog. Make sure it is correct for the paper you are using. See Page Setup
Whenever loading non-Epson special media, test if the paper can be loaded correctly before printing.
To clear Paper jams, see Clearing paper jams.
Try one ore more of these solutions:
To remove jammed roll paper, follow the steps below:
|
| Turn off the printer. |
|
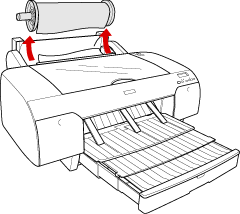
| Open the roll paper cover, and move the paper lever to the released position. |

|
| Cut the paper at the paper insertion slot, and remove the roll paper. |
|
| Remove the jammed paper from the front or rear side of the printer. |
If necessary, open the top cover, and remove the jammed paper.


To remove jammed paper, follow the steps below.
|
| Turn off the printer. |
|
| Move the paper lever to the released position. |

|
| Remove the paper tray from the printer. |

|
| Carefully remove the jammed paper. |
If necessary, open the top cover, and remove the jammed paper.
If the paper is jammed around the rear cover, remove the rear cover by squeezing the knobs, and remove the jammed paper.


To remove jammed paper, follow the steps below:
|
| Turn off the printer. |
|
| Move the paper lever to the released position. |
|
| Remove the jammed paper from the front or rear side of the printer. |
|
Front |
|
|
Rear 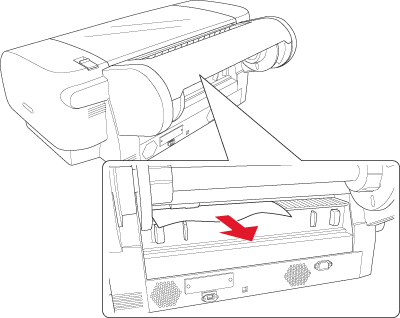 |
|
To remove jammed paper, follow the steps below:
|
| Turn off the printer. |
|
| Move the paper lever to released position. |
|
| Remove the jammed paper from the front. If necessary, open the top cover and remove the jammed paper. |
If your Epson product is not operating properly and you cannot solve the problem using the troubleshooting information in your product documentation, contact customer support services for assistance. If customer support for your area is not listed below, contact the dealer where you purchased your product.
Customer support will be able to help you much more quickly if you give them the following information:
Epson Australia wishes to provide you with a high level of customer service. In addition to your product documentation, we provide the following sources for obtaining information:
Don't forget that your dealer can often help identify and resolve problems. The dealer should always be the first call for advise on problems; they can often solve problems quickly and easily as well as give advise on the next step to take.
Access the Epson Australia World Wide Web pages. Worth taking your modem here for the occasional surf! The site provides a download area for drivers, Epson contact points, new product information and technical support (e-mail).
Epson Faxback service will fax you the latest specifications for most Epson products offered in Australia. Phone (02) 9903 9075 and the system will guide you through a number of choices before faxing the information to your fax machine.
Epson Helpdesk is provided as a final backup to make sure our clients have access to advise. Operators on the Helpdesk can aid you in installing, configuring and operating your Epson product. Our Pre-sales Helpdesk staff can provide literature on new Epson products and advise where the nearest dealer or service agent is located. Many types of queries are answered here.
The Helpdesk numbers are:
|
Phone: |
1300 361 054 |
|
Fax: |
(02) 9903 9189 |
We encourage you to have all the relevant information on hand when you ring. The more information you prepare, the faster we can help solve the problem. This information includes your Epson product documentation, type of computer, operating system, application programs, and any information you feel is required.
Sources of information, support, and services available from Epson Singapore are:
Information on product specifications, drivers for download, Frequently Asked Questions (FAQ), Sales Enquiries, and Technical Support via e-mail are available.
Our HelpDesk team can help you with the following over the phone:
Contact for information, support, and services are:
Information on product specifications, drivers for download, Frequently Asked Questions (FAQ), and e-mail are available.
Our Hotline team can help you with the following over the phone:
Contacts for information, support, and services are:
|
Phone |
(62) 21-572 4350 |
|
Fax |
(62) 21-572 4357 |
|
Jakarta |
Mangga Dua Mall 3rd floor No 3A/B |
|
Bandung |
Lippo Center 8th floor |
|
Surabaya |
Hitech Mall Lt. IIB No.12 |
|
Yogyakarta |
Hotel Natour Garuda |
|
Medan |
Wisma HSBC 4th floor |
|
Makassar |
MTC Karebosi Lt. Ill Kav. P7-8 |
To obtain technical support as well as other after-sales services, users are welcome to contact Epson Hong Kong Limited.
Epson Hong Kong has established a local home page in both Chinese and English on the Internet to provide users with the following information:
Users can access our World Wide Web home page at:
http://www.epson.com.hk
You can also contact our technical staff at the following telephone and fax numbers:
|
Phone: |
(852) 2827-8911 |
|
Fax: |
(852) 2827-4383 |
Contacts for information, support, and services are:
Head Office.
|
Phone: |
603-56288288 |
|
Fax: |
603-56288388/399 |
|
Phone: |
603-56288222 |
|
Phone: |
603-56288333 |
Contacts for information, support, and services are:
Information on product specifications, drivers for download, and products enquiry are available.
|
Phone: |
5321266 (14 Lines) |
|
Fax: |
5581439/5321095 |
|
Mumbai |
Phone: 28261516-17 |
|
Delhi |
Phone: 26447201/02/03/04/07/09 |
|
Chennai |
Phone: 28203940/41 -- 8218658/59 |
|
Kolkata |
Phone: 22831589/90 |
|
Hyderabad |
Phone: 55331738/39 |
|
Cochin |
Phone: 2357638/2356652 |
|
Pune |
Phone: 4335460/90 Ext 214 |
|
Ahmedabad |
Phone: 6407176/77 |
To learn more about Epson products or to avail service support, please call 1600 440011. This is a toll-free number and can be accessed (9 A.M to 9 P.M) anywhere in the country.
To obtain technical support as well as other after sales services, users are welcome to contact the Epson Philippines Corporation at the telephone and fax numbers and e-mail address below:
|
Phone: |
(63) 2-813-6567 |
|
Fax: |
(63) 2-813-6545 |
|
E-mail: |
customersupport@epc.epson.com.ph |
World Wide Web (http://www.epson.com.ph)
Information on product specifications, drivers for download, Frequently Asked Questions (FAQ), and E-mail Enquiries are available.
Epson Helpdesk (Phone: (63) 2-813-6567)
Our Hotline team can help you with the following over the phone:
 Next |
| Version NPD1123-00, Copyright © 2005, SEIKO EPSON CORPORATION |
 . See
. See  . See
. See