|

Reference Guide
|
|
Printing with Mac OS 9.x
Making Settings in the Page Setup Dialog
 Making the Paper Sizes setting
 Making the Paper Source setting
 Making the Borderless setting
 Making the Auto Cut setting
 Making the Orientation setting
 Making Double-sided Printing setting
 Making the Reduce or Enlarge setting
 Making the Printable Area settings
 Making the Roll Paper Option settings
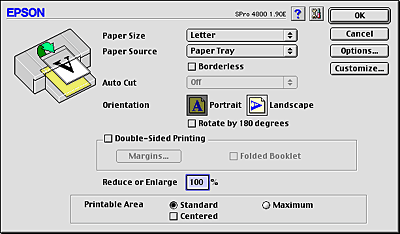
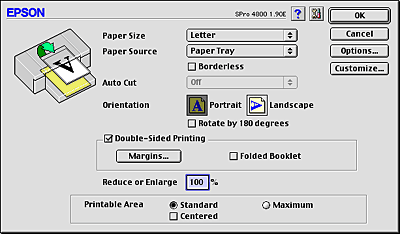
You can make the Paper Size, Paper Source, Borderless, Auto Cut, Orientation, Reduce or Enlarge, Printable Area, and Roll Paper Option settings in this dialog.
Making the Paper Sizes setting
You can select the paper size that you want to use. Select the paper size in the Paper Size pull-down menu.
You can also add a customized paper size. To do this, follow the steps below.
 |
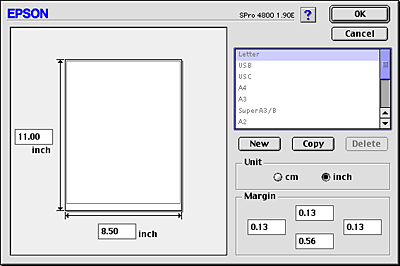
Click Customize. The following dialog appears.
|
 |
To define a new paper size, click New.
|
 |
Type a unique name for the paper size in the paper size list.
|
 |
Specify the measurement unit as either cm or inch.
|
 |
Enter the width and height of your paper by typing the text in the appropriate text boxes.
|
 |  |
Note:
|
 |  | |
The maximum paper height is 44 inches (111.76 cm).
|
|
 |
Specify the margins by typing in the Margin text boxes or by manipulating the preview image.
|
 |
Click OK to return to the Page Setup dialog.
|

[Top]
Making the Paper Source setting
You can select Paper Tray, Roll Paper, Roll Paper (Banner), or Manual Feed from the Paper Source pull-down menu. Select one that matches the paper loaded in the printer.

[Top]
Making the Borderless setting
You can print your data without margins on paper.
For this printing mode, Epson recommends the following media conditions.
Accommodate media width:
|
|
|
|
-
Letter (8.5 in), 215.9 mm
|
|
|
|
|
|
|
|
|
|
|
|
|
|
|
|
|
|
|
|
|
|
|
|
|
 |
Note:
|
 | -
You cannot perform borderless printing on cut-sheet media with a width of 420 mm (A2).
|
|
 | -
If your application has margin settings, make sure they are set to zero before printing.
|
|
 | -
When printing on cut-sheet media, only the left and right margins are set to zero.
|
|
 | -
The ink may contaminate the platen of the printer. In this case, wipe the ink away using a cloth.
|
|
 | -
Printing with this feature takes longer time than normal printing.
|
|
 | -
Only Plain Paper and Plain Paper (line drawing) can set the bottom margin to 3 mm. When printing on the other media, the bottom margin is always 14 mm.
|
|
 | -
When Premium Glossy Photo Paper (250) roll paper or Premium Semigloss Photo Paper (250) roll paper is used in printing, the top margin is always 20 mm.
|
|
 | -
Smear may result in the top and bottom areas depending on the media.
|
|
To print your data with this feature, follow the steps below.
 |
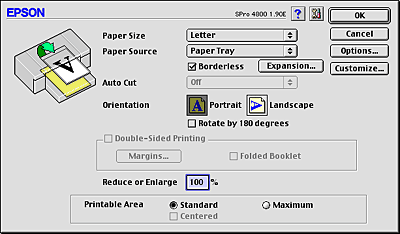
Select Borderless.
|
 |
Click the Expansion button. The following dialog appears.
|
 |
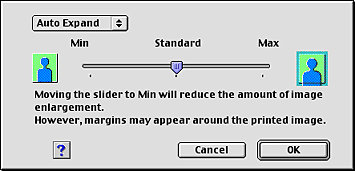
Choose Auto Expand or Retain Size from the pull-down menu.
|
|
Auto Expand
|
Select this setting if you want to enlarge the size of print data automatically and print with no margins. You can choose the amount of enlargement by moving the slider.
Note:
Enlarged areas that exceed the paper size will not be printed on the paper.
|
|
Retain Size
|
Select this setting if you do not want to change the ratio of your print data.
If you select this setting, you need to enlarge your image data to exceed the paper width, to avoid unprinted areas appearing along the left and right edges. Enlarging 3 mm in both the left and right directions is recommended, using the application that created the data.
To use this feature, see Making the Paper Sizes setting.
|
|
Amount of Enlargement
|
When you select Auto Expand, the slider becomes available. Using the slider, you can control the amount of the image that extends beyond the edges of the paper during borderless printing.
For most print jobs, Standard is recommended in order to eliminate margins on all sides of the paper.
In a very humid environment, the width of paper may expand due to moisture absorption. In this case, move the slider to Max to eliminate margins around the image. If Max is selected, the center of the image may move about 1 mm to the right.
Moving the slider towards Min decreases the amount of the image enlargement; however, as this amount decreases, margins may appear on one or more sides of the paper.
|
 |
Click OK.
|
 |
Start printing your data from your application.
|

[Top]
Making the Auto Cut setting
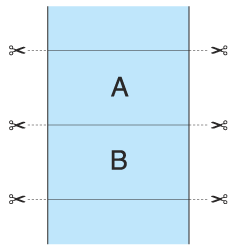
This setting is available only when Roll Paper or Roll Paper (Banner) is selected as the Paper Source setting. You can select how the paper is cut after printing.
Single Cut
Select this setting if you want to save paper.
If you select this setting, the boundary of a picture or the boundary of a page is cut. However, the cut position may shift slightly.
 |
Note:
|
 | -
When printing on Premium Glossy Photo Paper (250) roll paper or Premium Semigloss Photo Paper (250) roll paper, do not select this setting; otherwise, the print quality may decline.
|
|
 | -
This setting appears only when the Borderless check box is selected.
|
|
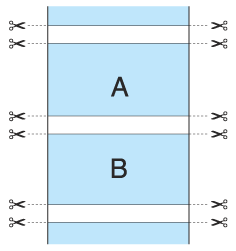
Double Cut
Select this setting to avoid the slight gap that occurs with the Single Cut setting. A margin is created between pictures, and 1 mm along the inside of each picture is cut.
 |
Note:
|
 | |
This setting appears only when the Borderless check box is selected.
|
|
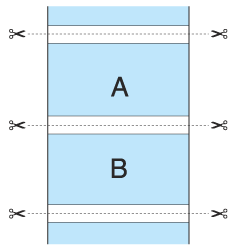
Normal Cut
Select this setting to keep margins at the top and bottom of the printed data.
Off
Select this setting to cut printouts manually. To cut printouts manually, follow the steps below.
 |
Press the Paper Feed  or Paper Feed or Paper Feed  button, and then match the cutting position with the scissors mark on the left side of the print head. button, and then match the cutting position with the scissors mark on the left side of the print head.
|
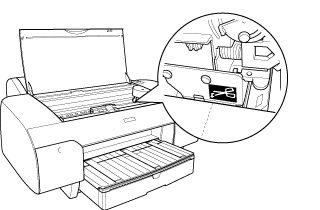
 |
Press the Paper Source  button to select Auto Cut On button to select Auto Cut On  . .
|
 |
Press and hold the Paper Source  button for 3 seconds. The paper cutter cuts the printout at the cutting position. button for 3 seconds. The paper cutter cuts the printout at the cutting position.
|

[Top]
Making the Orientation setting
You can specify the direction of printing on the page.

|
Portrait
|
Print direction is short edge first, like most magazines.
|
|
Landscape
|
Print direction is long edge first, like many spreadsheets.
|
|
Rotated by 180°
|
Prints your document upside down.
Note:
This function is not available when Roll Paper (Banner) is selected as the Paper Source setting.
|

[Top]
Making Double-sided Printing setting
You can perform double-sided printing. There are two types of double-sided printing available. Standard double-sided printing allows you to print the odd-numbered pages first. Once these pages are printed, the paper can then be reloaded for printing the even-numbered pages onto the opposite side of the paper.
You can also perform Folded Booklet double-sided printing. It lets you make single-fold booklets.
 |
Note:
|
 | -
The double-sided printing feature is not available when the printer is accessed over a network, or is used as a shared printer.
|
|
 | -
Depending on the media type, stacks of up to 30 sheets can be loaded into the sheet feeder during double-sided printing.
|
|
 | -
Only use media types that are suitable for double-sided printing; otherwise, the print quality may deteriorate.
|
|
 | -
Depending on the type of paper and the amount of ink used to print text and images, ink may bleed through to the other side of the paper.
|
|
 | -
The surface of the paper may be smeared during the double-sided printing.
|
|
Standard double-sided printing
To print odd and even numbered pages on the opposite sides of a sheet, follow the steps below.
 |
Select the Double-Sided Printing.
|
 |
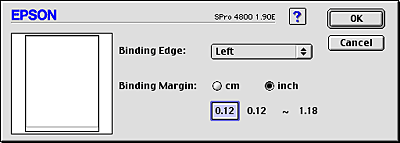
Click Margins. The following dialog appears.
|
 |
Specify the edge of the paper where binding will be placed. You can choose Left, Top, or Right.
|
 |
Specify the width of the binding margin, using the Binding Margin text box. You can specify any width from 3 to 30 mm.
|
 |  |
Note:
|
 |  | |
The actual binding margin may vary depending on the settings specified in your application. We recommend that you test the print quality before printing the entire job.
|
|
 |
Click OK to return to the Page Setup dialog, and then click OK to save your settings.
|
 |
Make sure paper is loaded, and then send a print job from your application. Instructions for generating the even-numbered pages will be displayed while the odd-numbered pages are output.
|
 |
Follow the on-screen instructions and reload the paper.
|
 |  |
Note:
|
 |  | -
The paper may curl during printing due to the amount of ink used. If this problem occurs, slightly curl the sheets in the opposite direction prior to reloading them into the printer.
|
|
 |  | -
Align the sheet stack by tapping its edges against a hard, flat surface prior to reloading the stack into the printer.
|
|
 |  | -
Follow the instructions provided when reloading the printouts. Paper jams or improperly placed binding margins may occur if the printouts are not reloaded correctly.
|
|
 |
Once the paper is reloaded, click Resume to print the even-numbered pages.
|
Folded Booklet double-sided printing
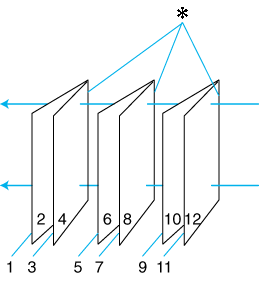
You can also make single-fold booklets using the double-sided printing feature. When you create a single-fold booklet, the pages that appear on the outside (after the booklet is folded) are printed first. The pages that will appear inside the booklet can then be printed after the paper is reloaded into the printer.
 |
 Binding Edge Binding Edge
|
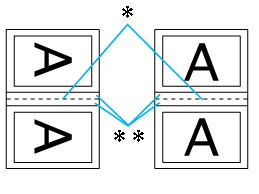
A booklet can be created by printing pages 1 and 4 on the first sheet of paper, pages 5 and 8 on the second sheet of paper, and pages 9 and 12 on the third sheet of paper. After these sheets are reloaded into the sheet feeder, you can then print pages 2 and 3 on the back of the first sheet of paper, pages 6 and 7 on the back of the second sheet of paper, and pages 10 and 11 on the back of the third sheet of paper. The resulting pages can then be folded and bound together into a booklet.
To create the booklet, follow the steps below.
 |
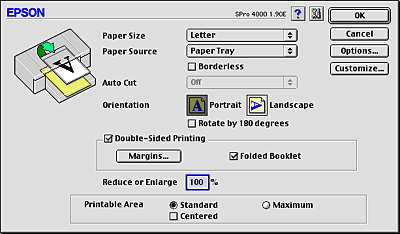
Select Double-Sided Printing, and then select the Folded Booklet.
|
 |
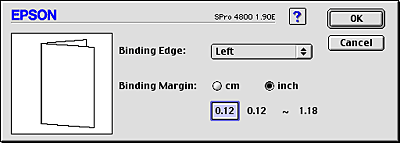
Click Margins. The Margins dialog appears.
|
 |
Specify the edge of the paper where binding will be placed. You can choose Left, Top, or Right.
|
 |  |
Note:
|
 |  | |
When Portrait is selected as the Orientation setting in the printer driver, Left or Right binding positions are available. The Top binding position is supported when Landscape is selected as the Orientation setting.
|
|
 |
Specify the width of the binding margin, using the Binding Margin text box. You can specify any width from 3 to 30 mm. The specified margin width will be used on both sides of the fold. For example, if a 10-mm margin is specified, a 20-mm margin will be inserted (a margin of 10 mm will be placed on each side of the fold).
|
|
|
Portrait
|
Landscape
|
 |
 Folding Edge Folding Edge
|
 |
Click OK to return to the Page Setup dialog, and then click OK to save your settings.
|
 |
Make sure paper is loaded, and then send a print job from your application.
|
 |
Instructions for printing the inside pages will be displayed while the outside pages are output. Follow the on-screen instructions to reload the paper.
|
 |  |
Note:
|
 |  | -
The paper may curl during printing due to the amount of ink used. If this problem occurs, slightly curl the sheets in the opposite direction prior to reloading them into the printer.
|
|
 |  | -
Align the sheet stack by tapping its edges against a hard, flat surface prior to reloading the stack into the printer.
|
|
 |  | -
Follow the instructions provided when reloading the printouts. Paper jams or improperly placed binding margins may occur if the printouts are not reloaded correctly.
|
|
 |
Once the paper is reloaded, click Resume to print the inside pages.
|
 |
Once printing is complete, fold the sheets and bind them together using a stapler or other binding method.
|

[Top]
Making the Reduce or Enlarge setting
You can enlarge or reduce the size of data while maintaining its aspect ratio. You can enter any number from 25 to 400 in the Reduce or Enlarge box.


[Top]
Making the Printable Area settings
This setting is available when you select Paper Tray or Manual Feed as the Paper Source setting. You can make the following settings.

Standard
Select this setting to use the standard printable area.
Maximum
Select this setting to increase the printable area at the bottom edge.
 |
Note:
|
 | -
This setting is available only when Plain Paper, Plain Paper (line drawing), or Tracing Paper is selected as the Media Type setting.
|
|
 | -
The print quality may decline at the edges of printouts when this setting is selected. Before printing large jobs using this setting, print a single sheet to check the quality. When this setting is selected, make sure that paper loaded in the paper tray is not curled.
|
|
Centered
Select this setting to center printouts.

[Top]
Making the Roll Paper Option settings
This option is available when you select Roll Paper or Roll Paper (Banner) as the Paper Source setting. You can make the following settings.

Auto Rotate
 |
Note:
|
 | |
This function is available only when Roll Paper is selected as the Paper Source setting.
|
|
This function is effective only when the print data length is shorter than the printable width of the roll paper. The print data will automatically be turned 90 degrees to print crosswise, saving roll paper.
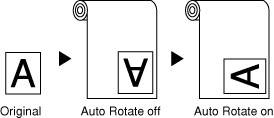
To enable this function, select Auto Rotate.
Print Page Line
This function lets you specify whether to print a page line on the right side and also below the printed data for manual cutting. To enable this function, select Print Page Line.
The Print Page Line operation changes according to the Auto Cut setting. Check these settings as necessary by referring to the printer's operation.
|
Auto Cut
|
Print Page Line
|
Printer's Operation
|
|
Single Cut
Double Cut
Normal Cut
|
Selected
|
Prints page line on the right side only, and cuts paper automatically after the print job.
|
|
Single Cut
Double Cut
Normal Cut
|
Not selected
|
Does not print page line, and cuts paper automatically after the print job.
|
|
Off
|
Selected
|
Prints page lines on the right side and below the printed data, but does not cut paper automatically after the print job.
|
|
Off
|
Not selected
|
Does not print page lines or cut paper automatically after the print job.
|
Save Roll Paper
 |
Note:
|
 | |
This function is available only when Roll Paper (Banner) is selected as the Paper Source setting.
|
|
This function is effective if you wish to save roll paper, because blank portion of the last page or your printed data is not fed through the printer.To enable this function, select Save Roll Paper.

[Top]
| Version NPD1123-00, Copyright © 2005, SEIKO EPSON CORPORATION |
Making the Paper Sizes setting
Making the Paper Source setting
Making the Borderless setting
Making the Auto Cut setting
Making the Orientation setting
Making Double-sided Printing setting
Making the Reduce or Enlarge setting
Making the Printable Area settings
Making the Roll Paper Option settings