|

Reference Guide
|
|
Printing with Mac OS 9.x
Using the Printer Utilities
 Checking the print head nozzles
 Cleaning the print head
 Aligning the print head
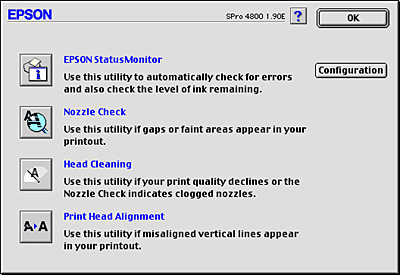
The EPSON printer utilities let you check the current printer status and perform printer maintenance from your screen.

 |
Note:
|
 | -
Do not use the Nozzle Check, Head Cleaning, or Print Head Alignment utilities if your printer is connected to your computer through a network.
|
|
 | -
Do not use the Nozzle Check, Head Cleaning, or Print Head Alignment utilities while printing is in progress; otherwise, your printout may be marred.
|
|
EPSON StatusMonitor
This utility provides you with printer status information, such as the amount of remaining ink.
Nozzle Check
This utility checks the print head nozzles for clogging. Check the nozzles when you notice the print quality has declined and after cleaning to confirm that the print head nozzles have been cleared. See Checking the print head nozzles.
If you click Auto in the Nozzle Check dialog, or turn on AUTO CLEANING from the control panel on the printer, this utility not only checks the clogging nozzles, but also performs head cleaning automatically.
Head Cleaning
This utility cleans the print head. You may need to clean the print head if you notice the print quality has declined. Use this utility to perform head clean. See Cleaning the print head.
Print Head Alignment
This utility can be used to improve the print quality of your printed data. The alignment of the print head may need to be adjusted if vertical lines appear out of alignment or if white or black banding noise appear in your printed data. Use this utility to realign the print head. See Aligning the print head.
Configuration
Clicking this button opens the Configuration Settings dialog, where you can change the way the EPSON Status Monitor utility notifies you when the printer status changes. See Making Configuration Settings.
Checking the print head nozzles
If you find that the printed data is unexpectedly faint or dots in the printed data are missing, you may be able to identify the problem by checking the print head nozzles by using the Nozzle Check utility.
To use the Nozzle Check utility, follow the steps below.
 |
Note:
|
 | |
Do not start the Nozzle Check utility while printing is in progress; otherwise, your printout may be marred.
|
|
 |
Make sure paper is loaded in the printer.
|
 |
Click Nozzle Check.
|
 |
Click Print if you want to visually check if any print head nozzles are clogged, if you are using non-Epson special media, or if the width of paper you are using is less than 210 mm. Click Auto if you want to perform an automatic nozzle check, and if the nozzle check indicates it is necessary.
|

 |  |
Note:
|
 |  | |
If you turn on AUTO CLEANING from the control panel on the printer even though Print has been selected, the Nozzle Check utility not only checks for the clogged nozzles, but also performs head cleaning automatically. If you are using non-Epson special media, or if the width of paper you are using is less than 210 mm, turn off AUTO CLEANING from the control panel on the printer.
|
|
 |
Follow the on-screen instructions to print a nozzle check pattern.
|

[Top]
Cleaning the print head
If you find that the printed data is unexpectedly faint or dots in the printed data are missing, you may be able to solve these problems by using the Head Cleaning utility to clean the print head, which ensures that the nozzles are delivering ink properly.
To use the Head Cleaning utility, follow the steps below.
 |
Note:
|
 | -
Do not start the Head Cleaning utility while printing is in progress; otherwise, your printout may be marred.
|
|
 | -
To save ink, use the Nozzle Check utility first to confirm that the print head needs to be cleaned. This is because the cleaning process consumes some ink.
|
|
 | -
When one check ink out light is flashing or on, you cannot clean the print head. Replace the appropriate ink cartridge first. See Replacing Ink Cartridges.
|
|
 |
Make sure the printer is turned on and all ink check lights are off.
|
 |
Click Head Cleaning.
|
 |
Follow the on-screen instructions.
|
 |
Click Print Nozzle Check Pattern in the Head Cleaning dialog to confirm that the head is cleaned and to reset the cleaning cycle.
|
If you still find missing dots after cleaning, try these solutions.
-
Select PWR CLEANING from the control panel on the printer. See PWR CLEANING.
-
Repeat this procedure four or five times, turn the printer off and leave it alone overnight, and then try head cleaning again.
-
Replace some of ink cartridges as they may be old or damaged.
If the print quality remains a problem after you have tried these solutions, contact your dealer. See Contacting Customer Support.

[Top]
Aligning the print head
If you find misaligned lines or black or white banding on the printed data, you may be able to solve these problems by using the Print Head Alignment utility to align the print head.
To use the Print Head Alignment utility, follow the steps below.
 |
Make sure paper is loaded in the printer.
|
 |
Click Print Head Alignment.
|
 |
Follow the on-screen instructions.
|

[Top]
| Version NPD1123-00, Copyright © 2005, SEIKO EPSON CORPORATION |
Checking the print head nozzles
Cleaning the print head
Aligning the print head