|

Reference Guide
|
|
Maintenance and Transportation
Converting the Black Ink Cartridges
 Updating the printer driver information
You can change the black ink according to your purpose. You can choose either Matte Black or Photo Black.
 |
Caution:
|
 | |
To avoid interrupting a black ink change, observe the following conditions:
|
|
| -
Do not turn off the printer.
|
|
| -
Do not open the top cover.
|
|
| -
Do not remove the rear cover.
|
|
| -
Do not move the paper lever to the released position.
|
|
| -
Do not remove the ink cartridges.
|
|
| -
Do not remove the maintenance tank.
|
|
| -
Do not unplug the power cord.
|
|
 |
Note:
|
| -
If an electrical power failure occurs during this operation, turn the printer on again. You can continue your procedure at the breakpoint.
|
|
| -
The Black Ink Conversion Kit is required when changing the black ink. Also, the black ink cartridge (either Matte or Photo that you want to convert) is required. To check the product code, see Consumable Products.
|
|
To change the black ink, follow the steps below.
 |
Make sure that READY appears on the LCD panel.
|
 |
Press the Menu  button to enter the SelecType mode. button to enter the SelecType mode.
|
 |
Press the Paper Feed  or Paper Feed or Paper Feed  button to display MAINTENANCE on the LCD, and then press the Menu button. button to display MAINTENANCE on the LCD, and then press the Menu button.
|
 |
Press the Paper Feed or Paper Feed button to display BK INK CHANGE, and then press the Menu button.
|
 |
Press the Menu button again to execute.
|
 |
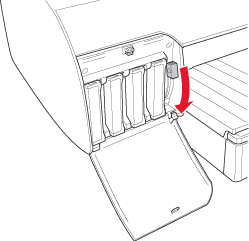
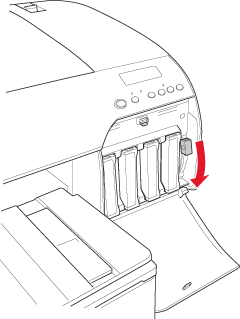
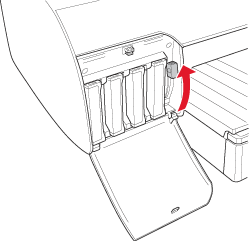
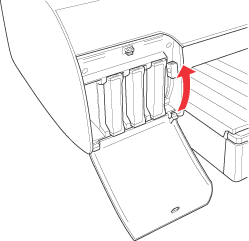
Make sure RAISE THE RIGHT INK LEVER appears on the LCD, and then raise the ink lever on the right ink compartment.
|
 |
Make sure RAISE THE LEFT INK LEVER appears on the LCD, and then raise the ink lever on the left ink compartment.
|
 |
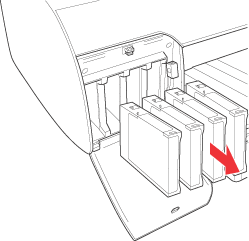
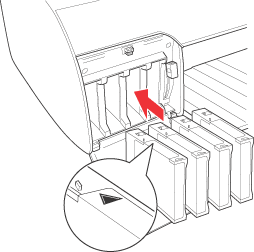
Make sure REMOVE INK CRTG appears on the LCD, and then remove all four ink cartridges from the left ink compartment.
|
 |
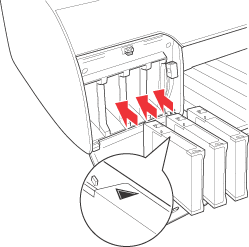
Make sure INSTALL CNVRSION CRTG appears on the LCD, and then insert three conversion cartridges in the slots on the left ink compartment.
|
| |
Note:
|
| |
If REPLACE CNVRSION CRTG appears on the LCD, press the Pause  button. Remove the old conversion cartridge(s) from the left ink compartment, and then insert the new conversion cartridge(s). Finally, go to step 4 to start again. button. Remove the old conversion cartridge(s) from the left ink compartment, and then insert the new conversion cartridge(s). Finally, go to step 4 to start again.
|
|
 |
Make sure LOWER THE LEFT INK LEVER appears on the LCD, and then lower the ink lever on the left ink compartment.
|

 |
The printer starts draining ink, and DRAINING XX% appears on the LCD. Wait until draining is complete.
|
 |
When draining is complete, RAISE THE LEFT INK LEVER appears on the LCD. Raise the ink lever on the left ink compartment.
|
 |
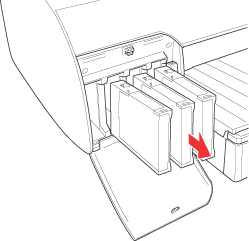
Make sure REMOVE CNVRSION CRTG appears on the LCD, and then remove the conversion cartridges from the slots on the left ink compartment.
|
 |
Make sure INSERT INK CRTG appears on the LCD, and then insert the cartridges in their specified slots.
|
 |
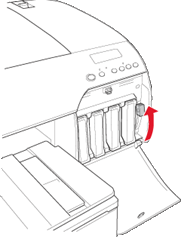
Make sure LOWER BOTH INK LEVERS appears on the LCD, and then lower the ink levers on the right and left ink compartments.
|
 |
Make sure RAISE THE BOTH INK LEVERS appears on the LCD, and then raise the ink lever on the right and left ink compartments.
|
 |
The printer starts charging ink. After a while, ink lever messages appear on the LCD. When a message appears on the LCD, raise or lower the ink levers accordingly until READY appears on the LCD.
|
| |
Note:
|
| | |
Because ink charging after black ink conversion consumes a large quantity of ink, you may need to replace the ink cartridges soon.
|
|
 |
When READY appears on the LCD, ink charging is completed. Close the ink compartment covers.
|
| |
Note:
|
| | |
If you have installed 220 ml ink cartridges, do not close the ink compartment covers.
|
|
Updating the printer driver information
After the replacement operation, update the driver information using the steps below.
For Windows
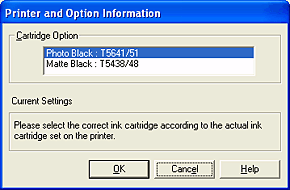
Click the Main tab and make sure that the correct ink cartridge is displayed. If not, set the information manually by clicking the Utility tab and then the Printer and Option Information button.
For Mac OS 8.6 to 9.x
Select Chooser from the Apple menu, and then click the printer's icon and printer port.

For Mac OS X
Remove the printer from the Print Center (for Mac OS X 10.2.x) or the Printer Setup Utility (for Mac OS X 10.3.x), and then add it again.

[Top]
| Version NPD1123-00, Copyright © 2005, SEIKO EPSON CORPORATION |