|

Reference Guide
|
|
Maintenance and Transportation
Replacing Ink Cartridges
When the printer's indicator light is flashing, this indicates that the ink is low and you need to obtain a replacement ink cartridge. When the indicator light remains on, this indicates that there is no more ink and you need to replace the empty ink cartridge. The LCD panel also displays INK LOW or INK OUT.
 |
Note:
|
 | |
Even if only one ink cartridge is empty, the printer cannot continue to print.
|
|
Epson recommends the use of genuine Epson ink cartridges. Other products not manufactured by Epson may cause damage to your printer not covered by Epson's warranties. For detailed information on ink cartridges, see Ink cartridges.
To check the product codes of ink cartridges, see Consumable Products.
To replace an ink cartridge, follow the steps below.
 |
Caution:
|
 | |
Leave the old ink cartridge installed in the printer until you are ready to replace it with a new one.
|
|
 |
Note:
|
 | -
The UltraChrome ink cartridges for EPSON Stylus Pro 4000/7600/9600 can also be used with EPSON Stylus Pro 4400.
|
|
 | -
The UltraChrome K3 ink cartridges are designed for the exclusive use of EPSON Stylus Pro 4800.
|
|
 |
Make sure the printer is on. Find out which cartridge needs to be replaced, as indicated by the steady or flashing Ink check light.
|
 |
Open the ink compartment cover by pushing it.
|
 |
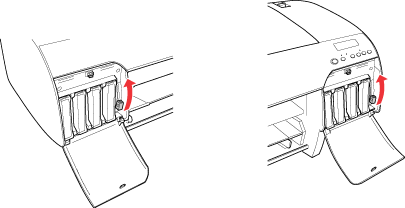
Raise the ink levers to the released position.
|
 |  |
Note:
|
 |  | |
The right ink compartment is available for EPSON Stylus Pro 4800 only.
|
|
 |
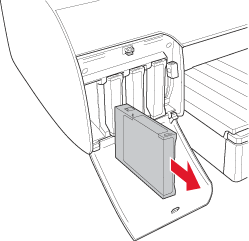
Carefully pull the empty cartridge straight out of the printer.
|
 |  |
Warning:
|
 |  | |
If ink gets on your hands, wash them thoroughly with soap and water. If ink gets into your eyes, flush them immediately with water.
|
|
 |  |
Caution:
|
 |  | |
Do not shake cartridges (that have been installed previously) with too much force.
|
|
 |
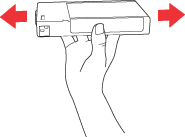
Make sure the replacement ink cartridge is the correct color, and remove it from the package. Shake the ink cartridge well before installing it for best results.
|
 |  |
Note:
|
 |  | |
A protection system is provided to prevent improper cartridge insertion. If you cannot insert the ink cartridge smoothly, the type of cartridge may be incorrect. Check the package and product code.
|
|
 |
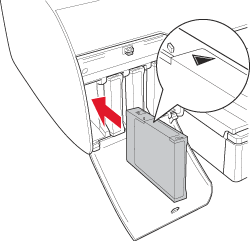
Hold the ink cartridge with the arrow mark facing up and pointing to the rear of the printer, and then insert it into the slot. Do not force the cartridge in further by hand.
|
 |  |
Note:
|
 |  | |
If the Ink check light remains on, this indicates the ink cartridge may not be installed correctly. Remove the ink cartridge and then reinsert it as described above.
|
|
 |
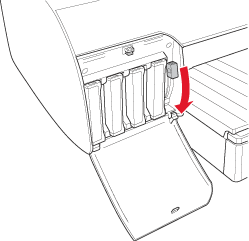
Lower the ink lever to the secured position.
|
 |  |
Note:
|
 |  | |
If you install an ink cartridge in the wrong slot, NO INK CRTG appears on the LCD. Make sure that the correct ink cartridge is installed in the correct slot.
|
|
 |
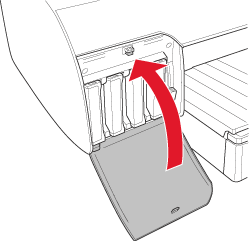
Close the ink compartment cover. The printer returns to the previous status.
|
 |  |
Note:
|
 |  | |
If you have installed 220 ml ink cartridge, do not close the ink compartment cover.
|
|

[Top]
| Version NPD1123-00, Copyright © 2005, SEIKO EPSON CORPORATION |