![]()
Reference Guide
|
|
Index |
|
Search |
|
Glossary | |||||
|
|
Contents |
|
Help |
|
||||||
|
|
|
|||||||||||||||||||||||||||||||||
Problem Solver
Preventing paper feed and paper jam problems
To prevent frequent paper feed or paper jam problems, use this checklist of corrective measures.
When a paper jam occurs, Paper Jam xxxx or Feed Jam message appears on the LCD panel. See the messages in this section for instructions on clearing paper jams in each location.
 | Note: |
| Check for jams at all paper sources or paths indicated on the LCD panel. The printer cannot resume printing until all the jams are cleared. |

|
 |
 |
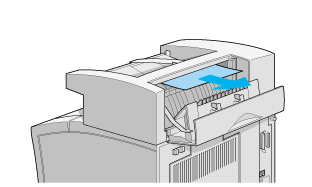
This message indicates that there may be a paper jam in the output area or at the photoconductor unit.
 | Open the rear cover. |
 | Remove any paper you find jammed inside the printer. |

 | Close the rear cover. |
Check this location also when outputting to the optional Multibin Unit or the Shifter.
When the paper jam is cleared completely, the jammed page's print data is automatically reprinted.
This message indicates that there is paper jammed in the paper feed slots.
|
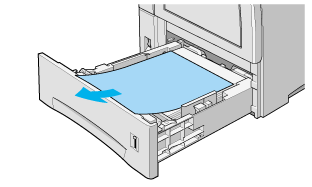
| Pull out the paper cassette. |
|
| Carefully remove any paper you find jammed inside the paper feed slots. |
|
| Remove the stack of paper from the paper cassette. Even its edges by tapping it on a flat surface. Then reinsert it into the cassette making sure that the paper is evenly aligned and the top of the stack is below the maximum paper mark. |
 | If the control panel still indicates a paper jam, then completely remove the cassette, as shown in the illustration below. |
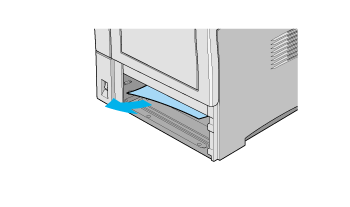
 | Carefully remove any sheets that have fed part way into the printer. |
 | Reinsert the paper cassette back into the printer. |
 | Open and close the front cover. |
 | If necessary, repeat this process with the paper cassettes in the optional Large Capacity Paper Units. |
 | Caution: |
| If you completely removed paper cassettes, be sure to put them back into their original position. Changing the position of the cassettes may cause improper paper feeding. |
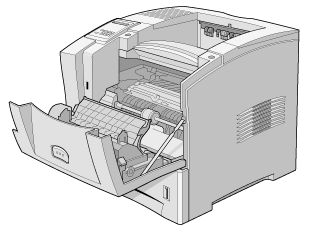
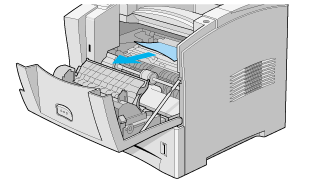
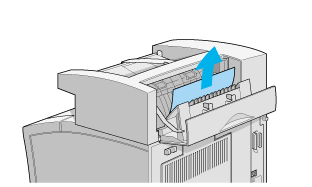
This message indicates that there is paper jammed inside the front cover. To clear the paper jam follow the instructions below.
|
| Open the front cover. |
|
| Remove any wrinkled or folded paper you find jammed inside the printer. |

|
| Remove the Imaging Cartridge and remove any jammed paper. See Replacing the Imaging Cartridge for instructions on removing the Imaging Cartridge. |
| Caution: |
| When removing jammed paper, make sure you lift the metal flap and pull the paper out towards the front of the printer. |
 | Warning: |
| When opening the printer, do not touch the hot areas marked with caution labels inside the front and rear covers. |
|
| Reinsert the Imaging Cartridge. |
|
| Close the front cover. |
When the paper jam is cleared completely, the jammed page's print data is automatically reprinted.
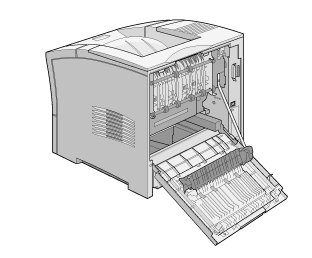
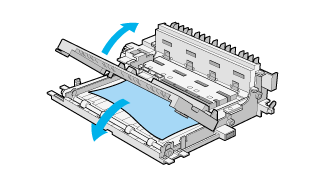
This message indicates that there is paper jammed inside the Duplex unit.
|
| Open the rear cover. |
|
| Remove any wrinkled or folded paper you find jammed inside the printer. |
| Warning: |
| When opening the printer, do not touch the hot areas marked with caution labels inside the front and rear covers. |
|
| If necessary, remove the Duplex Unit. For instructions on removing the Duplex Unit, see Duplex Unit. |
|
| Remove any paper you find jammed in the Duplex Unit. If necessary open the Duplex Unit as shown in the illustration below. |
|
| Remove any paper you find inside the Duplex Unit. |
|
| Reinstall the Duplex Unit. For instructions on reinstalling the Duplex Unit, see Duplex Unit. |
|
| Close the rear cover. |
When the paper jam is cleared completely, the jammed page's print data is automatically reprinted.
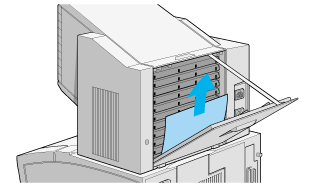
This message indicates that there is paper jammed inside the Multibin Unit.
|
| Open the rear cover of the Multibin Unit. |
|
| Remove any paper you find jammed inside the Multibin Unit. |
|
| Check the mailboxes for any jammed paper and remove it. You may need to open locked mailboxes. If necessary open the Multibin Unit as shown in the illustration below. |

| Note: |
| To open locked mailboxes you may need to contact the administrator. |
|
| Remove any paper you find jammed in the Multibin Unit. |
|
| Open and close the rear cover. |
When the paper jam is cleared completely, the jammed page's print data is automatically reprinted.
This message indicates that there is paper jammed inside the Shifter.
|
| Open the rear cover of the Shifter. |
|
| Remove any paper you find jammed inside the Shifter as shown in the illustration below. |
|
| Remove any paper you find inside the Shifter as shown in the illustration below. |
|
| Open and close the front cover and the rear cover. |
When the paper jam is cleared completely, the jammed page's print data is automatically reprinted.
Turn off the printer and check the power cord connections between the printer and the electrical outlet. Then turn the printer back on.
If the electrical outlet is controlled by an outside source such as a wall switch, make sure the switch is turned on, or plug another electrical device into the outlet to check whether the outlet is operating properly.
Your computer may not be properly connected to the printer. Refer to the connecting instructions in the Setup Guide.
The interface cable may not be securely plugged in. Check both ends of the cable between the printer and the computer.
Make sure that your interface cable meets the specifications for the printer and your computer.
If you are using the parallel interface, set the Speed setting (in the Parallel menu) to match the value that the computer requires.
Make sure that your printer is selected in your application software.
The Imaging Cartridge may be empty. Replace it following the instructions described in Replacing the Imaging Cartridge.
Press the On Line button once to put the printer online (the On Line light turns on).
The selected font is not installed in your printer. Be sure you have installed the correct font. See Adding and Selecting Fonts for more information.
Make sure that both ends of the interface cable are plugged in securely.
Make sure you use a double-shielded, twisted-pair parallel interface cable no longer than 1.8 meters in length.
The Image Optimum setting may be set to Auto or On. If it is, certain unexpected fonts may be printed to increase the printing speed. Turn the Image Optimum setting off in the printer driver or SelecType Config Menu.
The emulation setting for that port may not be correct. Specify the correct emulation mode on the SelecType Emulation Menu.
If the printer still does not print correctly, contact your dealer or a qualified service representative.
Make sure that you are using the correct page length and margin settings, such as T. Margin or Text, in your application software.
Set the paper guides to fit the paper size you have loaded.
Make sure that your application software is set for the printer emulation you are using. For example, if you are using the LJ4 emulation mode, make sure that your software program is set to use a LaserJet 4000 printer.
Graphics require large amounts of memory. See Memory Modules for more information.
Settings made in the application software or the printer driver override SelecType settings. Use those settings instead of SelecType settings whenever possible.
Your settings may have been changed by your software program. Perform a factory reset (initialize) with the SelecType Init function on the SelecType Setup Menu. See Using SelecType for more information.
You may not have reset the printer after making settings. Press the ALT and Continue buttons at the same time to reset the printer and enable the new settings.
The Imaging Cartridge is not installed correctly. To properly install the cartridge, see Replacing the Imaging Cartridge.
If you encounter any one of the following problems with your printout, try the solutions listed for each problem.
Lighten the Density setting using the printer driver or the SelecType Config Menu.
Clean the paper path inside the printer with a clean, soft, and lint-free cloth. See Cleaning the Printer.
Clean internal printer components by printing several pages with only one character per page.
There may be a problem with the Imaging Cartridge. Remove the cartridge, gently shake it from side to side, and then reinstall it. If this does not solve the problem, replace the Imaging Cartridge as described in Replacing the Imaging Cartridge.
Install a new Imaging Cartridge as described in Replacing the Imaging Cartridge.
Take out the Imaging Cartridge, shake it from side to side, and reinstall it.
Your paper may be moist or damp. The printer is sensitive to moisture absorbed by the paper. Do not store paper in a humid or damp environment.
Install a new Imaging Cartridge following the instructions described in Replacing the Imaging Cartridge. Then print several pages to check the print quality.
Remove the Imaging Cartridge, gently shake it from side to side to distribute the toner, and wipe the bottom of it with a clean, dry cloth.
Clean the paper path inside the printer using a clean, soft, and lint-free cloth.
Clean internal printer components by printing several pages with only one character per page.
If the problem remains, replace the Imaging Cartridge following the instructions described in Replacing the Imaging Cartridge.
Your paper may be moist or damp. The printer is sensitive to moisture absorbed by the paper. The higher the moisture content in the paper, the lighter the printed output. Do not store paper in a humid or damp environment.
You may not be using the correct type of paper for your printer. If the surface of your paper is too rough, printed characters appear distorted or broken. Smooth, high-quality copier paper is recommended for best results. See Available Paper Types and Printer for information on choosing paper.
Check the amount of toner in the imaging cartridge by using SelecType Toner option in the Setup Menu. If a message on the LCD panel indicates that the amount of toner is low (E* F) or toner out (E F), replace the imaging cartridge. See Replacing the Imaging Cartridge for more information.
Check that the Imaging Cartridge is installed properly as described in Replacing the Imaging Cartridge.
The problem may be with your application software or interface cable. Print out a status sheet by pressing the Enter button on the control panel twice while the printer is online. If the status sheet is also blank, the problem may be with the printer. Turn off the printer and contact your dealer.
Darken the Density setting using the printer driver or the SelecType Config Menu.
Your paper may be moist or damp. The printer is sensitive to moisture absorbed by the paper. The higher the moisture content in the paper, the lighter the printed output. Do not store your paper in a humid or damp environment.
Take out the Imaging Cartridge, gently shake it from side to side to distribute the toner, and then reinstall it. If the problem persists, replace the Imaging Cartridge following the instructions described in Replacing the Imaging Cartridge.
The Toner Save mode may be on. Turn off the Toner Save mode using the printer driver, OneTouch mode 2, or SelecType Config Menu.
The Density setting may be incorrect. Change the Density setting on the printer driver's Panel menu. You can also change this setting from the printer's control panel using SelecType. See Using SelecType for details.
If the problem persists, replace the Imaging Cartridge following the instructions described in Replacing the Imaging Cartridge.
Toner may have spilled in the paper feed path. Remove the Imaging Cartridge and then clean the paper path of the printer using a soft, lint-free cloth. See Cleaning the Printer for more information.
| Warning: |
| When opening the printer, do not touch the hot areas marked with the caution labels inside the printer. |
Make sure that you have selected the proper paper cassette in your application software.
There may be no paper in the unit. Load it with paper.
Make sure that the Large Capacity Paper Unit is properly installed as described in Installing.
Make sure you have not loaded the paper cassette with too many sheets of paper. A cassette can hold a maximum of 550 sheets of 80g/m2 paper.
The Page Protect setting in the printer driver or SelecType may need to be changed.
You may not have enough memory installed. If you are printing at 1200 dpi, lowering the resolution setting to 600 dpi may solve the problem.
| Version 1.00E, Copyright © 2001, SEIKO EPSON CORPORATION |