|

Reference Guide
|
|
How to / Replacing the Consumables
About Replacing the Consumables
If your printed images become faint, access the SelecType Setup menu and use the Toner function to find out approximately how much toner remains in the imaging cartridge.
To determine the amount of toner remaining in the Imaging Cartridge simply count the asterisks between the E (empty) and the F (full) on the display. Each asterisk represents about 25% of the total toner capacity. If you see only one asterisk on the display indicating that there is less than 25% toner left, prepare a replacement imaging cartridge.
Replace the cartridge with the Imaging Cartridge (S051070) even if the cartridge you remove has a different part number. Order the cartridge (S051070) that is specially designed for your high-quality 1200-dpi printer.
 |
Caution:
|
 |
We recommend the use of genuine EPSON Imaging Cartridges. Products not manufactured by EPSON may cause damage to your printer, which is not covered by EPSON's warranties.
|
 |
Note:
|
|
Make sure to reset the toner counter after replacing the imaging cartridge to resume printing.
|
Replacing the Imaging Cartridge
Follow these steps to replace the imaging cartridge:
 |
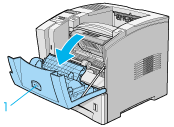
Push the button on the front cover of the printer and open it as shown below.
|
1. Push
|  |
Warning:
|
| |
Do not touch the hot areas marked with the caution labels inside the front cover. Touching these areas may cause burns or injuries.
|
 |
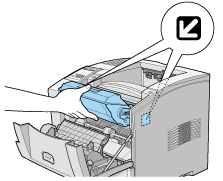
Grasp the imaging cartridge at its center and pull it toward you at an upward angle. The cartridge slides out easily and does not need to be forced.
|
 |
Dispose of the used imaging cartridge according to local regulations.
|
| |
Warning:
|
| |
Do not dispose of used imaging cartridges in fire, as they can explode and cause injury. Dispose of them according to local regulations.
|
| |
Caution:
|
| |
Do not turn the imaging cartridge upside down. Do not expose the imaging cartridge to light any longer than necessary.
|
 |
Remove the new imaging cartridge from its package.
|
 |
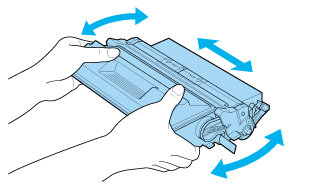
While holding the new imaging cartridge horizontally, gently shake it a few times to distribute the toner evenly.
|
 |
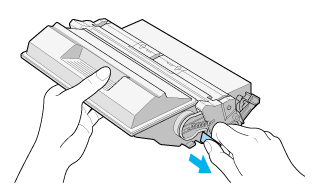
Pull the protective strip located on the right side of the cartridge all the way out completely with firm, even pressure.
|
 |
Note the arrows on the left and right sides inside the printer. Slide the new imaging cartridge, in the direction of the arrows, at a slight downward angle into the printer. Push the cartridge into the printer until it is securely placed in its proper position.
|
 |
Close the front cover of the printer by pushing it upward until it clicks into place.
|
| |
Caution:
|
| |
To avoid spilling toner, do not tilt the imaging cartridge.
|
| |
Warning:
|
| |
Do not touch the hot areas marked with the caution labels inside the front cover. Touching these areas may cause burns or injuries.
|
Resetting the toner counter
After replacing the imaging cartridge, you need to reset the toner counter in order to continue using the printer.
Follow these steps to reset the toner counter:
|
|
Press the Menu button until the Setup Menu is displayed on the LCD panel.
|
|
|
Press the Item button to display Toner Count Clear in the menu.
|
|
|
Press Enter.
Your toner counter is now reset.
|

[Top]
| Version 1.00E, Copyright © 2001, SEIKO EPSON CORPORATION |

