|

Reference Guide
|
|
How to / Install and Remove Options
Duplex Unit
 Installing
Removing
The optional Duplex Unit allows you to print on both sides of the paper automatically.
Installing
To install the Duplex Unit, see the following section or the Setup Guide.
Before installing
 |
Caution:
|
 |
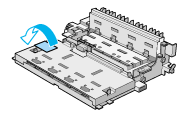
Open the inner tray of the Duplex Unit and remove the packing tape; otherwise, the printer will not function properly.
|
 |
Turn off the printer.
|
 |
Unplug the printer's power cord from the electrical outlet.
|
 |
Unpack the Duplex Unit and remove the packing tape.
|
Installing
|
|
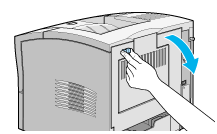
Squeeze together the two adjacent knobs on the printer's rear cover, so that the rear cover comes free. Gently lower the rear cover all the way down.
|
|
|
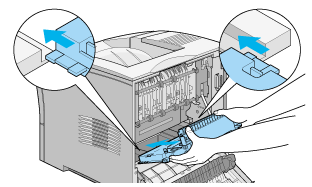
While holding the Duplex Unit in both hands, align the edges on the unit with the guide rails in the printer. Slowly tilt the unit and slide it into the printer as shown in the illustration below. You do not need to force the unit into the printer, as it is designed to join smoothly.
|
| |
Caution:
|
| |
Do not touch the areas marked with the caution labels inside the rear cover. If the printer has been in use, these areas may be very hot.
|
|
|
Close the rear cover of the printer.
|
After Installing
|
|
Make sure the printer is not turned on.
|
|
|
Plug the printer's power cord into an electrical outlet.
|
|
|
Turn on the printer.
|
To confirm that the Duplex Unit is installed correctly, print a status sheet. If the unit is not listed on the status sheet, try installing it again.
 |
Note:
|
|
Keep the packaging materials in case you remove the Duplex Unit in the future.
|

[Top]
Removing
To remove the Duplex Unit, follow the instructions below.
Before removing
|
|
Turn off the printer.
|
|
|
Unplug the printer's power cord from the electrical outlet.
|
Removing
|
|
Squeeze together the two adjacent knobs on the printer's rear cover, so that the rear cover comes free. Gently lower the rear cover all the way down.
|
|
|
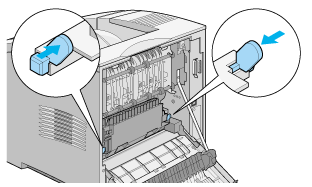
Using both hands, grab the Duplex Unit and simultaneously push the blue buttons located on both sides of the Duplex Unit, as shown in the illustration below.
|
|
|
Carefully lift and slide the unit out of the printer.
|

 |
Close the rear cover of the printer.
|
After removing
|
|
Make sure the printer is not turned on.
|
|
|
Plug the printer's power cord into an electrical outlet.
|
|
|
Turn on the printer.
|
[Top]
| Version 1.00E, Copyright © 2001, SEIKO EPSON CORPORATION |

