![]()
Reference Guide
|
|
Index |
|
Search |
|
Glossary | |||||
|
|
Contents |
|
Help |
|
||||||
|
|
|
|||||||||||||||||||||||||||||||||
How to / Controlling the Printer
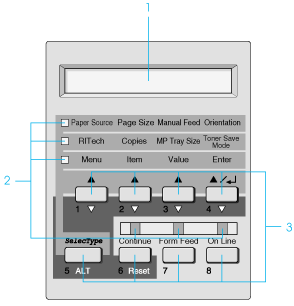
LCD panel
The control panel is made up of three elements: a liquid crystal display (LCD) panel, indicator lights, and buttons. The LCD panel and indicator lights tell you the current status of the printer, and you can use the buttons to select settings and functions. However, settings made in applications or the printer driver usually override these settings.
|
1. |
LCD panel |
|
2. |
indicator lights |
|
3. |
buttons |
The LCD panel shows the following:
For information on problem-solving and routine maintenance, see Printer Problems and Cleaning the Printer. For more information on SelecType, see Using SelecType.
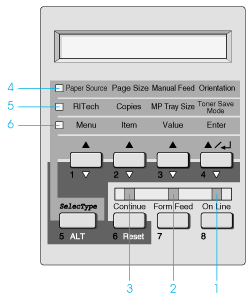
|
1 |
On Line |
On when the printer is online, indicating the printer can receive and print data. When the printer is offline, this light is off. The light flashes as the system switches between online and offline status. |
|
2 |
Form Feed |
On when data is received and stored in the printer buffer (printer memory reserved for receiving data), but not yet printed. Flashing indicates the printer is processing data. When no data remains in the printer buffer, this light turns off. |
|
3 |
Continue |
Flashes when an error is detected or a maintenance procedure must be performed. Check the LCD panel for error or maintenance messages when this light is flashing. |
|
4 |
OneTouch |
On when the printer is in OneTouch mode 1. See Using the OneTouch Modes for details. |
|
5 |
OneTouch |
On when the printer is in OneTouch mode 2. See Using the OneTouch Modes for details. |
|
6 |
SelecType |
On when the printer is in SelecType mode. See Using SelecType for more information. |
This section explains how to use the control panel buttons.
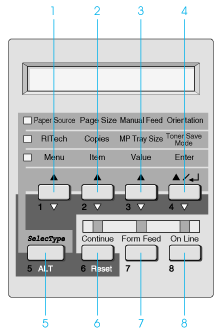
|
1 |
Menu |
Selects the corresponding OneTouch mode setting listed above this button if in OneTouch mode 1 or 2, or selects the SelecType menu if in SelecType mode. Press this button when the printer is online to enter SelecType mode. |
|
2 |
Item |
Selects the corresponding OneTouch mode setting listed above this button if in OneTouch mode 1 or 2, or selects the function available within the current menu after entering the SelecType mode. |
|
3 |
Value |
Selects the corresponding OneTouch mode option listed above this button if in OneTouch mode 1 or 2, or selects the value available for the current item, after entering the SelecType mode menu. |
|
4 |
Enter |
Selects the corresponding OneTouch mode option listed above this button if in OneTouch mode 1 or 2, or activates the setting currently shown on the LCD panel when in SelecType mode. Press this button two times when the printer is online to print the status sheet. |
|
5 |
SelecType |
Selects OneTouch mode or SelecType mode. Press this button once to enter OneTouch mode 1. Press this button again to enter OneTouch mode 2. Press this button once more to enter SelecType mode. Pressing this button while in SelecType mode turns the printer back to on-line status. See Using SelecType for more information. |
|
6 |
Continue |
Enables the printer to resume printing after certain maintenance-required conditions or errors have been cleared. If the Continue light is flashing, read the status or error message on the LCD panel and correct the problem following instructions described in Status and Error Messages. If used in combination with the ALT button, the printer is reset. |
|
7 |
Form Feed |
When the printer is offline and data remains in the printer's memory (Form Feed light is on), prints out the data and clears the buffer. |
|
8 |
On Line |
Switches the printer between online and offline status. |
|
ALT + Menu, Item, or Value |
Returns the setting shown to the previous value in each group. |
|
These eight buttons are used as numeric keys to enter passwords when you print the Confidential Jobs of the Using the Reserve Job Function as well as passwords for mailboxes of the Multibin Unit.
|
1 |
Menu |
Used as the number 1 key. |
|
2 |
Item |
Used as the number 2 key. |
|
3 |
Value |
Used as the number 3 key. |
|
4 |
Enter |
Used as the number 4 key. |
|
5 |
SelecType |
Used as the number 5 key. |
|
6 |
Continue |
Used as the number 6 key. |
|
7 |
Form Feed |
Used as the number 7 key. |
|
8 |
On Line |
Used as the number 8 key. |
 Previous |
 Next |
| Version 1.00E, Copyright © 2001, SEIKO EPSON CORPORATION |