|

Reference Guide
|
|
How to / Printing
Using the Reserve Job Function
 Re-Print Job
Verify Job
Stored Job
Confidential Job
The Reserve Job function allows you to store the data of print jobs in the printer's Hard Disk Drive so you can print directly from the printer's control panel. It has four features; Re-Print Job, Verify Job, Stored Job, and Confidential Job. Follow instructions below to use the Reserve Job function.
 |
Note:
|
 |
You need an optional Hard Disk Drive (HDD) installed into your printer in order to use the Reserve Job function. Make sure that the Hard Disk Drive is correctly recognized by the printer driver before you start using the Reserve Job function. See Making HDD setting for more information.
|
The printer functions differently according to the type of Reserve Job you are using. Refer to the tables below for detailed information.
|
Type of Reserve Job
|
Maximum number of jobs stored in the HDD
|
When the maximum number is reached
|
When the HDD is full
|
|
Re-Print Job
|
64
(Re-Print Job + Verify Job)
|
automatically deleted from the oldest one to store the new job
|
the printer automatically deletes Re-Print Jobs or Verify Jobs from the oldest one and stores the new job
|
|
Verify Job
|
|
Stored Job
|
64
|
needs to be deleted manually by user
|
|
Confidential Job
|
64
|
|
Type of Reserve Job
|
When printing is complete
|
When the printer is turned off or All Reset is performed
|
|
Re-Print Job
|
data remains in the HDD
|
data is cleared
|
|
Verify Job
|
|
Stored Job
|
data remains in the HDD
|
|
Confiden- tial Job
|
data is cleared
|
data is cleared
|
Re-Print Job
The Re-Print Job feature allows you to store the data of a print job in the printer's Hard Disk Drive so that you may print the same data at any time as many times as you need from the printer's control panel. However, once you turn off the printer or reset the printer by using Reset All, the stored data of Re-Print Jobs will be cleared.
Follow these steps to use the Re-Print Job feature:
 |
Access the printer driver through the File menu of the application you are using.
|
 |
Go to the Basic Settings menu. Specify the number of copies to be printed, and select the Collate check box.
|
 |
Go to the Optional Settings menu, and click the Reserve Jobs Settings button. The Reserve Jobs Settings dialog box opens.
|
 |
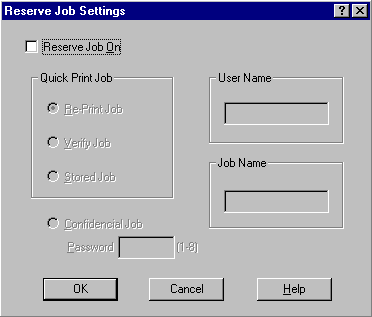
Select the Reserve Job On check box and the Re-Print Job radio button.
|
 |
Enter the user name and job name in the corresponding text boxes.
|
 |
Click OK. The printer prints the data of your print job, and stores the data in the Hard Disk Drive at the same time.
|
Printing and deleting the stored data of a Re-Print Job
You can print or delete the data stored in the printer's Hard Disk Drive at any time from the printer's control panel by using the Quick Print Job Menu of SelecType.
Using the Quick Print Job Menu
Follow these steps to print or delete the stored data using the Quick Print Job Menu of SelecType:
|
|
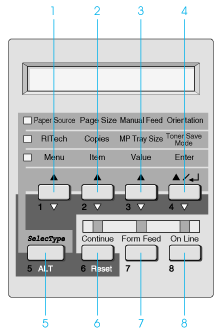
Press the Menu button on the printer's control panel to enter the SelecType mode. You can also enter the SelecType mode by pressing the SelecType (ALT) button three times. The indicator light next to Menu comes on.
|
|
|
Press Menu repeatedly until Quick Print Job Menu appears on the LCD panel.
|
|
|
Specify the user name by pressing the Item button repeatedly until your user name appears on the LCD panel. Press Enter.
|
|
|
Select the job name by pressing the Item button repeatedly until the desired job name appears on the LCD panel. Press Enter.
|
|
|
Specify the number of copies by pressing the Value button.
To delete the print job, press Item button. Delete appears on the LCD panel.
|
|
|
Press Enter to start printing or to delete the data.
The printer automatically exits the SelecType mode when the printing is complete.
|
|
Note:
|
|
You can cycle backward through available options by holding down ALT (SelecType) while pressing the button under the setting you want to change.
|

[Top]
Verify Job
The Verify Job feature allows you to print one copy in order to verify the content before printing multiple copies to avoid printing unwanted copies.
Follow these steps to use the Verify Job feature:
|
|
Access the printer driver through the File menu of the application you are using.
|
|
|
Go to the Basic Settings menu. Specify the number of copies to be printed, and select the Collate check box.
|
|
|
Go to the Optional Settings menu, and click the Reserve Jobs Settings button. The Reserve Jobs Settings dialog box opens.
|
|
|
Select the Reserve Job On check box and the Verify Job radio button.
|
|
|
Enter the user name and job name in the corresponding text boxes.
|
|
|
Click OK. The printer prints one copy of your print job, and at the same time stores the data with information on the number of remaining copies to be printed in the Hard Disk Drive.
|
Printing and deleting the stored data of a Verify Job
You can print or delete the data stored in the printer's Hard Disk Drive at any time from the printer's control panel by using the Quick Print Job Menu of SelecType. See Using the Quick Print Job Menu for instructions.
[Top]
Stored Job
The Stored Job feature is useful if you print the same data regularly, such as an invoice. You can print only from the control panel by using SelecType. The stored data remains in the Hard Disk Drive even if you turn off the printer or reset the printer by using Reset All.
Follow these steps to store print data using the Stored Job feature:
|
|
Access the printer driver through the File menu of the application you are using.
|
|
|
Go to the Basic Settings menu. Specify the number of copies to be printed, and select the Collate check box.
|
|
|
Go to the Optional Settings menu, and click the Reserve Jobs Settings button. The Reserve Jobs Settings dialog box opens.
|
|
|
Select the Reserve Job On check box and Stored Job radio button.
|
|
|
Enter the user name and job name in the corresponding text boxes.
|
|
|
Click OK. The printer stores the data in the Hard Disk Drive.
|
Printing and deleting the stored data of a Stored Job
You can print or delete the data stored in the printer's Hard Disk Drive at any time from the printer's control panel by using the Quick Print Job Menu of SelecType. See Using the Quick Print Job Menu for instructions.
[Top]
Confidential Job
The Confidential Job feature is useful when you want to print private or confidential data. You can limit access to the data by setting a password to it.
Follow these steps to store print data using the Confidential Job feature:
|
|
Access the printer driver through the File menu of the application you are using.
|
|
|
Go to the Basic Settings menu. Specify the number of copies to be printed, and select the Collate check box.
|
|
|
Go to the Optional Settings menu, and click the Reserve Jobs Settings button. The Reserve Jobs Settings dialog box opens.
|
|
|
Select the Reserve Job On check box and Confidential Job radio button.
|
|
|
Enter the user name and job name in the corresponding text boxes.
|
|
|
Set the password for the job by entering a 4-digit number in the password text box.
|
| |
Note:
|
| | -
Passwords must be 4-digit numbers.
|
| | -
Only numbers from 1 through 8 can be used for passwords.
|
| | -
It is recommended that you keep passwords in a safe place as you are required to enter the correct password when printing a Confidential Job.
|
 |
Click OK. The printer stores the data in the Hard Disk Drive.
|
Printing and deleting the stored data of a Confidential Job
You can print or delete the data of a Confidential Job stored in the printer's Hard Disk Drive at any time from the printer's control panel by using the Confidential Job Menu of SelecType.
Using the Confidential Job Menu
Follow these steps to print the stored data using the Confidential Job Menu of SelecType:
|
|
Click the Menu button on the printer's control panel to enter the SelecType mode. You can also enter the SelecType mode by pressing the SelecType (ALT) button three times. The indicator light next to Menu comes on.
|
|
|
Press Menu repeatedly until Confidential Job Menu appears on the LCD panel.
|
|
|
Specify the user name by pressing the Item button repeatedly until your user name appears on the LCD panel. Press Enter.
|
|
|
Enter the correct password by using the eight buttons on the control panel as numeric keys as shown in the illustration below.
|
| |
Note:
|
| | -
Passwords are 4-digit numbers.
|
| | -
Passwords consist of numbers from 1 through 8.
|
|
|
If the printer finds one or more print jobs that have the password you entered, one of the job names appears on the LCD panel.
If there is no Confidential Job stored in the Hard Disk Drive that has the password you entered, Password Error appears on the LCD panel for two seconds and the printer returns to the Online mode. Make sure you have the correct password for the print job, and repeat the printing procedure from step 1.
|
|
|
Select the job name by pressing the Item button repeatedly until the desired job name appears on the LCD panel. Press Enter.
|
|
|
Specify the number of copies by pressing the Value button.
To delete the print job, press Item button. Delete appears on the LCD panel.
|
 |
Press Enter to start printing or to delete the data.
The printer automatically exits the SelecType mode when the printing is complete.
|
|
Note:
|
|
You can cycle backward through available options by holding down ALT (SelecType) while pressing the button under the setting you want to change.
|
[Top]
| Version 1.00E, Copyright © 2001, SEIKO EPSON CORPORATION |

