|

Reference Guide
|
|
How to / Installing and Removing Options
Face-up Tray
 Installing (without the Duplex Unit installed)
Installing (with the Duplex Unit installed)
Removing (without the Duplex Unit installed)
Removing (with the Duplex Unit installed)
Installation and removal procedures differ depending on whether the optional Duplex Unit is installed.
Installing (without the Duplex Unit installed)
Follow the instructions below if you will not install the optional Duplex Unit on your printer.
Before installing
 |
Turn off the printer.
|
 |
Unplug the printer's power cord from the electrical outlet.
|
 |
Remove all interface cables from the interface connectors.
|
 |
Unpack the Face-up Tray and remove all protective materials. Make sure the contents of the package match the items on the Packing list.
|
Installing
|
|
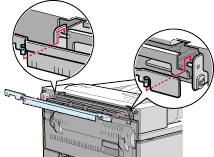
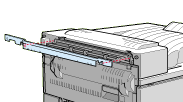
Attach the metal bar with the static barrier to the printer as shown below.
|
|
|
Insert and tighten the two finger screws included with the Face-up Tray as shown below.
|
|
|
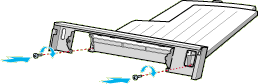
Attach the frame to the tray with the two remaining screws.
|
|
|
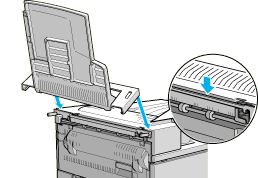
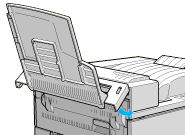
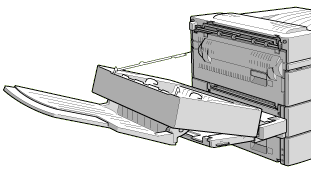
Hook the top edge of the Face-up Tray around the metal bar to attach the tray to the printer.
|
 |
Lower the Face-up Tray.
|
After installing
|
|
Reconnect any interface cables you removed.
|
|
|
Make sure the printer is turned off. Plug the power cord into an electrical outlet.
|
|
|
Turn on the printer.
|
|
|
On the control panel's Setup Menu, set Face-up Enable to On. See Using SelecType.
|
To confirm that the Face-up Tray is installed correctly, print a status sheet. If the tray is not listed on the status sheet, try reinstalling it.
 |
Note:
|
 | -
To use the Face-up Tray, set Face-up Enable to On in the SelecType Setup menu after setting up and turning on the printer. See Face-up Printing.
|
| -
When replacing the Imaging Cartridge or clearing a paper jam, make sure to temporarily remove the Face-up Tray before opening cover A.
|
| -
Store the packaging materials in case you want to ship the Face-up Tray in the future.
|
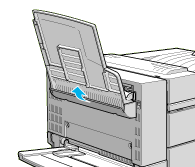
To temporarily remove the Face-up Tray, lift and tilt it upward.

[Top]
Installing (with the Duplex Unit installed)
Follow the instructions below if you will install both the Face-up Tray and the optional Duplex Unit.
Before installing
|
|
Turn off the printer.
|
|
|
Unplug the printer's power cord from the electrical outlet.
|
|
|
Remove all interface cables from the interface connectors.
|
|
|
Unpack the Face-up Tray and remove all protective materials. Make sure the contents of the package match the items on the packing list.
|
Installing
|
|
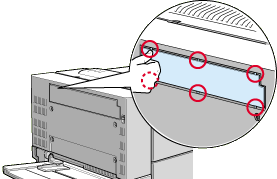
Push the plate on the optional Duplex Unit in six locations to detach it. Then remove the plate.
|
|
|
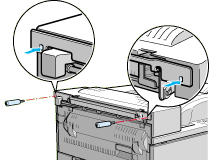
Attach the cover to the printer using the two finger screws included with the Face-up Tray.
|

|
|
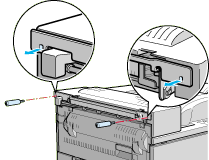
Holding the hook as shown below, attach it to the printer by sliding it into the slot.
|

|
|
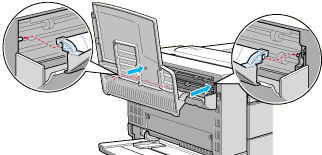
To attach the tray, hook the slots on both sides of the Face-up Tray to the corresponding pegs.
|
|
|
Lower the Face-up Tray.
|

After installing
|
|
Reconnect any interface cables you removed.
|
|
|
Make sure the printer is turned off. Plug the power cord into an electrical outlet.
|
|
|
Turn on the printer.
|
|
|
On the control panel's Setup Menu, set Face-up Enable to On. See Using SelecType.
|
To confirm that the Face-up Tray is installed correctly, print a status sheet. If the tray is not listed on the status sheet, try reinstalling it.
|
Note:
|
| -
To use the Face-up Tray, set Face-up Enable to On in the SelecType Setup menu after setting up and turning on the printer. See Face-up Printing.
|
| -
You can open the DM cover without detaching the Face-up Tray. The tray remains angled to hold printed sheets as shown below.
|
| -
Store the packaging materials in case you want to ship the Face-up Tray in the future.
|
[Top]
Removing (without the Duplex Unit installed)
To remove the Face-up Tray completely from the printer, follow the instructions below.
Before removing
|
|
Turn off the printer.
|
|
|
Unplug the printer's power cord from the electrical outlet.
|
|
|
Remove all interface cables from the interface connectors.
|
Removing
|
|
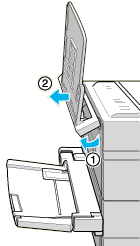
Unhook the Face-up Tray by tilting it upward and lifting up slightly. Then pull it away from the printer.
|
|
|
Loosen and remove the two screws as shown below.
|
|
|
Remove the metal bar from the printer.
|
After removing
|
|
Reconnect any interface cables you removed.
|
|
|
Make sure the printer is off. Plug the power cord into an electrical outlet.
|
|
|
Turn on the printer.
|
Make sure to save all parts for future use.
[Top]
Removing (with the Duplex Unit installed)
To remove the Face-up Tray completely from the printer, follow the instructions below.
Before removing
|
|
Turn off the printer.
|
|
|
Unplug the printer's power cord from the electrical outlet.
|
|
|
Remove all interface cables from the interface connectors.
|
Removing
|
|
Turn the Face-up Tray upward and lift it up.
|
|
|
Detach the hook from the cover.
|

|
|
Loosen and remove the two screws to detach the cover.
|
After removing
|
|
Reconnect any interface cables you removed.
|
|
|
Be sure the printer is turned off. Plug the power cord into an electrical outlet.
|
|
|
Turn on the printer.
|
Be sure to save all parts for future use.
[Top]
| Version 1.00E, Copyright © 2002, SEIKO EPSON CORPORATION |

