|

Reference Guide
|
|
How to / Installing and Removing Options
Multibin Unit
 Installing
Removing
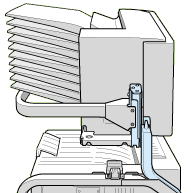
This unit can be used as a mailbox, a sorter, a multiple sorter, or a large capacity stacker. To install the Multibin Unit, follow the instructions below.
 |
Note:
|
 |
This unit cannot be installed at the same time as the Finisher Stapler.
|
Installing
|
Note:
|
| -
Install the memory module, ROM module, and Hard Disk Drive before you install the Multibin Unit.
|
| -
The optional Large Capacity Paper Unit must be installed when attaching the optional Multibin Unit.
|
Before installing
 |
Turn off the printer.
|
 |
Unplug the printer's power cord from the electrical outlet.
|
 |
Remove all interface cables from the interface connectors.
|
 |
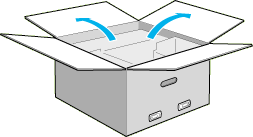
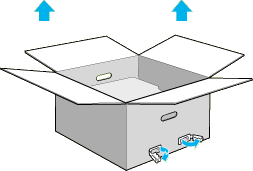
Open the box from the top. Without removing the Multibin Unit, take out all other parts and protective materials from the box.
|
Installing the side brackets
|
|
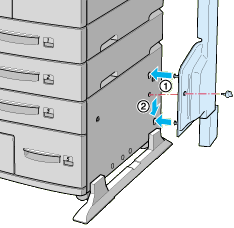
Open the included box and take out the side bracket that fits on the right side of the Large Capacity Paper Unit (see illustration).
|
|
|
Align the two pins on the side bracket with the holes on the right side as shown below. Insert the pins into the Large Capacity Paper Unit, then lower the bracket until it is firmly attached.
|
|
|
Insert one of the included screws shown above into the hole in the side bracket and tighten.
|
|
|
Remove the protective cover from the remaining side bracket, then repeat steps 2 and 3 to install the side bracket to the left side of the printer.
|
Installing the top bracket
|
|
Remove the protective cover from the top bracket.
|
|
|
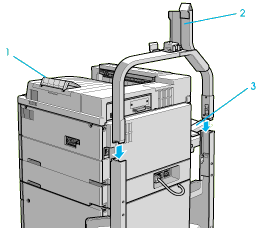
With the orientation shown below, insert the two legs of the top bracket into the side brackets and push down evenly on both sides until the bracket clicks into place.
|
|
1.
|
stopper
|
|
2.
|
Install this pole opposite the stopper, on the same side as the MP tray.
|
|
3.
|
MP tray
|
|
|
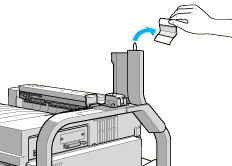
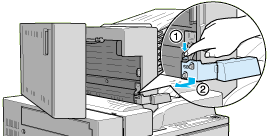
Remove the protective material from the top pin.
|
Installing the Multibin Unit
|
|
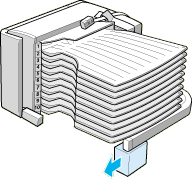
Pull away the four clips from the box, then lift the box up.
|
|
|
After you remove the box, the Multibin Unit remains on the floor as shown below. Remove the protective material just before installing the unit on the printer. When you place the Multibin Unit temporarily on a desk or floor, see the caution on the following page.
|
|
|
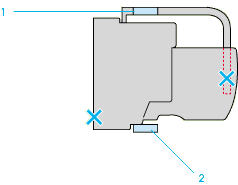
Grasp the Multibin Unit at the solid areas shown below.
|
top view
1. arm
2. grip
|  |
Caution:
|
| | -
Do not support the unit at the areas marked with an X above (the latch on cover D and the end of the arm). Attempting this might damage the cover or the unit.
|
| | -
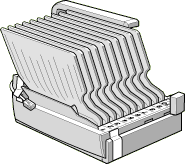
If you place the Multibin Unit temporarily on a desk or floor, always keep the bins pointing up as shown below; doing otherwise can damage the unit.
|
|
|
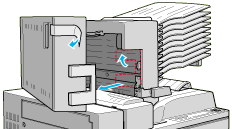
Lift the unit and align the pole on the Multibin Unit with the pole of the top bracket as shown below.
|
 |
Lower the Multibin Unit until the plate on the Multibin Unit is slightly higher than the top of the pin on the top bracket.
|
 |
Push the Multibin Unit horizontally into the pole on the top bracket as shown below.
|

 |
Lower the Multibin Unit until the pin fits completely into the hole on the plate.
|
 |
Make sure the bottom part of the unit is set above and parallel with the printer.
|
Locking the Multibin Unit
|
|
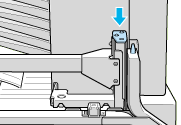
Remove the protective tape as shown below.
|
|
|
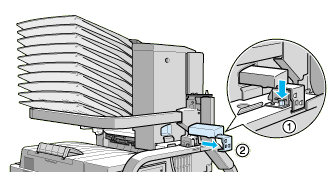
Open cover D and detach the grip from the inside. To detach the grip, push the button near the side of the grip, lower the grip a little, then pull it away from the Multibin Unit.
|
|
|
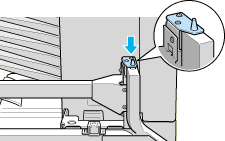
Attach the grip on the opposite side of the Multibin Unit. To do this, align the grip's metal bracket with the slot in the top bracket, then insert the grip into the hollow on the side of the Multibin Unit. Push in until it clicks.
|

| |
Note:
|
| | -
Be sure to lock the Multibin Unit by attaching the grip as explained above.
|
| | -
Store the packaging materials in case you want to ship the Multibin Unit in the future.
|
After installing
|
|
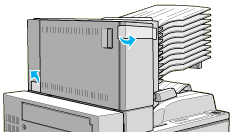
Open cover D and remove all protective materials inside and outside the Multibin Unit.
|
|
|
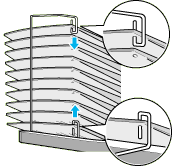
Attach the sheet stopper by inserting its two ends into the holes on the top and bottom bin.
|

|
|
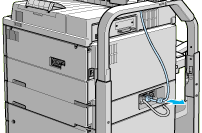
Plug the cord of the Multibin Unit into the appropriate connector on the back of the printer.
|

|
|
Reconnect any interface cables you removed.
|
|
|
Make sure the printer is turned off. Plug the power cord into an electrical outlet.
|
|
|
Turn on the printer.
|
To confirm that the Multibin Unit is installed correctly, print a status sheet by pushing the Enter button on the control panel two times while the printer is online. If the unit is not listed on the status sheet, make sure the cable connecting the Multibin Unit to the printer is connected securely.

[Top]
Removing
Follow the instructions below.
Before removing
|
|
Turn off the printer.
|
|
|
Unplug the printer's power cord from the electrical outlet.
|
|
|
Remove all interface cables from the interface connectors.
|
|
|
Unplug the cord of the Multibin Unit from its connector on the back of the printer.
|
|
|
Detach the sheet stopper by pulling its ends out of the top and bottom bins.
|
Unlocking the Multibin Unit
|
|
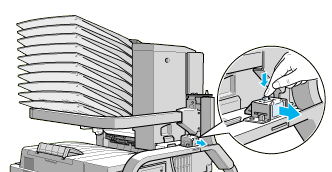
Detach the grip at the back by pushing the button and pulling out the grip, as shown below.
|
|
|
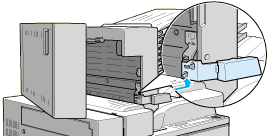
Push the tab of the lock down and pull it away from the unit until it unlocks.
|
|
|
Open cover D and attach the grip to the inside of the unit. To do so, position the grip as shown below, push it in and lift it up slightly until it clicks.
|
Removing the Multibin Unit
|
|
Grasp the Multibin Unit at the solid areas below.
|
top view
1. arm
2. grip
| |
Caution:
|
| |
Do not support the unit at the areas above marked with an X (the latch on cover D and the end of the arm). Attempting this might damage the cover or the unit.
|
|
|
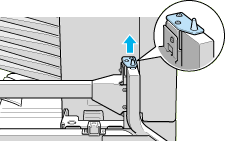
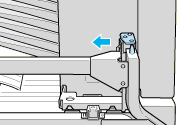
Lift the unit up, completely away from the pin on the top bracket.
|
|
|
Move the unit away from the pole on the top bracket.
|
| |
Caution:
|
| |
If you place the Multibin Unit temporarily on a desk or floor, always keep the bins pointing up as shown below; doing otherwise can damage the unit.
|
|
|
Push in the plastic tabs on the inside of both side brackets, and lift up the top bracket.
|

After removing
To remove the side brackets, reverse the order of the installation steps.
|
|
Reconnect any interface cables you removed.
|
|
|
Make sure the printer is turned off. Plug the power cord into an electrical outlet.
|
|
|
Turn on the printer.
|
[Top]
| Version 1.00E, Copyright © 2002, SEIKO EPSON CORPORATION |

