|

Reference Guide
|
|
How to / Using Options
Memory Modules
 Installing a memory module
Removing a memory module
The printer comes with 16 MB of memory. By installing an optional Dual In-line Memory Module (DIMM), you can increase printer memory up to a maximum of 256 MB. You may want to add memory if you are having difficulty printing complex, graphics-intensive pages using one of the optional multibin units with the duplex feature, or if you regularly use numerous downloaded fonts.
You can purchase DIMMs from various vendors. Be sure the DIMM you purchase meets the following requirements:
-
Synchronous Dynamic RAM Dual In-line Memory Module (SDRAM DIMM)
-
64 bit, 168-pin type, with SPD
-
Capacity of 16, 32, 64, 128, or 256 MB
-
Access speed of 66.66 MHz or higher (15 ns or less)
-
Less than 40 mm in height
Installing a memory module
Follow these steps to install an optional memory module:
 |
Turn off the printer.
|
 |  |
Warning:
|
| |
To avoid electrical shock, do not attempt to install a DIMM unless the printer is turned off.
|
 |
Unplug the printer's power cord from the electrical outlet.
|
 |
Remove all interface cables from the interface connectors.
|
 |
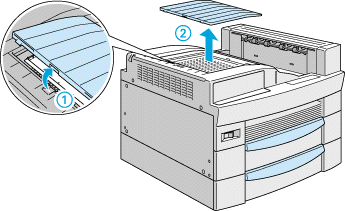
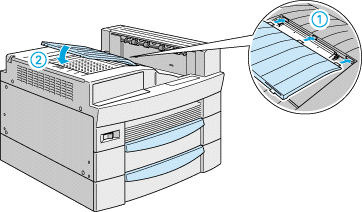
Open the top cover of the face-down tray.
|
 |
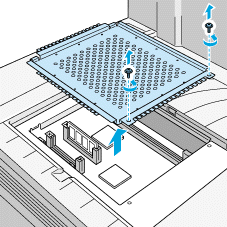
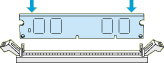
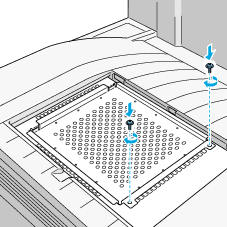
Loosen the two retaining screws and remove the plate.
|
|  |
Note:
|
| |
To avoid losing the retaining screws, do not remove them completely from the plate.
|
| |
Warning:
|
| |
Avoid touching electrical components that are exposed after you remove the plate. They may be very hot if the printer has been in use.
|
 |
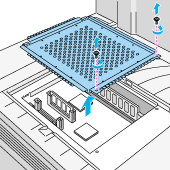
Identify the DIMM slot. Its relative location is as shown below.
|
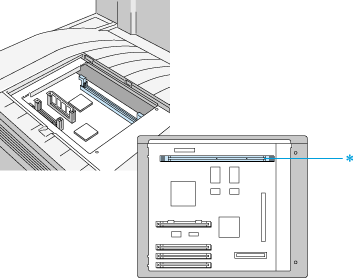
* DIMM slot
 |
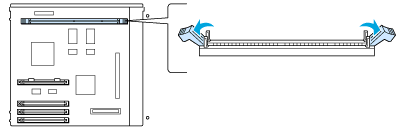
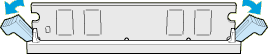
Push the clips on each side of the DIMM slot outward.
|
 |
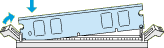
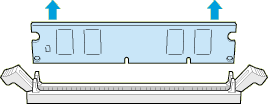
Hold the memory module above the DIMM slot in the following orientation, then insert it into the slot. Do not apply too much force.
|
 |
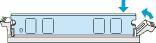
Push one end of the DIMM into the slot until the clip comes up.
|
 |
With your other hand, push down the other end of the DIMM into the slot until the clip comes up to retain the memory module securely.
|
 |
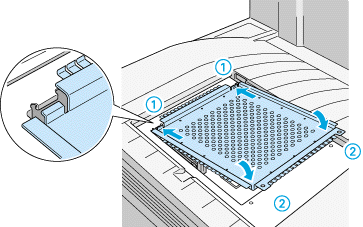
Return the plate to its original position. Place the two outside tabs of the plate under the edge of the opening with the inside tabs on top of the edge.
|
 |
Push the plate down into place. Then fasten the two retaining screws that you loosened earlier.
|
 |
Gently replace the top cover until it clicks shut.
|
To confirm that the memory module is installed correctly, print a status sheet. If the total amount of memory listed does not include the size of the optional memory module, try reinstalling the module. Make sure that the module is securely attached to the DIMM slot.

[Top]
Removing a memory module
Follow these steps to remove a memory module:
|
|
Turn off the printer.
|
| |
Warning:
|
| |
To avoid electrical shock, do not attempt to remove a DIMM unless the printer is turned off.
|
|
|
Unplug the printer's power cord from the electrical outlet.
|
|
|
Remove all interface cables from the interface connectors.
|
|
|
Open the top cover of the face-down tray.
|
|
|
Loosen the two retaining screws and remove the plate.
|
| |
Note:
|
| |
To avoid losing the retaining screws, do not remove them completely from the plate.
|
| |
Warning:
|
| |
Avoid touching electrical components that are exposed after you remove the plate. They may be very hot if the printer has been in use.
|
|
|
Push the clips on each side of the DIMM slot outward to release the memory module.
|
|
|
Grasp both sides of the memory module and pull the module out.
|
|
|
Return the plate to its original position. Place the two outside tabs of the plate under the edge of the opening with the inside tabs on top of the edge.
|
|
|
Push the plate down into place. Then fasten the two retaining screws that you loosened earlier.
|
|
|
Gently replace the top cover until it clicks shut.
|
|
|
Reconnect all interface cables.
|
|
|
Plug the power cord into an electrical outlet.
|
|
|
Turn on the printer.
|
[Top]
| Version 1.00E, Copyright © 2001, SEIKO EPSON CORPORATION |


