|

Reference Guide
|
|
How to / Using Options
5-Bin Multi-Purpose Unit
 Installing the 5-Bin Multi-Purpose Unit
Removing the 5-Bin Multi-Purpose Unit
Using the 5-Bin Multi-Purpose Unit
Installing the 5-Bin Multi-Purpose Unit
Follow these steps to install the optional 5-Bin Multi-Purpose Unit:
 |
Turn off the printer.
|
 |
Unplug the printer's power cord from the electrical outlet.
|
 |
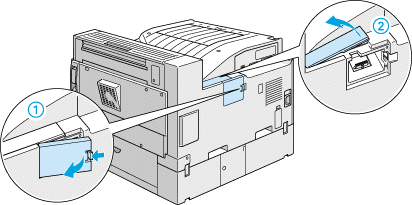
Remove all interface cables from the interface connectors.
|
 |
Unpack the 5-Bin Multi-Purpose Unit and remove all protective materials.
|
 |  |
Note:
|
| |
Keep all packing materials for future use.
|
 |
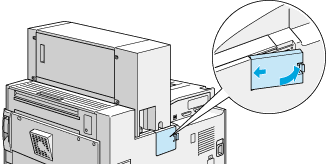
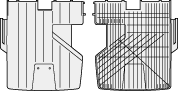
Remove the printer covers, as shown below.
|
 |
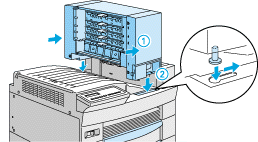
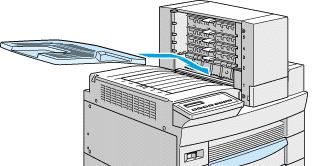
Place the unit on top of the printer, taking care not to drop the unit.
|
 |
Fasten the screw on the front of the unit.
|

 |
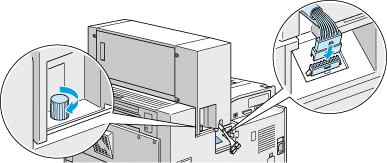
Fasten the screw on the back of the unit, then attach the cable to the connector on the back of the printer.
|
 |
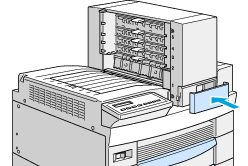
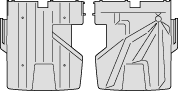
Attach the covers as shown below.
|
 |
Insert the tray shown below into Bin 1. (The tray has the number 1 printed on the top right corner). Note that this tray differs in shape from the trays for the other bins.
|

|
|
top
|
 |
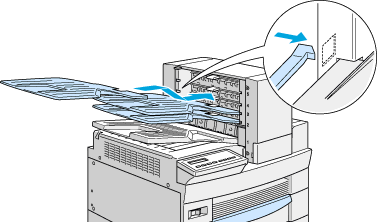
Insert the trays shown below into Bins 2 to 4, starting from the bottom. (These trays are numbered from 2 to 4). Note that these trays differ in shape from the trays for Bins 1 and 5.
|
|
|
top / bottom
|
 |
Insert the tray shown below into Bin 5. (The tray has the number 5 printed on the top right corner). Note that the this tray differs in shape from the trays for the other bins.
|
|
|
top / bottom
|

 |
Open the back cover of the unit and remove all protective materials.
|
 |
Reconnect all interface cables.
|
 |
Plug the power cord into an electrical outlet.
|
 |
Turn on the printer.
|
To confirm that this option is installed correctly, print a status sheet by pushing the Enter button on the control panel twice while the printer is online. If Multibin does not appear on the status sheet, make sure the cables connecting the unit to the printer are connected securely.

[Top]
Removing the 5-Bin Multi-Purpose Unit
Follow these steps to remove the 5-Bin Multi-Purpose Unit:
|
|
Turn off the printer.
|
|
|
Unplug the printer's power cord from the electrical outlet.
|
|
|
Remove the trays from the unit.
|
|
|
Remove the connector cover, and unplug the unit cable.
|
|
|
Remove the screw cover on the front side of the printer, then remove the screws from the front and back of the unit and lift the unit off the printer carefully.
|
|
|
Replace the covers on the printer.
|
|
|
Plug the power cord into an electrical outlet.
|
|
|
Turn on the printer.
|
[Top]
Using the 5-Bin Multi-Purpose Unit
The 5-Bin Multi-Purpose Unit (C81320 ) can be used as a mailbox, a sorter, a multiple sorter, or a large capacity stacker. You can also use the unit for offset stacking in Bin 1.
To set the output mode, access your printer driver's Optional Settings tab and click the Settings button. Select 5-Bin Multi-Purpose Unit from the Optional Output Trays list, then select the mode you want to use from the Multibin Mode Settings list. To use the Offset Stacking feature, select Bin 1 from the Bin No. list and select the Offset Stacking check box. See the printer driver's online help for more information.
If you are printing from an application or operating system that does not support your printer driver, you can also select these output modes from the printer's control panel using the SelecType menus. For details, see SelecType Settings.
The 5-Bin Multi-Purpose Unit has a total capacity of 500 sheets. Bin 1 holds 250 sheets, Bins 2 through 4 hold 50 sheets each, and Bin 5 holds 100 sheets.
|
Note:
|
| -
When this unit is installed, you cannot use the standard face-down tray.
|
| -
Changing the output mode too frequently could cause confusion and should be avoided.
|
| -
Before changing the output mode, always consult your printer's administrator and inform all other users of the changes.
|
Using the mailbox feature
The mailbox mode allows each bin to be assigned to an individual or department.
When in the mailbox mode, if Bin 1 (the first bin from the bottom) is assigned to you, you always need to select Bin 1 as your output tray in the printer driver when sending a job to this printer.
Make sure all users know who is assigned to which bin.
Using the sorter feature
You can use the 5-Bin Multi-Purpose Unit as a sorter, like those on copiers. In this mode, you can print a total of five copies for each print job, one copy in each bin. If your printer has at least 64 MB of memory installed, you can print more than five copies at a time by using the multiple sorter feature explained below.
Using the multiple sorter feature
If your printer has at least 64 MB of memory, you can use the multiple sorter feature to print out multiple copies of a print job into each bin. This allows you to print more than five copies of a print job at a time, up to 500 sheets.
|
Note:
|
|
If you printer does not have at least 64 MB of memory, printing in this mode will produce only one copy of your document. In this case, please use the sorter feature, or add more memory to your printer.
|
Using the large capacity stacker feature
When in Stacker mode, this unit functions as a large-capacity output tray, allowing you print out a total of 500 sheets at a time.
Using the offset stacking feature
The offset stacking mode allows you to separate print jobs, or multiple copies of your document, by alternating their positions in Bin 1.
|
Note:
|
|
You cannot use Bin 2 to Bin 5 when in the offset stacking mode.
|
[Top]
| Version 1.00E, Copyright © 2001, SEIKO EPSON CORPORATION |

