|

Reference Guide
|
|
Various Printing Options
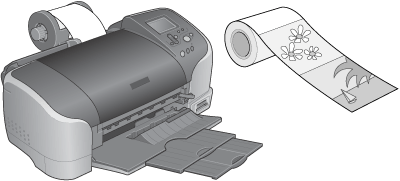
Printing on Roll Paper
 Handling roll paper
Attaching the catcher
Printing area and margins
Driver settings for Windows
Driver settings for Macintosh
Storing EPSON roll paper
When printing on roll paper, you can print panoramic photographs or print documents continuously.
 |
Note:
|
 | |
This feature is not available with Mac OS X.
|
|
When you are printing using the roll paper holder, keep the following in mind:
-
Load the paper printable side up.
-
Use flat, undamaged paper. If the paper is curled, flatten it before loading to avoid paper feeding problems.
-
Always handle the paper by the edges.
-
Provide ample space in front of the printer for the paper to eject fully.
-
Make sure that the output tray is lowered and the output tray extension is out all the way.
-
Check that the end of the paper is cut cleanly, perpendicular to the long axis of the paper. If it is cut on a diagonal or not cleanly, the paper may not feed smoothly or the print may extend off the edge of the paper.
-
EPSON recommends using media distributed by EPSON to ensure high-quality results.
-
Always check the ink levels before printing on roll paper, as replacing ink cartridges while the roll paper is loaded can smear the paper.
-
We recommend replacing the roll paper with a new roll when there is 20 cm remaining. Otherwise, print quality may be compromised on the remaining portion.
Handling roll paper
Refer to the section below for loading roll paper.

[Top]
Attaching the catcher
When printing on 210 mm roll peper, you need to attach the catcher to receive the cut paper. Refer to the section below for attaching the catcher.
[Top]
Printing area and margins
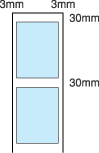
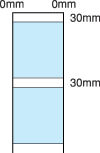
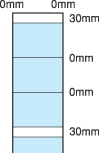
You can also change the printing area between pages of printed data for roll paper. There are two settings. One setting creates a 30-mm gap between pages of your printout. The other setting prints without a gap between pages.
Follow the steps below to change the margins between pages of printed data.
 |
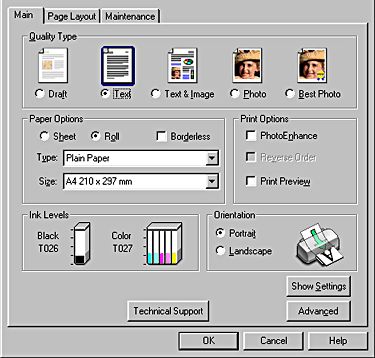
Select Roll as the Source setting under Paper Options on the Main menu (Windows).
|
Select Roll Paper as the Source setting on the Page Setup dialog box (Macintosh).
 |
Press the  roll paper button in order to cut the last page. roll paper button in order to cut the last page.
|
|
Standard margins
|
Borderless
|
|
|
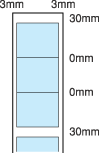
To print data without margins between separate files, as shown below, do not press the roll paper button between print jobs.
|
Standard margins
|
Borderless
|
|
|
|
Note:
|
| |
The top margin is automatically set to 30 mm, regardless of the margin setting.
|
|
You can change the margins for roll paper with the printer driver settings. Refer to the section below to print without margins on either side of your printout.
 Borderless Printing
[Top]
Driver settings for Windows
|
Note:
|
| -
When printing on roll paper, you can use only Mirror Image and Copies on the Page Layout menu.
|
|
| -
Do not print using the PhotoEnhance mode, as this may cause gaps in your printout.
|
|
After the roll paper is loaded in the printer, follow the procedure described below to configure your printer software.
|
|
Open the file you want to print in the appropriate application.
|
|
|
Access the printer driver.
|
 |
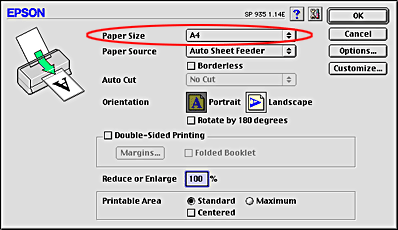
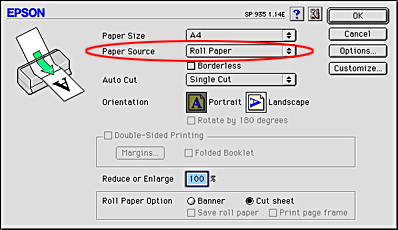
Select Roll as the Source setting under Paper Options on the Main menu.
|
 |
Make the Options settings in the Roll Paper Options dialog box.
|
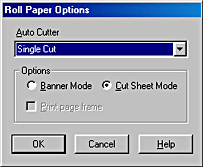
The following Auto Cutter settings are available.
|
Not Cut
|
No cutting with the cutter is done. Press the roll paper button in order to cut the roll paper.
|
|
Single Cut
|
The paper is cut at the boundary between images (the boundary between pages). However, the cutting position may shift slightly.
|
|
Double Cut
|
If you have selected Single Cut and are unhappy with the gap of the cutting position, select Double Cut. In this mode, the space between images is extended and the paper is cut twice inside this space. By cutting twice, an 18 mm slip of paper is left. Double Cut is selectable only when printing with Borderless selected.
|
| |
Note:
|
| | |
Adjust the cutting position before you use the cutter. Refer to the Adjusting the Cutting Position for more details about the cutting position adjustment.
|
|
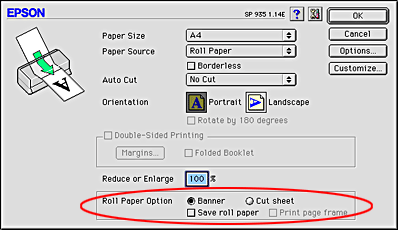
The following Options settings are available.
|
Banner Mode
|
Select this mode when you want to print multi-page data continuously rather than as individual pages. When this is selected, the Save Roll Paper check box is available.
|
|
Cut Sheet Mode
|
Select this mode when you want to print multi-page data as individual pages rather than continuously. When this is selected, the Print page frame check box is displayed.
|
|
Save Roll Paper
|
Select this check box when you want to save roll paper. When this is selected, the blank portion of the last page of your document is not fed through the printer. This feature is only available when No Cut is selected.
|
|
Print page frame
|
Select this check box to print a line on the roll paper between pages in a multi-page document, to indicate where the paper should be cut. This feature is useful when it is unclear where the page breaks should be. This feature is only available when No Cut is selected.
|
 |
Click OK to return to the Main menu.
|
 |
Select the desired Type setting under Paper Options on the Main menu.
|
 |
Select the desired Size setting under Paper Options on the Main menu.
|
When you have selected a predefined paper size and the data exceeds the selected size, it is printed as individual pages on the roll paper. A 30-mm margin is inserted between each page of data when you press the roll paper button.
To define a custom paper size, select User Defined from the list. The User Defined Paper Size dialog box opens, allowing you to specify the length and width of your document. If the data is not larger than the size of the loaded paper, it is printed as one page. This allows you to print large or long data without page breaks.
For more information, see Printing area and margins.
| |
Note:
|
| | |
Do not select Sheet as the Paper Source setting under Paper Options on the Main menu when roll paper is loaded in the sheet feeder. Doing so causes unnecessary paper to feed after each document. If you have already started printing, cancel printing from the printer software by referring to Cancelling Printing. Wait until the printer stops printing and feeding paper. Cut off the paper at the back of the printer, and then turn off the printer. The remaining paper is ejected.
|
|
 |
Select Portrait (tall) or Landscape (wide) under Orientation on the Main menu to change the orientation of your printout.
|
 |
Click OK to close the printer software. Print your data.
|
 |
When printing is finished, press the roll paper button once to cut the photo. The paper is fed back to the printig position automatically.
|
 |
To print the next document, press the roll paper button to feed the paper back to the printing position.
|
The above steps ensure that the space between pages is 30 mm. If you do not need this space, skip pressing the roll paper button in step 10 and start printing the next document.
After printing is finished, the photo printed last remains in the printer without being cut. See the section below to cut the remaining photo and remove the roll paper.
|
Note:
|
| |
After printing, printed paper is stacked on the raised part of the output tray. However, depending on the type or warping condition of roll paper, the printed paper may not be stacked properly. If this happens, it is recommended to take out the printed paper from the output tray as it is ejected.
|
|
[Top]
Driver settings for Macintosh
|
Note:
|
| -
The procedures described in this section may vary depending on the application you are using. Check your application's user manual for details.
|
|
| -
When printing on roll paper, you cannot use the Reverse Order or Rotate by 180 degrees features, select Maximum or Centered as the Printable Area setting in the Print dialog box, or use the functions in the Layout dialog box.
|
|
| -
Do not select PhotoEnhance as the Mode setting in the Print dialog box, because it may cause gaps in your printout.
|
|
After the roll paper is loaded in the printer, make sure that EPSON Stylus Photo 935 is selected in the Chooser before proceeding. Follow the steps below to configure your printer software.
|
|
In the appropriate application, open the file that you want to print.
|
|
|
Access the printer driver.
|
|
|
Select the desired Paper Size setting in the Page Setup dialog box.
|
|
|
Select Roll Paper as the Paper Source setting.
|
| |
Note:
|
| | |
Do not select Auto Sheet Feeder as the Paper Source setting in the Page Setup dialog box when roll paper is loaded in the sheet feeder. Doing so causes unnecessary paper to feed after each document. If you have already started printing, cancel printing from the printer software by referring to Cancelling Printing. Wait until the printer stops printing and feeding paper. Cut off the paper at the back of the printer, and then turn off the printer. The remaining paper is ejected.
|
|
|
|
Make the appropriate Auto Cut settings.
|

The following Auto Cut settings are available:
|
Not Cut
|
No cutting with the cutter is done.
|
|
Single Cut
|
The paper is cut at the boundary between images (or pages). However, the cutting position may shift slightly.
|
|
Double Cut
|
Select Double Cut if you have selected Single Cut and are unhappy with the gap of the cutting position.In this mode, the space between images is extended and the paper is cut twice inside this space. By cutting twice, an 18-mm slip of paper is left. Double Cut is available only when printing with Borderless selected.
|
| |
Note:
|
| | |
Adjust the cutting position before you use the auto cutter. Refer to the Adjusting the Cutting Position for more details about the cutting position adjustment.
|
|
|
|
Select Portrait (tall) or Landscape (wide) to change the orientation of your printout.
|
|
|
Make the appropriate Roll Paper Option settings.
|
The following Roll Paper Option settings are available:
|
Banner
|
Select this mode when you want to print multi-page data continuously rather than as individual pages. When this is selected, the Save roll paper check box is available.
|
|
Cut sheet
|
Select this mode when you want to print multi-page data as individual pages rather than continuously. When this is selected, the Print page frame check box is available.
|
|
Save roll paper
|
Select this check box when you want to save roll paper. When this is selected, the blank portion of the last page of your document is not fed through the printer. This feature is only available when No Cut is selected.
|
|
Print page frame
|
Select this check box to print a line on the roll paper between pages in a multi-page document, to indicate where the paper should be cut. This feature is useful when it is unclear where the page breaks should be. This feature is only available when No Cut is selected.
|
|
|
Click OK to save the setting and close the dialog box.
|
|
|
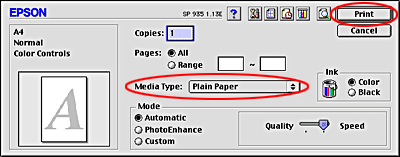
Select the desired Media Type setting in the Print dialog box, click Print to print your document, and then proceed to the following section.
|
|
|
When printing is finished, press the roll paper button once to cut the photo. The paper is fed back to the printing position automatically.
|
|
|
To print the next document, press the roll paper button to feed the paper back to the printing position.
|
The above steps ensure that the space between pages is 30mm. If you do not need this space, skip pressing the roll paper button in step 10 and start printing the next document.
After printing is finished, the photo printed last remains in the printer without being cut. See the section below to cut the remaining photo and remove the roll paper.
| |
Note:
|
| | -
Click the
 Preview icon button to change the Print button to the Preview button. Click the Preview button to see a preview of the printout. Preview icon button to change the Print button to the Preview button. Click the Preview button to see a preview of the printout.
|
|
| | -
After printing, printed paper is stacked on the raised part of the output tray. However, depending on the type or warping condition of roll paper, the printed paper may not be stacked properly. If this happens, it is recommended to take out the printed paper from the output tray as it is ejected.
|
|
[Top]
Storing EPSON roll paper
Return unused paper to the original package as soon as you finish printing. EPSON recommends storing your printouts in a resealable plastic bag. Keep them away from high temperature, humidity, and direct sunlight.
[Top]
| Version 1.00E, Copyright © 2003, SEIKO EPSON CORPORATION |


