![]()
Reference Guide
|
|
Index |
|
Search |
|
Glossary | |||||
|
|
Contents |
|
Help |
|
||||||
|
|
|
|||||||||||||||||||||||||||||||||
How to / Checking Printer Condition and Maintaining
For Windows
Follow the steps below in order to adjust the cutting position of the auto cutter.
| Note: |
|
|
|
 | Check that no warnings or errors are displayed on the LCD panel. |
 | Make sure that the roll paper is loaded. |
 | Access the printer software. |
 | Accessing the Printer Software for Windows |
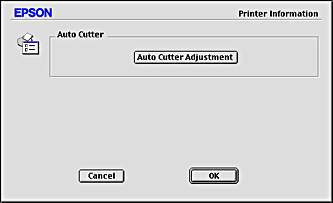
 | Click the Maintenance tab, then click the Printer and Option Information button. |
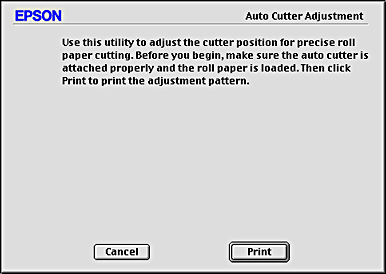
 | Click Auto Cutter Adjustment. The Auto Cutter Adjustment dialog box opens. |
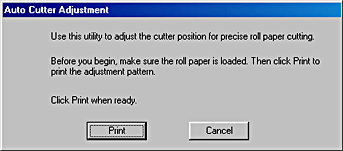
 | Click Print. The cutting position adjustment pattern is printed and cut off. |
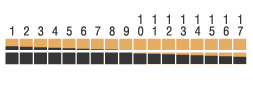
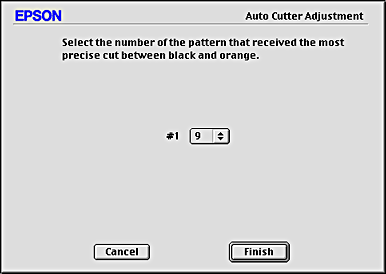
 | By using the cut roll paper, check the most precisely printed number among the color boundaries. |
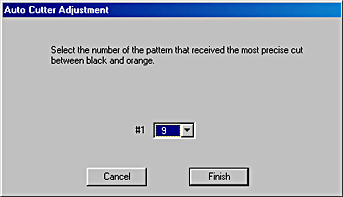
 | Select the number of the most precisely printed color boundary from the list box. Click Finish to enable the adjustment. |
| Note: |
|
|
| Check that no warnings or errors are displayed on the LCD panel. |
|
| Make sure that the roll paper is loaded. |
|
|
Access the printer software, click the  Utility icon button, and then click the Printer Information button. Utility icon button, and then click the Printer Information button.
|
|
| Click Auto Cutter Adjustment. The Auto Cutter Adjustment dialog box opens. |
|
| Click Print. The cutting position adjustment pattern is printed and cut off. |
|
| By using the cut roll paper, check the most precisely printed number among the color boundaries. |
|
| Select the number of the most precisely printed color boundary form the list box. Click Finish to enable the adjustment. |
|
| Check that no warnings or errors are displayed on the LCD panel. |
|
|
Press the  maintenance button to display the Advanced Settings menu. maintenance button to display the Advanced Settings menu.
|
|
|
Press the  button to position the cursor at the Cutting Position Adjustment and press the Select button. button to position the cursor at the Cutting Position Adjustment and press the Select button.
|
|
| Check that the roll paper is set and press the Custom 1 button. |
The cutting position adjustment pattern is printed out and cut off.
|
| By using the cut roll paper, check the most precisely printed number among the color boundaries. |

|
|
Press the  or button to position the cursor at the number identified in step 4, and press the Select button. or button to position the cursor at the number identified in step 4, and press the Select button.
|
 Previous |
 Next |
| Version 1.00E, Copyright © 2003, SEIKO EPSON CORPORATION |