|

Reference Guide
|
|
Setting Your Materials for Scanning
Placing Films
 Perfection 2480 Photo
 Perfection 2580 Photo
 |
Caution:
|
 | |
Hold the film at its edges, or use gloves. Touching the film surface with bare hands can leave fingerprints or other traces on the film.
|
|
 |
Note
|
 | -
In the Full Auto Mode, you can scan 35 mm color films and 35 mm color slides. If you want to scan monochrome negative films, switch to the Home Mode or the Professional Mode.
|
|
Removing the reflective document mat
To scan film strips or slides, you need to remove the reflective document mat from the document cover.
 |
Note:
|
 | |
Most illustrations shown in this section are for the Perfection 2480 Photo, so they may be different in appearance from the Perfection 2580 Photo. The instructions are the same, except as noted.
|
|
 |
Make sure the cover cable is connected to the scanner.
|
 |  |
Note:
|
 |  | |
Before connecting or disconnecting the cover cable, make sure the scanner is turned off.
|
|

 |
Open the document cover and slide up the reflective document mat gently to remove it.
|

Perfection 2480 Photo
The Perfection 2480 Photo has a built-in transparency unit and a film holder that you can use to scan films.
 |
Note
|
 | -
Before scanning films, be sure to use a soft cloth to wipe the inside of the document cover and the scanner's document table.
|
|
 | -
To use the Perfection 2480 Photo, make sure the EPSON Scan driver is installed correctly, and the power of your computer and the scanner are turned on.
|
|
 | -
Make sure the scanner and your computer are connected with the USB cable.
|
|
 | -
Make sure the
 Start button light is on, in green (not flashing). Start button light is on, in green (not flashing).
|
|
35 mm film strips
 |
Slide the edge of the strip in the 35 mm film holder, with its face (the side you can see the image correctly) down. Then place it so that all of the frame is positioned inside the film holder.
|
 |  |
Note:
|
 |  | |
We recommend that you take the edge of the film gently or to use gloves to touch the film; otherwise you may damage the film.
|
|

 |
When you want to scan the films in the A area of the film holder:
Place the film holder on the document table so that it is aligned with the lower left corner of the document table. Make sure the mark "A" on the tab of the film holder matches the mark "A" on the scanner and the projection on the tab of the film holder fits the hole on the scanner.
|
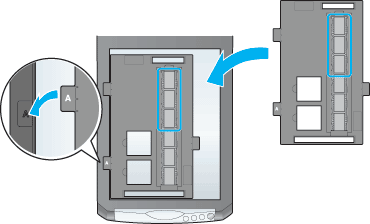
When you want to scan the films in the B area of the film holder:
Place the film holder on the document table so that it is aligned with the lower left corner of the document table. Make sure the mark "B" on the tab of the film holder matches the mark "B" on the scanner and the projection on the tab of the film holder fits the hole on the scanner.

35 mm slides
 |
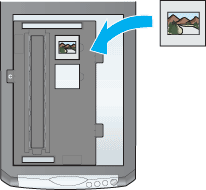
Place the film holder on the document table so that it is aligned with the lower left corner of the document table. Make sure the mark "C" on the tab of the film holder matches the mark "C" on the scanner and the projection on the tab of the film holder fits the hole on the scanner.
|

 |
Place slides in the 35 mm slides holder face down, as shown below.
|
Storing the film holder
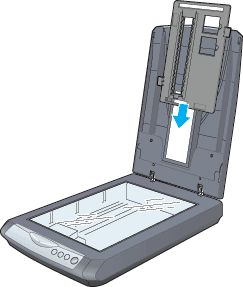
When not using the film holder, you can store it inside the document cover.
 |
If the reflective document mat has not been removed yet, open the document cover and then remove it.
|
 |
Slide the film holder into the document cover.
|
 |
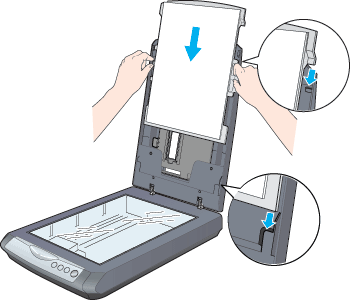
Replace the reflective document mat.
|

[Top]
Perfection 2580 Photo
 |
Note:
|
 | -
Before scanning films, be sure to use a soft cloth to wipe the scanner's document table. Be careful not to wipe the inside of the Auto Film Loader.
|
|
 | -
To use the Perfection 2580 Photo, make sure the EPSON Scan driver is installed correctly, and the power of your computer and the scanner are turned on.
|
|
 | -
Do not disconnect the cover cable while the scanner is turned on.
|
|
 | -
Make sure the scanner and your computer are connected with the USB cable.
|
|
 | -
Make sure the
 Start button light is on, in green (not flashing). Start button light is on, in green (not flashing).
|
|
35 mm film strips
The Perfection 2580 Photo comes with the Auto Film Loader on the document cover to provide you an easy way to load films.
Film condition
Check to see whether the film meets the following requirements before loading it.
-
The width of the film is 74 to 232 mm.
-
The film with its warp not exceeding 3 mm.
-
Film with no large warp (and not over 1 curl for a film with 6 frames).
-
The film has no sticker on it.
There may be a sticker on the first part (the space with no image) of a film. This type of film is not recommended. However, if you want to use it, you can carefully cut off the part with the sticker in a direction perpendicular to the long side of the film.
-
The film is not an infrared film.
-
The film is not rippled or wrinkled.
-
The hole on the edge of film is not damaged.
 |
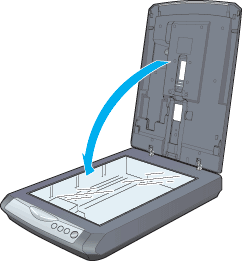
Close the document cover.
|
 |  |
Note:
|
 |  | |
Be sure, nothing is on the document table and the reflective document mat is removed.
|
|
 |
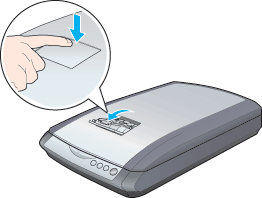
Push the film feeder cover to open it.
|
 |
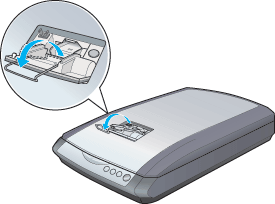
Open the film guide. Fix the film guide by pushing down the front end of the film guide gently until it clicks so that it will not close while it is in use.
|
 |  |
Note:
|
 |  | |
Always open the film guide whenever you use the Auto Film Loader, no matter how short a film strip is; otherwise, it may cause a film jam.
|
|
 |
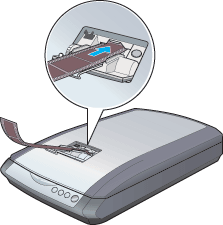
Load a film into the film feeder with its face (the side you can see the image correctly) down. The film is automatically loaded inside the Auto Film Loader, and then the  Start button light turns on (green). Start button light turns on (green).
|
 |  |
Note:
|
 |  | -
We recommend that you hold the edge of the film or use gloves to touch the film: otherwise you may damage the film.
|
|
 |  | -
When loading starts, remove your hand from the film; otherwise, it may cause a film jam.
|
|
 |  | -
Do not touch the film while the scanner is scanning.
|
|
 |  | -
Do not close the film feeder cover while the scanner is scanning.
|
|
 |  | -
Do not press the
 Eject button while scanning. The Eject button while scanning. The  Eject button does not work until scanning is completed. Eject button does not work until scanning is completed.
|
|
 |  | -
If you fail to load the film into the film feeder, wait 10 seconds and then try again.
|
|
Ejecting a film
When you finish scanning, eject the film from the Auto Film Loader.
 |
Press the  Eject button. Eject button.
|

 |
Remove the film after you see the  Start button light turns on (green). Start button light turns on (green).
|
 |  |
Note:
|
 |  | -
Do not force out the film but wait until it is ejected automatically.
|
|
 |  | -
Do not turn off the scanner before ejecting the film. If you do so accidentally, turn on the scanner again and then press the
 Eject button. Eject button.
|
|
 |
After you see finish ejecting your films, close the film guide and then close the film feeder cover.
|
 |
Note:
|
 |
If the  Start button light is flashing in red, a film jam may have happened. See Film jams for details. Start button light is flashing in red, a film jam may have happened. See Film jams for details.
|
|
35 mm slide
You can scan a 35 mm slide using the 35 mm slide holder.
 |
Note:
|
 | |
You cannot scan negative slides.
|
|
 |
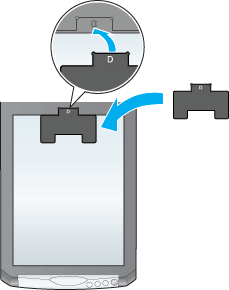
Place the 35 mm slide holder on the document table so that it is aligned with the top of the document table. Make sure the mark "D" on the tab of the 35 mm slide holder matches the mark "D" on the scanner, and the projection on the tab of the 35 mm slide holder fits the hole on the scanner.
|
 |
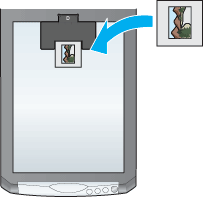
Set the slide in the 35 mm slide holder with its face down. Make sure the top of the slide is facing the left for landscape orientation, or its top is attached to the 35 mm slide holder for portrait orientation, as shown below.
|
 |  |
Note:
|
 |  | |
You cannot get the correct result if you place the slide width wise.
|
|
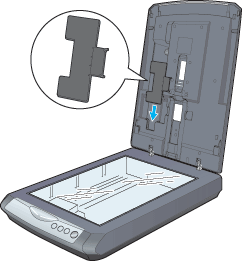
Storing the film holder
When not using the film holder, you can store it inside the document cover.
 |
If the reflective document mat has not been removed yet, open the document cover and then remove it.
|
 |
Slide the film holder into the document cover.
|
 |
Replace the reflective document mat.
|


[Top]
| Version NPD0616-00, Copyright © 2004, SEIKO EPSON CORPORATION |
Perfection 2480 Photo
Perfection 2580 Photo