![]()
Online Reference Guide
|
|
Index |
|
Search |
|
Glossary | |||||
|
|
Contents |
|
Help |
|
||||||
|
|
|
|||||||||||||||||||||||||||||||||
Understanding EPSON TWAIN HS Features
Auto Exposure
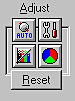
Before you scan an image, you can make adjustments manually with the powerful image quality adjustment tools on the Preview window. The following adjust buttons are available.
 | Note: |
| All adjust buttons appear dimmed and is not available when Image Type setting is 24-bit Color or 24-bit Color De-screening and ICM or ICM/sRGB is selected in the Configuration dialog box. |
 |
|
 |
|
 |
|
 |
Click the Auto Exposure button on the Preview window to automatically optimize the exposure for an image. The Gamma, Highlight, and Shadow settings in the Image Controls dialog box are automatically set.
| Note: |
| The Auto Exposure button appears dimmed and is not available when the Image Type setting is Black & White. |
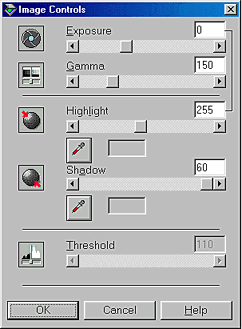
Click the Image Controls button on the Preview window to view the following dialog box.
| Note: |
|
|
The Exposure setting lightens or darkens an image. You can select from -10 (darkest) to 20 (brightest) by moving the slider.
The Exposure and Highlight controls are related. When the Exposure setting is changed, the Highlight value is automatically set.
The Gamma control allows you to adjust the mid-tones in an image. You can select from 50 (darkest) to 500 (brightest) by moving the slider.
The Highlight control allows you to adjust the brightness level of the brightest parts of an image. You can select from 61 to 490 by moving the slider.
Click the eyedropper button beneath the slider, and the pointer changes to an eyedropper. Move the eyedropper over the preview image, and click a bright area. The eyedropper "picks up" the color from that area, and uses it as the highlight for the entire image. This effect appears immediately in the preview image. Click Cancel to restore the original image.
If you want to stop adjusting the setting using the eyedropper, press the Esc key on your keyboard.
The Shadow control allows you to adjust the darkness level of the darkest parts of an image. You can select from 0 to 60 by moving the slider.
Click the eyedropper button beneath the slider, and the pointer changes to an eyedropper. Move the eyedropper over the preview image, and click a dark area. The eyedropper "picks up" the color from that area, and uses it as the shadow for the entire image. This effect appears immediately in the preview image. Click Cancel to restore the original image.
If you want to stop adjusting the setting using the eyedropper, press the Esc key on your keyboard.
Available only when the Image Type setting is Black & White. The scanner scans gray shades as either black or white using this setting.
You can select from 0 (lightest) to 255 (darkest) by moving the slider.
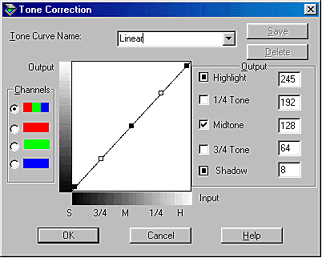
Click the Tone Correction button in the Preview window to view the following dialog box.
| Note: |
|
|
|
The tone value represents the contrast in the tonal relationship between an original image and its reproduction on a monitor or printer.
Select a tone correction setting from this list. The custom settings you have saved appear in this list.
The editor allows you to customize tone correction. Drag points on the tone curve to adjust the tone value. You can edit up to five tonal elements.
If you select the check box for a specific point, such as 1/4 Tone or Midtone, you can move that point and it remains where you leave it; it is not affected by the movement of other points on the curve. If the check box is cleared, the point becomes affected by the movement of other points.
You can select the combined red, green, and blue (RGB) channel to modify all colors, or select these colors separately.
| Note: |
| If the Image Type setting is 8-bit Gray, 8-bit Gray De-screening, or Black & White Halftone, you can select only the combined RGB channel option. |
After you correct tone, type a name for your custom settings in the Tone Curve Name list, and then click Save.
To delete a setting, select the name of the setting you want from the Tone Curve Name list, and then click Delete.
To accept the defining Tone Correction or close the dialog box, click OK.
To cancel the operation, click Cancel.
To access the online help, click Help.
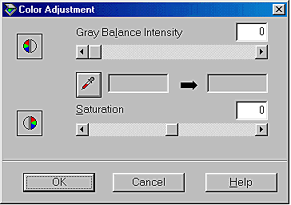
Click the Color Adjustment button in the Preview window to view the following dialog box.
| Note: |
|
|
Gray Balance Intensity removes unwanted color casts and tints by balancing color saturation.
Click the eyedropper button beneath the slider. The pointer changes to an eyedropper. Then click the color you want to represent gray. The eyedropper "picks up" the color and displays it in the box beside the eyedropper button. You can then correct the cast level for that color from 0 to 100 by moving the slider. The corrected color appears in the box on the right, and the effect shows up immediately in the preview image. Click Cancel to restore the original image.
If you want to stop adjusting the setting using the eyedropper, press the Esc key on your keyboard.
Saturation is the property that defines color depth. Select a saturation level from -100 (less color) to 100 (more color) by moving the slider.
Click the Reset button to return any image control settings you made back to their default settings. If you did not alter any image control settings, this button appears dimmed and is not available.
 Previous |
 Next |
| Version 1.00E, Copyright © 2001, SEIKO EPSON CORPORATION |