|

Reference Guide
|
|
How to / Installing and Removing Options
Finisher Stapler
 Installing
 Removing
Installing
To install the Finisher Stapler to your printer, follow the instructions below.
Before installing
 |
Turn off the printer.
|
 |
Unplug the printer's power cord from the electrical outlet.
|
 |
Remove all interface cables from the interface connectors.
|
Installing
 |
Note:
|
 | -
The Finisher Stapler cannot be installed at the same time as the Multibin Unit.
|
 | -
The optional Large Capacity Paper Unit must be installed when attaching the optional Multibin Unit.
|
 |
Carefully open the box according to the instructions printed on it.
|
 |
Remove the inserts and all other protective materials inside the box. Make sure the contents of the package match the items on the included packing list.
|
 |  |
Note:
|
 |  |
Store the packaging materials in case you want to ship the Finisher Stapler in the future.
|
Installing the cover unit
 |
Raise the cover unit flap.
|

 |
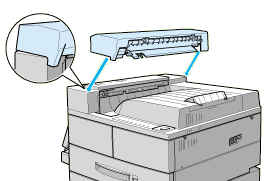
Face the front of the printer and place the cover unit on the top left side of the printer. Make sure the lip on the side of the cover is positioned under the connecting edge of the printer, as shown below.
|
 |
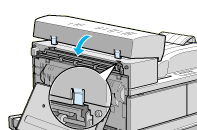
Align the connecting tabs on the cover unit with the corresponding slots on the edge of the printer as shown below. Then gently pull the cover towards the left side of the printer until it clicks into place.
|
 |
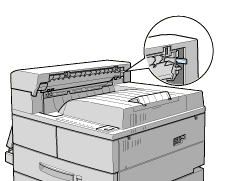
Make sure the switch is exposed and parallel to the floor as shown below.
|
Preparing the brackets
 |
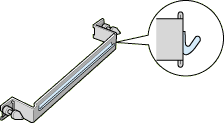
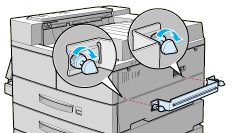
Make sure you install the bracket with the "V" shaped edge seal facing up.
|
 |
Attach the bracket to the printer by inserting the two finger screws into the holes as shown and screwing them in.
|
 |
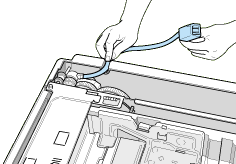
Slide the guide rail under the center of the printer as far as it will go, as shown below. Make sure the guide rail is parallel to the front of the printer.
|
 |
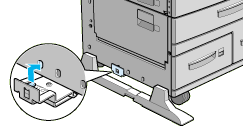
At the left side of the printer, align the bracket with the third hole from the front, lift it over the printer's plastic cover panel, and insert its tab into the hole.
|
 |
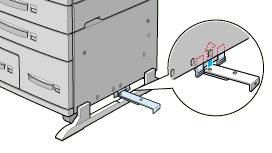
At the right side of the printer, align the bracket with the third hole from the front and firmly push it upwards between the printer's plastic cover panel and frame until it clicks into place.
|
 |
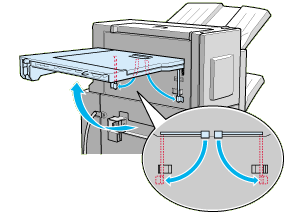
Hold the paper transport parallel to the ground and unfold the two brackets under the edge nearest to the printer by pulling on their tabs. Rotate the brackets into place by turning them down and to the side as shown and push them snugly against the retainers.
|
Connecting the Finisher Stapler
 |
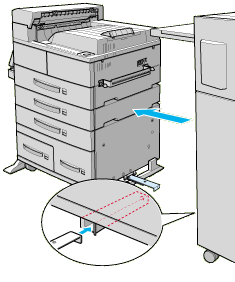
Bring the Finisher Stapler towards the printer until its power cord and connector cable can easily reach the printer.
|
 |  |
Caution:
|
 |  |
Be careful not to tip over the Finisher Stapler when moving it.
|
 |
Fully extend the guide rail attached underneath the printer and align it with the guide rail slot under the Finisher Stapler. Make sure the guide rail is completely inserted into the guide rail slot under the Finisher Stapler and is aligned with the slot underneath the right side of the Finisher Stapler.
|
 |
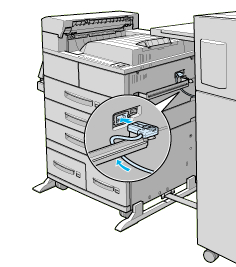
Pass the Finisher Stapler power cord behind the bracket and plug it into the printer as shown below.
|
 |
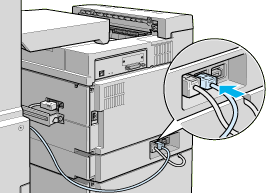
Connect the Finisher Stapler connector cables to the rear of the printer as shown below.
|
 |
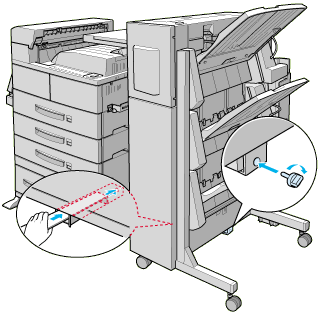
Make sure the guide rail is firmly inserted into the guide rail slot at the base of the Finisher Stapler. Insert the finger screw into the hole at the end of the guide rail and hand tighten it as shown below.
|
 |
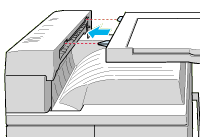
Connect the Finisher Stapler with the printer by aligning the pins on the left edge of the paper transport with the holes on the top of the cover unit, then lock the rear wheels of the Finisher Stapler.
|
 |
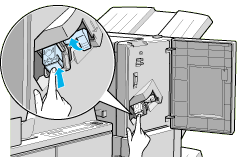
Open the front cover of the Finisher Stapler and push in the Staple Cartridge into the Finisher Stapler until the lever lifts up.
|
 |
Close the front cover of the Finisher Stapler.
|
After installing
 |
Reconnect the printer's power cord
|
 |
Make sure the printer is turned off. Plug the power cord into an electrical outlet.
|
 |
Turn on the printer.
|
To confirm that the Finisher Stapler is installed correctly, print a status sheet by pushing the Enter button on the control panel two times while the printer is online. If the Finisher Stapler is not listed on the status sheet, make sure the cable connecting the Finisher Stapler to the printer is connected securely.

[Top]
Removing
To remove the Finisher Stapler, follow the instructions below.
Before Removing
 |
Turn off the printer.
|
 |
Unplug the printer's power cord from electrical outlet.
|
 |
Remove all interface cables from the interface connectors.
|
Removing
 |
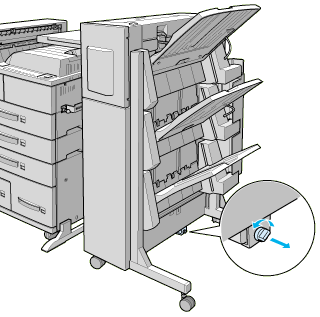
Turn the finger screw to remove it from the end of the guide rail.
|
 |
Release the locks on the Finisher Stapler's casters before moving it.
|
 |
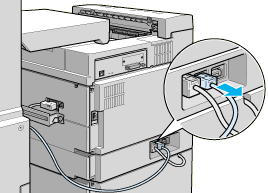
Unplug the Finisher Stapler's power cord from the back of the printer.
|
 |
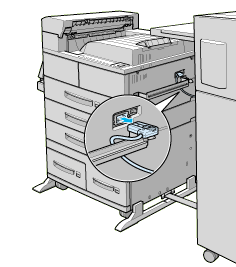
Remove the Finisher Stapler connecting cables from the printer.
|
 |
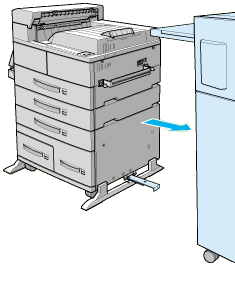
Slowly pull the Finisher Stapler away from the printer.
|
 |
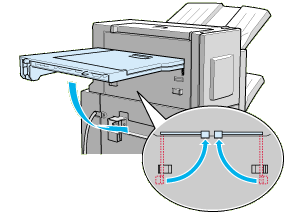
Release the two brackets under the paper transport and rotate them up into place at the edge of the paper transport. Let the paper transport hang against the side of the Finisher Stapler.
|
 |
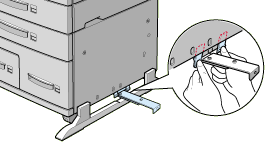
Free the guide rail from the base on the right side of the printer by firmly pressing with both thumbs, and pushing down on the guide rail as shown below.
|
 |
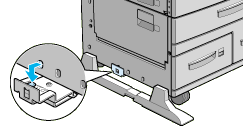
Free the guide rail on the left side of the printer.
|
 |
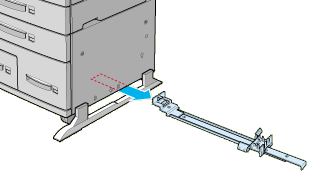
Pull the guide rail out from under the printer.
|
 |
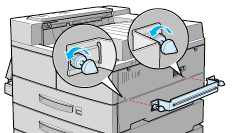
Remove the bracket from the printer by removing the two finger screws.
|
 |
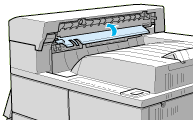
Lift the flap.
|
 |
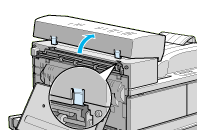
Rotate the cover unit away from the edge of the printer until the connecting tabs pull free.
|
After Removing
 |
Reconnect the printer's power cord
|
 |
Make sure the printer is turned off. Plug the power cord into an electrical outlet.
|
 |
Turn on the printer.
|

[Top]
| Version 1.00E, Copyright © 2002, SEIKO EPSON CORPORATION |
Installing
Removing