![]()
Administrator's Guide
|
|
Index |
|
Search | |||||||
|
|
Contents |
|
Help | |||||||
|
|
|
|||||||||||||||||||||||||||||||||
EPSON Status Monitor 3 (Windows only)
Environment for EPSON Status Monitor 3
EPSON Status Monitor 3 is a utility program that monitors your printer and gives you information about its current status, including the amount of remaining toner. If a print error occurs, the Status Monitor also provides you with a message describing the error. You can access EPSON Status Monitor 3 from your printer driver.
For more information on using the Status Monitor, open the online help included with this utility.
Before using Status Monitor 3, be sure to read the printer driver's README file. This file contains the latest information on the printer driver including Status Monitor 3.
The protocols that must be installed to run EPSON Status Monitor 3 vary depending on your operating system and printer type. The following table divides printers into four categories: Local printers; LPR printers, which use TCP/IP (generally in a Windows NT network environment); NetWare printers, which use Novell's IPX/SPX protocol in a NetWare environment; and Windows shared printers.
Use this table to determine what protocols you need to install according to your operating system and printer type, then see the corresponding section for your operating system.
|
|
Local Printer |
LPR Printer (TCP/IP) |
NetWare Printer (IPX/SPX) |
Windows Shared Printers |
|
Windows 98 |
LPT |
EPSON LPR1 |
NetWare3 |
LPT |
|
Windows 95 |
LPT |
EPSON LPR1 |
NetWare3 |
LPT |
|
Windows NT 4.0 |
LPT |
TCP/IP & LPR2 |
NetWare3 |
LPR2 & LPT |
| EPSON LPR1 = EpsonNet Direct Print |
| LPR2 = Windows NT LPR protocol |
| NetWare3 = Necessary protocols already installed |
 | Note: |
|
|
|
LPR printers use LPR over TCP/IP as their communication protocol suite, and you must install both protocols to use the Status Monitor to monitor a LPR printer. See your operating system documentation for installing TCP/IP.
To monitor a shared printer from the client through the server machine, select Allow monitoring of shared printer in the Monitoring Preference dialog box in the server machine.
|
1: |
client machine |
|
2: |
server machine |
|
3: |
Windows shared printer |
| Note: |
|
|
|
|
LPT1 |
TCP/IP-LPR |
|
Windows 98/95 |
supported |
not supported |
|
Windows NT 4.0 |
supported |
supported |
See the Readme file for more information about support for Windows shared printers.
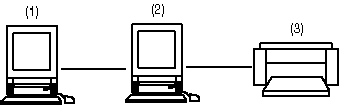
Connect the printer directly to the printer port of your computer.
|
1: |
local printer |
|
2: |
Windows 98/95/NT4.0 |
|
3: |
local cable |
|
Windows 98/95 |
Windows NT 4.0 |
|
Bi-directional support is necessary. |
Do not need any special settings. |
For Windows 98/95:
You need to set the bi-directional support in the printer's properties dialog box. Click the Details tab and click Spool Settings. Then click the Enable bi-directional support for this printer radio button.
| Note: |
| When you monitor a local printer with Windows 98/95, use LPT1 for the printer port. |
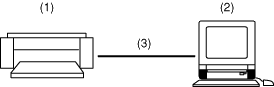
|
1: |
LPR printer |
|
2: |
Windows NT4.0 with Windows NT LPR |
|
3: |
Ethernet network |
To connect to a printer on the network and share the printer without using the server:
For Windows 98/95:
You need to set the printer using EpsonNet Direct Print. See Printing with TCP/IP via EpsonNet Direct Print.
For Windows NT 4.0:
You need to set for TCP/IP printing. See Installing LPR software in Windows NT 4.0.
|
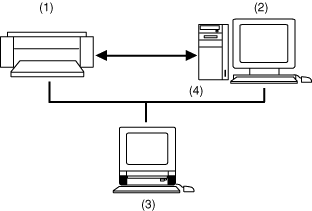
1: |
NetWare printer with IPX/SPX protocol |
|
2: |
Netware server |
|
3: |
Windows 98/95/NT4.0 |
|
4: |
Ethernet network |
You can use the network printer though the NetWare server. Make sure the following points;
If you use your printer in a NetWare environment, you need to connect to the print queue that is assigned to your printer.
 | Click Start, point to Settings, and click Printers. |
 | Click Add Printer. |
 | Select Network printer, and click Next. |
 | Double-click the NetWare file server that services the print queue assigned to your printer. |
 | All of the queues serviced by that file server appear in a list. Select the correct print queue, and click OK. (If the printer driver is not installed, a dialog box appears prompting you to select the printer driver.) |
 | Make the default printer setting and click Next. |
 | Click Finish. |
 Next |
| Version 1.00E, Copyright © 2002, SEIKO EPSON CORPORATION |