|

Administrator's Guide
|
|
Settings by System / Settings for Windows 98/95
Printing with TCP/IP via EpsonNet Direct Print
 Configuring for TCP/IP using EpsonNet WinAssist
 Installing EpsonNet Direct Print
 Setting up your printer
 Uninstalling EpsonNet Direct Print
Because Windows 98 and Windows 95 do not support LPR printing, standard TCP/IP printing cannot be done with Windows 98/95. However, TCP/IP (LPR) printing is possible via the EpsonNet Direct Print utility.
Configuring for TCP/IP using EpsonNet WinAssist
To use TCP/IP on the network, you need to set the IP address for the Internal Print Server.
See Setting the IP Address Using EpsonNet WinAssist/MacAssist to configure the Internal Print Server for TCP/IP.
 |
Note:
|
 |
Make sure you have installed TCP/IP in your operating system. For information on installing TCP/IP, see your operating system documentation.
|

[Top]
Installing EpsonNet Direct Print
Follow the steps below to install EpsonNet Direct Print. Be sure to install EpsonNet Direct Print in a computer connected to the network.
 |
Insert the Software CD-ROM shipped with this package in the CD-ROM drive.
|
 |
The EPSON Installation Program screen opens automatically.
|
If the EPSON Installation Program screen does not appear automatically, click Start and Run. Then, enter D:\EPSETUP.EXE and click OK (substitute the appropriate drive letter if necessary).
 |
Double-click Install EpsonNet Direct Print; or you can also install by selecting Install EpsonNet Direct Print and then clicking the arrow at the top right.
|
 |
Follow the on-screen instructions to complete the installation.
|
 |
Restart the computer.
|
Your computer is now set up to print with LPR via EpsonNet Direct Print. See the next section to set up your printer.

[Top]
Setting up your printer
When setting up a printer to print with LPR, you can add both a printer located in the same segment and one located beyond a router.
 |
Note:
|
 | -
Only LPR printers in the same segment as your computer are searched with EpsonNet Direct Print.
|
 | -
You cannot use functions such as pause printing, cancel printing, or purge print jobs.
|
 | -
The EPSON Status Monitor 2 and EPSON Status Monitor 3 can also monitor LPR printers added by EpsonNet Direct Print.
|
Adding a printer located in the same segment
 |
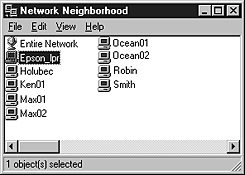
Double-click the Network Neighborhood icon.
|
 |
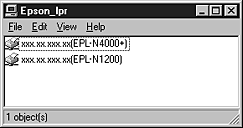
Double-click the Epson_lpr icon, so that available printers in the same segment as your computer appear in the screen.
|

 |
Double-click the target printer.
|

 |
Follow the on-screen instructions that the wizard gives you. If you are required to install a printer driver, follow the instructions in the user's guide that came with the printer.
|
Adding a printer beyond a router
 |
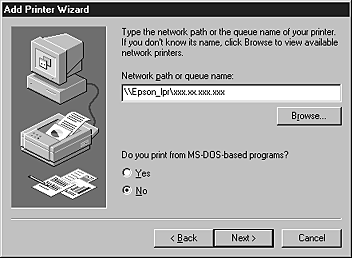
Double-click Add Printer in the Printers folder to start the Add Printer Wizard.
|
 |
Select Network printer.
|
 |
Set the IP address for the target printer by typing
\\Epson_lpr\ the IP address of the Internal Print Server.
|

 |
Click OK. Then follow the on-screen instructions to install the printer driver.
|

[Top]
Uninstalling EpsonNet Direct Print
Follow these steps to uninstall EpsonNet Direct Print.
 |
Double-click Control Panel in the My Computer window.
|
 |
Double-click the Add/Remove Programs icon.
|
 |
Select EpsonNet Direct Print and click the Add/Remove button.
|
 |
Click Yes to uninstall EpsonNet Direct Print.
|
 |
After uninstallation is complete, restart the computer.
|
 |
Caution:
|
 |
If you uninstall EPSON Status Monitor 2 from a computer with both EPSON Status Monitor 2 and EpsonNet Direct Print installed, the EPSON Status Monitor 2 folder (Epson folder) remains. Do not delete this folder because it is necessary for EpsonNet Direct Print to operate correctly.
|

[Top]
| Version 1.00E, Copyright © 2002, SEIKO EPSON CORPORATION |
Configuring for TCP/IP using EpsonNet WinAssist
Installing EpsonNet Direct Print
Setting up your printer
Uninstalling EpsonNet Direct Print