|

Reference Guide
|
|
How to / Using Options
Duplex Unit
 Installing the Duplex Unit
Removing the Duplex Unit
Using the Duplex Unit
Installing the Duplex Unit
Follow these steps to install the optional Duplex Unit:
 |
Turn off the printer.
|
 |
Unplug the printer's power cord from the electrical outlet.
|
 |
Remove all interface cables from the interface connectors.
|
 |
Unpack the Duplex Unit and remove all protective materials.
|
 |  |
Caution:
|
| |
When removing the Duplex Unit from the box, do not grasp the area indicated by the warning label shown below. Otherwise, you may damage the unit.
|

|  |
Note:
|
| |
Keep all packing materials for future use.
|
 |
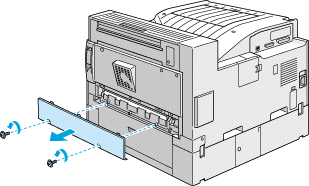
Remove the cover and connector cover on the side of the printer.
|
 |
Insert the paper transfer unit as shown below.
|
 |
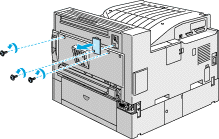
Fasten the paper transfer unit with the included screws.
|
 |
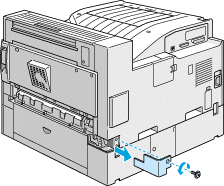
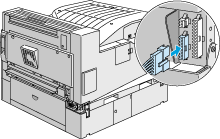
Connect the cable on the right side of the paper transfer unit to the connector on the printer.
|
 |
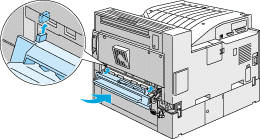
Remove the covers shown below.
|
 |
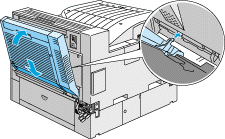
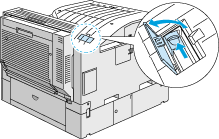
Hold the Duplex Unit at an angle and insert the two tabs at the base of the unit into the slots (marked with arrows) on the printer. Push to attach the upper portion of the unit onto the printer.
|
 |
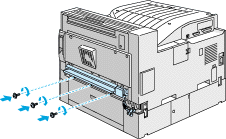
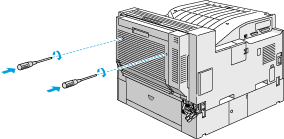
Fasten the screws as shown below. (The screws are already inside the Duplex Unit.)
|
 |
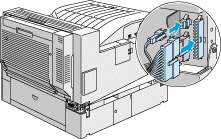
Remove the protective cover from the cable attached to the Duplex Unit, then plug the ends of the cable into the appropriate connectors at the side of the printer.
|
 |
Replace the connector cover and fasten the screw.
|
 |
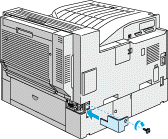
After you install the Duplex Unit, slide the tether tension lever to the position shown below.
|
| |
Note:
|
| |
Be sure you close the cover of the Duplex Unit before you adjust the tether.
|
 |
Reconnect all interface cables.
|
 |
Plug the power cord into an electrical outlet.
|
 |
Turn on the printer.
|
To confirm that the Duplex Unit is installed correctly, print a status sheet by pushing the Enter button on the control panel twice while the printer is online. If the unit is not listed on the status sheet, make sure the cables connecting the Duplex Unit to the printer are connected securely.

[Top]
Removing the Duplex Unit
Follow these steps to remove the Duplex Unit:
|
|
Turn off the printer.
|
|
|
Unplug the printer's power cord from the electrical outlet.
|
|
|
Remove all interface cables from the interface connectors.
|
|
|
Open the connector cover and unplug the ends of the Duplex Unit cable from their connectors.
|
|
|
Loosen the screws on the Duplex Unit, then remove the unit by pulling the upper portion of the unit away from the printer then lifting the unit up and off the printer.
|
|
|
Remove the paper transfer unit.
|
|
|
Replace the covers on the printer, and fasten the screws.
|
|
|
Plug the power cord into an electrical outlet.
|
|
|
Turn on the printer.
|
[Top]
Using the Duplex Unit
The Duplex Unit enables you to print on both sides of plain paper and supports the following paper sizes:
A3, A4, A5, B4, B5, Ledger, Legal, G-Legal, Letter, G-Letter, Executive, H-Letter
To use the Duplex Unit, select the Duplex Print Unit check box in the printer driver. This check box is accessed by clicking the Settings button in the Optional Settings tab of the printer driver.
When using the Duplex Unit, paper feeds automatically from the MP tray, the lower cassette, or any installed optional cassettes. After both sides of the paper have been printed on, the Duplex Unit outputs the paper onto the face-down tray or into an optional multibin unit, if installed.
[Top]
| Version 1.00E, Copyright © 2001, SEIKO EPSON CORPORATION |

