|

Reference Guide
|
|
How to / Using Options
Large Capacity Paper Unit
 Installing the Large Capacity Paper Unit
Using the Large Capacity Paper Unit
Installing the Large Capacity Paper Unit
It is best to install the optional Large Capacity Paper Unit when first setting up the printer. Please note that you will need the assistance of at least two other people to lift up the printer when installing this option.
Follow these steps to install the optional Large Capacity Paper Unit:
 |
Turn off the printer.
|
 |
Unplug the printer's power cord from the electrical outlet.
|
 |
Remove all interface cables from the interface connectors.
|
 |
Unpack the Large Capacity Paper Unit and remove all protective materials.
|
 |  |
Note:
|
| |
Keep all packing materials for future use.
|
 |
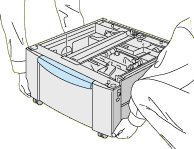
With the assistance of two or more people, place the unit near the printer.
|
| |
Note:
|
| |
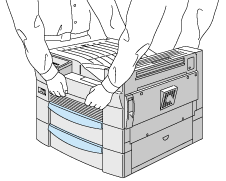
The unit has four handles that you can use to lift it with. Pull the handles out from the locations shown below when you need to use them.
|
 |
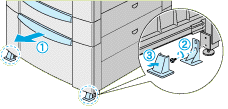
You will find three casters at the bottom of the Large Capacity Paper Unit. Lock the casters by pushing their levers down.
|
 |
If you are also installing an optional 500-Sheet Lower Cassette Unit, stack it on top of the Large Capacity Paper Unit. For instructions on how to prepare the Lower Cassette Unit for installation, see Installing the 500-Sheet Lower Cassette Unit.
|
| |
Note:
|
| |
All subsequent illustrations show both an optional 500-Sheet Lower Cassette Unit and an optional Large Capacity Paper Unit.
|
 |
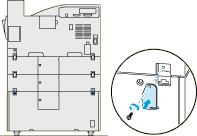
Remove the side cover from the bottom of the printer.
|
 |
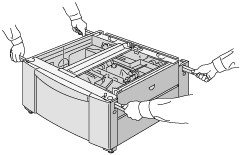
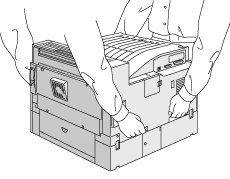
With the assistance of two or more people, grasp the printer at the positions indicated below and lift it carefully.
|
|
|
|
front
|
rear
|
|  |
Caution:
|
| |
The printer weighs about 30 kg (66.1 lb); always lift it with two or more people.
|
 |
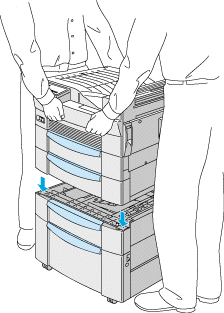
Align each of the printer's corners with those of the unit, then lower the printer until it rests securely on the unit.
|
 |
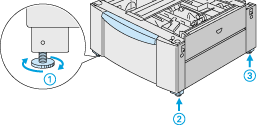
Make sure all corners of the printer fit firmly onto the unit. Then pull out the paper cassette and fasten the unit using the fittings and screws provided.
|
| |
Note:
|
| |
Also fasten the 500-Sheet Lower Cassette Unit with the fittings and screws provided if you're installing both options at the same time.
|
 |
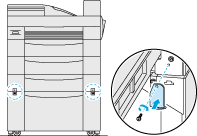
On the back of the printer, fasten the unit using the fittings and screws provided.
|
| |
Note:
|
| |
Also fasten the 500-Sheet Lower Cassette Unit with the fittings and screws provided if you're installing both options at the same time.
|
 |
Pull the paper cassette out of the unit and remove the protective materials.
|
 |
Peel the appropriate cover and cassette numbering labels from the label sheet included with the Large Capacity Paper Unit and attach it to the unit.
|

| |
Note:
|
| |
Do the same for the optional 500-Sheet Lower Cassette Unit if you are installing it at the same time.
|
 |
Pull out the cassette and attach the printer supports and printer support covers to the front of the printer, then attach the printer supports to the back of the printer.
|
 |
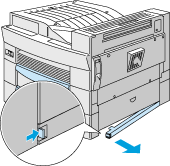
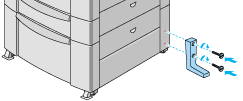
Attach the included L-shaped printer support to the side of the unit as shown below.
|
 |
Reconnect all interface cables.
|
 |
Plug the power cord into an electrical outlet.
|
 |
Turn on the printer.
|

[Top]
Using the Large Capacity Paper Unit
This unit can hold 2,500 sheets of plain paper and is useful for feeding paper you use often and in large amounts.
Follow these steps to load paper into the Large Capacity Paper Unit:
|
|
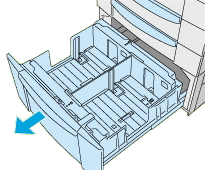
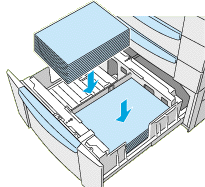
Pull out the paper cassette.
|
|
|
Fan a stack of paper and tap it on a flat surface to even the edges. Insert the paper into the cassette, making sure the amount of paper does not exceed the maximum paper mark inside the cassette.
|
| |
Note:
|
| |
If your printouts are curled or do not stack properly when using plain paper, try turning the stack over and reloading it.
|
|
|
Push the paper cassette back into the unit.
|
[Top]
| Version 1.00E, Copyright © 2001, SEIKO EPSON CORPORATION |

