|

Reference Guide
|
|
How to / Install and Remove Options
Hard Disk Drive
 Installing
 Removing
The optional Hard Disk Drive (C82377 ) can hold up to 6 GB of print jobs. This option allows you to print complex and large print jobs at high speed. The installing procedure for the optional Hard Disk Drive is Described below.
Installing
Follow these steps to install the Hard Disk Drive:
Before Installing
 |
Turn off the printer.
|
 |
Unplug the printer's power cord from the electrical outlet.
|
 |
Unpack the Hard Disk Drive and remove all protective materials.
|
Installing
 |
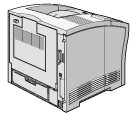
Face the left side of the printer.
|

 |
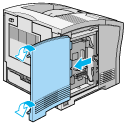
Loosen the two retaining screws on the back of the printer and remove the left side casing of the printer.
|

 |  |
Note:
|
 |  |
The two retaining screws are attached to the printer casing to prevent them from falling off.
|
 |
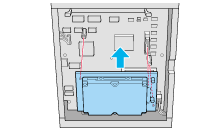
Align the two pins with the two holes, and the connector with the socket, then press the Hard Disk Drive down until the socket and connector are securely connected.
|

 |
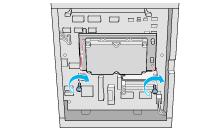
Tighten the two screws with a screwdriver.
|

 |
Replace the left side casing of the printer and tighten the two retaining screws.
|
After installing
 |
Make sure the printer is turned off.
|
 |
Plug the printer's power cord into an electrical outlet.
|
 |
Turn on the printer.
|
Making HDD setting
Make sure that the Hard Disk Drive is correctly recognized by the printer driver after installing the Hard Disk Drive.
Follow these steps to make necessary setting:
 |
Go to the Optional Settings menu of the printer driver.
|
 |
Select the Update the Printer Option Info Manually radio button, and then, click the Settings button. The Optional Settings dialog box opens.
|
 |
Select the HDD Unit check box located at the left bottom of the dialog box.
|
 |
Click OK.
|

[Top]
Removing
To remove the Hard Disk Drive, follow the instructions below.
Before removing
 |
Turn off the printer.
|
 |
Unplug the printer's power cord from the electrical outlet.
|
Removing
 |
Repeat steps 1 and 2 in "Installing" in this section to access the Hard Disk Drive.
|
 |
Loosen and remove the two screws with a screwdriver.
|
 |
Pull the Hard Disk Drive off from the Hard Disk Drive socket.
|
 |
Put the Hard Disk Drive in its original package.
|
 |
Replace the left side casing of the printer and tighten the two retaining screws.
|
 |
Store the Hard Disk Drive in a safe place until the next time it will be used.
|
After removing
 |
Make sure the printer is turned off.
|
 |
Plug the printer's power cord into an electrical outlet.
|
 |
Turn on the printer.
|

[Top]
| Version 1.00E, Copyright © 2001, SEIKO EPSON CORPORATION |
Installing
Removing
) can hold up to 6 GB of print jobs. This option allows you to print complex and large print jobs at high speed. The installing procedure for the optional Hard Disk Drive is Described below.