|

Reference Guide
|
|
How to / Install and Remove Options
Multibin Unit
 Installing
 Removing
Installing
To install the Multibin Unit, follow the instructions below.
 |
Note:
|
 |
The Multibin Unit cannot be used in combination with the optional Shifter. If the Shifter is installed, remove it before installing the Multibin Unit. For more information, see Shifter.
|
Before Installing
 |
Turn off the printer.
|
 |
Unplug the power cord from the electrical outlet.
|
 |
Detach the other end of the power cord from the power connector on the printer. Keep the cord nearby, as you need to connect it to the Multibin Unit.
|
 |
Remove all interface cables from the interface connectors.
|
 |
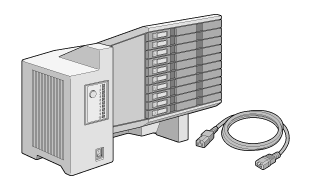
Open the box containing the Multibin Unit. Take the unit out carefully and gently place it on a stable surface. Also take out the power extension cable included in the package.
|
 |  |
Caution:
|
 |  |
After removing the protective material, do not place the Multibin Unit on its bottom.
|
Removing the Printer's Top Cover
 |
Note:
|
 |
If you have just removed the Shifter, the top cover is already off. In this case, proceed to "Installing the Multibin Unit".
|
 |
Make sure the printer is not turned on.
|
 |
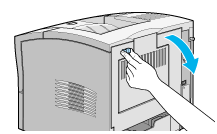
Squeeze together the two adjacent knobs on the printer's rear cover, so that the rear cover comes free. Gently lower the rear cover all the way down.
|
 |
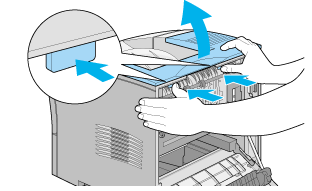
Reach into the top rear of the printer and press in the two plastic tabs locking the top cover in place, while at the same time holding onto the cover so it doesn't fall. Lift the top cover off carefully and store it in a safe place.
|
 |
Close the rear cover.
|
Installing the Multibin Unit
 |
Face the back of the printer. (If necessary, slide the printer around so that you can be in the proper position.)
|
 |
Before lifting the Multibin Unit, study carefully how it fits onto the printer.
|
 |
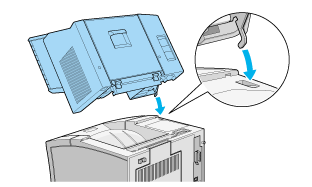
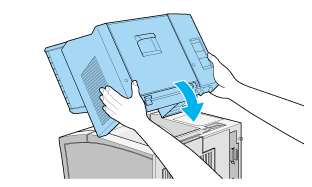
Carefully lift the Multibin Unit, holding it so that the drawers are facing the same direction as the front of the printer. Lift the unit over the printer, tilt the front end slightly downward, and fit the metal hook into the hook slot.
|
 |
Note the location of the interface plug on the Multibin Unit and its counterpart on the printer. Lower the rear of the unit into place and make sure the plug is inserted properly into the receptacle on the printer. Slide the unit slightly as necessary so that the plastic tabs snap into the slot along the rear of the printer.
|
 |
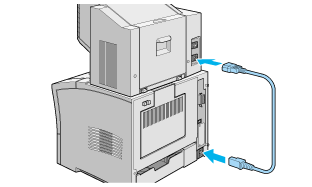
Connect one end of the power extension cable to the lower power outlet on the back of the Multibin Unit. Connect the other end of the cable to the power inlet on the printer.
|
 |
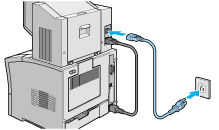
Connect the printer's original power cord to the upper power inlet on the Multibin Unit, and plug the other end into an electrical outlet.
|
After Installing
 |
Reconnect any interface cables that you removed.
|
 |
Make sure the printer and the Multibin Unit are turned off. Plug the power cord into an electrical outlet.
|
 |
Turn on the Multibin Unit.
|
 |
Turn on the printer.
|

[Top]
Removing
To remove the Multibin Unit, follow the instructions below.
Before Removing
 |
Turn off the printer and the Multibin Unit.
|
 |
Unplug the printer's power cord from the electrical outlet. Then unplug the other end of the cord from the power connector on the Multibin Unit.
|
 |
Remove all interface cables from the interface connectors.
|
 |
Disconnect the power extension cable from the printer and the Multibin Unit.
|
Removing
 |
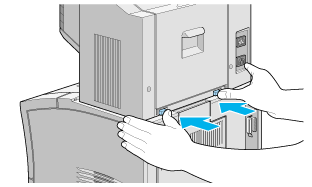
Press in the two tab buttons at the bottom rear of the Multibin Unit and raise the back of the unit slightly upwards so that the tabs come free.
|
 |
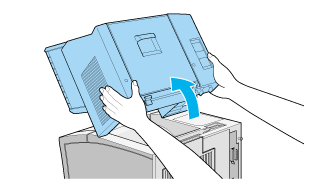
Holding the unit firmly, lift it up and tilt it to remove it, making sure that the metal hook comes out from the hook slot on the printer as shown in the illustration below.
|
 |
Store the Multibin Unit and power extension cable in their original box.
|
After Removing
 |
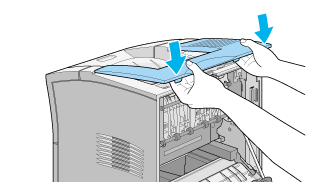
Replace the top cover (or install the optional Shifter). To replace the top cover, fit the hooks at the front of the cover into the slots and press the cover down gently so that it snaps into place.
|
 |
Reconnect any interface cables that you removed.
|
 |  |
Caution:
|
 |  |
Do not place the Multibin Unit on its bottom.
|
 |
Make sure the printer is turned off. Connect the power cord to the power connector on the rear of the printer. Then plug the other end of the cord into an electrical outlet.
|
 |
Turn on the printer.
|

[Top]
| Version 1.00E, Copyright © 2001, SEIKO EPSON CORPORATION |
Installing
Removing