![]()
Administrator's Guide
|
|
Index |
|
Search | |||||||
|
|
Contents |
|
Help | |||||||
|
|
|
|||||||||||||||||||||||||||||||||
EpsonNet WinAssist/MacAssist/WebAssist
Opening screen
This section describes the functions of EpsonNet WebAssist.
 | Note: |
|
|
Any user can access the following screen by typing the IP address of the Internal Print Server for the URL in your browser.
| Note: |
|
|
|
|
Home |
Links to the opening screen. |
|
Help |
Links to Help. |
|
About WebAssist |
Links to the copyright and version information for EpsonNet WebAssist. |
|
Link to EPSON |
Links to the EPSON Web site. |
|
Favorite |
Links to a web site previously defined by the administrator. |
|
EPSON logo |
Links to the EPSON Web site. |
|
Information - Printer |
|
|
Device |
Displays the printer device information. |
|
Consumable |
Displays the consumable information. |
|
Input |
Displays the input information. |
|
|
Displays the print settings. |
|
Emulation |
Displays the emulation information. |
|
Interface |
Displays the printer interface information. |
|
Information - Network |
|
|
General |
Displays the Internal Print Server information. |
|
NetWare |
Displays information about NetWare. |
|
TCP/IP |
Displays information about TCP/IP. |
|
AppleTalk |
Displays information about AppleTalk. |
|
NetBEUI |
Displays information about NetBEUI. |
|
IPP |
Displays information about IPP. |
|
SNMP |
Displays information about SNMP. |
|
Configuration - Printer |
|
|
Input |
Change the input settings. |
|
|
Change the print settings. |
|
Emulation |
Change the emulation settings. |
|
Interface |
Change the printer interface settings. |
|
Configuration - Network |
|
|
NetWare |
Configure the applicable settings for NetWare. |
|
TCP/IP |
Configure the desired settings/method for TCP/IP. |
|
AppleTalk |
Configure the desired settings for AppleTalk. |
|
NetBEUI |
Configure the desired settings for NetBEUI. |
|
IPP |
Configure the desired settings for IPP. |
|
SNMP |
Configure the desired settings for SNMP. |
|
Configuration - Optional |
|
|
Administrator |
Type the name of the administrator and a link to a favorite Web site. |
|
Reset |
Resets the Internal Print Server and returns to the default settings. |
|
Password |
Set the password to protect settings. |
This section explains about the Device and Consumable information screens. See Configuration - Printer screens about Input, Print, Emulation, and Interface information.
|
Items |
Explanations |
|
Panel canvas |
Displays the same information that is displayed on the printer's control panel. |
|
Signal |
A signal shows the status level. The green light is on when the printer is idle or printing. The yellow light is on when the toner or oil roll is low. The red light is on when the printer is out of paper or toner, if paper is jammed, the cover is open, or an error has occurred. |
|
LEDs |
The LEDs indicates the current operating printer status when you first turn on the printer, during normal operation, and when errors occur. |
|
Remote Control Panel (OnLine, FormFeed, Continue, Reset, and WarmingUp buttons) |
You can control the printer with this Remote Control Panel functions. You can get the same result when you click these buttons as pressing the buttons on your printer. |
|
Printer image |
Displays the printer image. |
|
Error information box |
Displays error/warning information for the printer. |
|
Printer Model Name |
The model name of the printer. |
|
IP Host Name |
The IP host name of the printer. |
|
IP Address |
The IP address of the printer. |
|
MAC Address |
The MAC address of the printer. |
|
Memory |
The installed memory size of the printer. |
|
HDD |
Capacity of the hard disk installed in the printer. |
|
Items |
Explanations |
|
Total Pages Printed |
Total number of pages that have been printed. |
|
Toner |
The amount of remaining toner. |
This section explains about printer information. With EpsonNet WebAssist, you can make some of the same printer settings that you can set using the printer's control panel. See the Reference Guide for more information on each item.
| Note: |
| A password is required when you click items under Printer on the Configuration menu. |
|
Items |
Explanations |
|
MP Mode |
Select the priority order of paper feeding from MP Tray. |
|
MP Tray Paper Size |
Select the paper size for MP Tray. |
|
ENV Tray Paper Size |
Select the envelope size for Envelope Feeder. This setting is available only when the ENV tray is installed. |
|
LC1 Paper Size |
Displays the currently loaded paper size in the lower paper cassette. |
|
LC2 and LC3 Paper Size |
If the optional Large Capacity Paper Unit is installed, the currently loaded paper size in each cassette of Large Capacity Paper Unit is displayed. |
|
MP Tray Paper Type |
Select the paper type for MP Tray. |
|
ENV Tray Paper Type |
Displays the paper type for ENV tray if it is installed. |
|
LC1 Paper Type |
Select the paper type for the lower paper cassette. |
|
LC2 and LC3 Paper Type |
Select the paper type for each cassette of Large Capacity Paper Unit only if the optional Large Capacity Paper Unit is installed. |
|
Set button |
Saves any changes. |
|
Reload button |
Clears any changes and reloads the previous settings. |
|
Items |
Explanations |
|
Menu Selection |
Select Setup Menu. |
|
Interface Time Out |
Type the length of the printer waits when it is on line and no new data is received. When this time is up, the printer searches for new print data on other channels. |
|
Language |
Select the displayed language. |
|
Panel Lock |
Select locking of the printer's control panel. If you select on, the printer's control panel is locked. |
|
Toner Out |
Select whether or not to continue printing when the toner is out. |
|
Set button |
Saves any changes. |
|
Reload button |
Clears any changes and reloads the previous settings. |
|
Items |
Explanations |
|
Menu Selection |
Select Printing Menu. |
|
Paper Source |
Select the paper source. |
|
Paper Size |
Select the paper size for printing. |
|
Wide A4 |
Select whether or not the printer accepts wide A4 paper for printing. |
|
Orientation |
Select whether the page is printed in portrait or landscape orientation. |
|
Output Bin |
Select the output tray for printout sheets. |
|
Copies |
Enter the number of copies to be printed. |
|
Manual Feed |
This item selects manual feed mode. |
|
Resolution |
Select the resolution. |
|
Skip Blank Page |
Select whether or not to skip a blank page. |
|
Auto Eject Page |
Select whether or not to eject pages automatically. |
|
Duplex |
Select whether or not to print on both sides of paper. This setting is available only when the Duplex Unit is installed. |
|
Binding |
Specify the binding direction of the printout. This setting is available only when the Duplex Unit is installed. |
|
StartPage |
Specify whether printing starts from the front or back side of the page. This setting is available only when the Duplex Unit installed. |
|
Offset Stacking |
Select whether or not to separate each set of printed copies when printing to the face-down tray. |
|
Set button |
Saves any changes. |
|
Reload button |
Clears any changes and reloads the previous settings. |
|
Items |
Explanations |
|
Menu Selection |
Select Configuration Menu. |
|
RITech |
Select whether or not to adjust the RITech setting. RIT produces smoother and crisper lines, text, and graphics. |
|
Toner Save |
Select whether or not to save toner. When on, the printer consumes less toner but print quality is reduced. |
|
Density |
Adjusts the print density to make your printout lighter or darker. |
|
Top Offset |
Type the value to adjust the printing start position from the top on the paper. |
|
Left Offset |
Type the value to adjust the printing start position from the left on the paper. |
|
Top Offset B |
Type a value to adjust the vertical printing position on the back side when printing on both sides. Available only when the Duplex Unit is installed. |
|
Left Offset B |
Type a value to adjust the horizontal printing position on the back side when printing on both sides. Available only when the Duplex Unit is installed. |
|
Size Ignore |
Select whether or not a paper size error is ignored. |
|
Auto Continue |
Select whether or not to permit the printer to automatically continue printing after a certain period of time when one of the following error occurs: paper set, print overrun, or insufficient memory error. |
|
Page Protect |
Select whether or not to allocate additional printer memory for printing data, as opposed to receiving it. |
|
Image Optimum |
Reduces the amount of graphics data when the data reaches the memory limit, allowing complex documents to be printed. |
|
Paper Type |
Select the paper type. |
|
Set button |
Saves any changes. |
|
Reload button |
Clears any changes and reloads the previous settings. |
|
Items |
Explanations |
|
Menu Selection |
Select Output Menu. |
|
Mailbin Name (1 through 10) |
Type a name for each Mailbin if they are installed (up to 24 characters). |
|
Set button |
Saves any changes. |
|
Reload button |
Clears any changes and reloads the previous settings. |
|
Items |
Explanations |
|
Menu Selection |
Select Support Menu. |
|
Standby |
Select whether or not to save power by reducing the power to the fixing heater if the printer receives no data for certain period of time. |
|
Set button |
Saves any changes. |
|
Reload button |
Clears any changes and reloads the previous settings. |
|
Items |
Explanations |
|
Emulation |
Select LJ4. |
|
Font Source |
Select the default font source. |
|
Font Number |
Type the default font number from the default font source. |
|
Pitch |
Type the default font pitch if the font is scalable and fixed-pitch. |
|
Height |
Type the default font height if the font is scalable and proportional. |
|
Symbol Set |
Select the default symbol set. |
|
Form |
Type the number of lines for the selected paper size and orientation. |
|
Source Symbol Set |
Available only when an optional font ROM is installed. |
|
Dest Symbol Set |
Available only when an optional font ROM is installed. |
|
CR Function |
Select CR (carriage-return) or CR+LF (carriage-return/line-feed) operation whenever the print position exceeds the right margin. |
|
LF Function |
Select LF (line-feed) or CR+LF (carriage-return/line-feed) operation to add a line feed to each carriage return it receives. |
|
Tray Assign |
Select the tray assigning from 4, 4K, or 5S. When 4, 4K, and 5S are selected, LaserJet 4 Compatible, LaserJet 4000/5000/8000 Compatible, and LaserJet 5 Si Compatible are available respectively. |
|
Set button |
Saves any changes. |
|
Reload button |
Clears any changes and reloads the previous settings. |
|
Items |
Explanations |
|
Emulation |
Select GL2. |
|
GL-Mode |
Select whether the emulation is similar to the GL/2 or the HP LaserJet 4 emulation of the GL/2. |
|
Scale |
Select whether the output from the software is scaled, and if so, how the scale factor is calculated: based on the output paper size of the software application. |
|
Origin |
Select whether the logical origin of the "plotter" is from the corner or the center of the paper. |
|
Pen |
Select the logical "pen" which "plots" the drawing. |
|
End |
Select the way in which lines end. |
|
Join |
Select the way in which lines are joined. |
|
Pen (0 to 6) |
Select the thickness of the seven "pens" used to make the printout. |
|
Set button |
Saves any changes. |
|
Reload button |
Clears any changes and reloads the previous settings. |
|
Items |
Explanations |
|
Emulation |
Select ESCP2 or FX. |
|
Font |
Select a font which is used for printing. |
|
Pitch |
Select a character pitch. |
|
Condensed |
Use this option to change the character spacing. |
|
T. Margin |
Use this option to specify the distance from the top of the sheet to the baseline of the first printable line. |
|
Text |
Use this option to set the page length in lines. |
|
CG Table |
Use the character generator table option to select the graphics character table, or the italics table. |
|
Country |
Use this option to select one of the international symbol sets. |
|
Auto CR |
Use the automatic carriage return option to perform a carriage-return line-feed (CR-LF) operation whenever the print position exceeds the right margin. |
|
Auto LF |
When you set AutoLF to Off, the printer does not send an automatic line feed (LF) command with each carriage return (CR). When on, the printer adds a line feed to each carriage return it receives. |
|
Bit Image |
With Bit Image set to Dark or Light, your printer can correctly emulate the graphics densities set with the printer command. When you select Dark, the bit image density is high. When you select Light, the bit image density is low. |
|
Zero Char |
Select whether the printer prints a slashed zero or an unslashed zero. |
|
Set button |
Saves any changes. |
|
Reload button |
Clears any changes and reloads the previous settings. |
|
Items |
Explanations |
|
Emulation |
Select 1239X. |
|
Font |
Select a font. |
|
Pitch |
Select a character pitch. |
|
Code Page |
Selects the character tables. Character tables contain the characters and symbols used in different languages. |
|
T. Margin |
Use this option to specify the distance from the top of the sheet to the baseline of the first printable line. |
|
Text |
Use this option to set the page length in lines. |
|
Auto CR |
Use the automatic carriage return option to perform a carriage-return line-feed (CR-LF) operation whenever the print position exceeds the right margin. |
|
Auto LF |
When you set AutoLF to Off, the printer does not send an automatic line feed (LF) command with each carriage return (CR). When on, the printer adds a line feed to each carriage return it receives. |
|
Alt. Graphic |
Turns the Alternate Graphics option on or off. |
|
Bit Image |
With Bit Image set to Dark or Light, your printer can correctly emulate the graphics densities set with the printer command. When you select Dark, the bit image density is high. When you select Light, the bit image density is low. |
|
Zero Char |
Select whether the printer prints a slashed zero or an unslashed zero. |
|
Character Set |
Select character table. |
|
Set button |
Saves any changes. |
|
Reload button |
Clears any changes and reloads the previous settings. |
|
Items |
Explanations |
|
Error Sheets |
Select whether or not to print an error sheet when any error occurs while the printer is in PS3 emulation mode. |
|
Set button |
Saves any changes. |
|
Reload button |
Clears any changes and reloads the previous settings. |
|
Items |
Explanations |
|
Parallel I/F |
Allows you to activate or deactivate the parallel interface. |
|
Speed |
Select the transfer speed. |
|
Bi-Directional |
Enable or disable bidirectional communication. |
|
Buffer Size |
Select the amount of memory to be used for receiving and printing data. |
|
Items |
Explanations |
|
Serial I/F |
Allows you to activate or deactivate the serial interface. |
|
Word Length |
Select an 8-bit or 7-bit word length. See your computer manual and software documentation for the proper setting. |
|
Baud Rate |
Set the data transfer rate (baud) for the serial interface. The baud rate is measured in bits per second (bps). See your computer manual and software documentation for the proper setting. |
|
Parity |
When selecting None, parity checking is disabled. The parity bit, if used, provides a basic form of error detection. See your computer manual and software documentation for the proper setting. |
|
Stop Bit |
Set the number of stop bits for each character of information sent to the printer. Stop bits signal the end of a character. |
|
DTR |
Use DTR (Data Terminal Ready) to turn the printer's DTR communications protocol on or off. You can use DTR protocol in combination with the Xon/Xoff option setting. |
|
DSR |
When DSR (Data Set Ready) is Off, the signal level is permanently set High, allowing the printer to send data to the computer. For most communications purposes, this option should be set to Off (Signal level High). When DSR is On, data is sent to the computer only when DSR is High. |
|
Xon/Xoff |
Set the Xon/Xoff communications protocol to On, Off, or Robust. You can use Xon/Xoff protocol in combination with the DTR option setting. If set to Robust, the printer sends a Xon signal when the printer is available to receive data. |
|
Buffer Size |
Select the amount of memory to be used for receiving and printing data. |
|
Items |
Explanations |
|
Network I/F |
Network I/F (Internal Print Server) is always on. |
|
Buffer Size |
Select the amount of memory to be used for receiving and printing data. |
|
Items |
Explanations |
|
AUX I/F |
Not available unless an optional print server is installed. |
|
Buffer Size |
Select the amount of memory to be used for receiving and printing data. Available only when an optional print server is installed. |
|
Set button |
Saves any changes. |
|
Reload button |
Clears any changes and reloads the previous settings. |
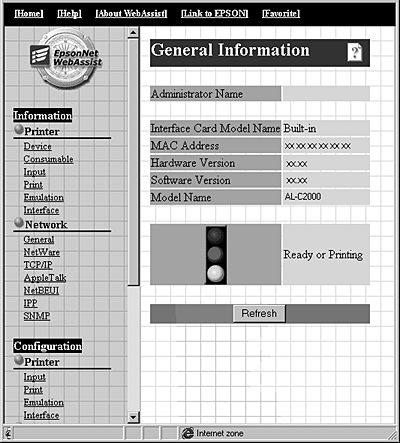
This section explains General and Printer Status information. See Configuration - Network screens about NetWare, TCP/IP, AppleTalk, NetBEUI, IPP, and SNMP information.
|
Items |
Explanations |
|
Administrator Name |
The administrator of the printer. |
|
Interface Card Model Name |
The type of the print server of the printer. |
|
MAC Address |
The MAC Address of the printer. You can distinguish the printer by its MAC Address. |
|
Hardware Version |
The hardware version of the Internal Print Server. |
|
Software Version |
The software version of the Internal Print Server. |
|
Model Name |
The model name of the printer. |
|
Status |
A signal shows the status level. The green light is on when the printer is idle or printing. The yellow light is on when the paper or toner is low. The red light is on when the printer has no paper or no toner, if paper is jammed, the cover is open, or an error has occurred. |
|
Refresh button |
Refreshes the printer status. |
| Note: |
| The printer status is not updated automatically. Press the Refresh button to display the latest printer information. |
|
Items |
Explanations |
|
NetWare |
Enable or Disable NetWare. |
|
Frame Type |
Select Auto that is the only one you can select for the frame type. |
|
Mode |
Select the appropriate NetWare mode. |
|
NDS Tree Name |
Type the NDS tree name (up to 31 characters). |
|
NDS Context |
Type the NDS context (up to 255 characters). |
|
Items |
Explanations |
|
Primary File Server Name |
Type the file server name (up to 47 characters) which the print server logs in. |
|
Print Server Name |
Type the print server name (up to 47 characters). |
|
Polling Interval |
Type the polling interval in seconds. |
|
NetWare Password |
Type the password (up to 20 characters) you use when you log in to the print server. |
|
Items |
Explanations |
|
Primary Print Server Name |
Type the primary print server name (up to 47 characters). |
|
Printer Port Number |
Type the printer port number. |
|
SUBMIT button |
Update the changes. |
|
Items |
Explanations |
|
Get IP Address |
Select the method of acquiring the IP address, either Auto or Panel. |
|
IP Address |
Type the IP address for the Internal Print Server if set to Panel. |
|
Subnet Mask |
Set the subnet mask. |
|
Default Gateway |
Set the gateway address if needed. |
|
SUBMIT button |
Update the changes. |
|
Items |
Explanations |
|
AppleTalk |
Enable or Disable AppleTalk. |
|
Printer Name |
Type the name of the printer (up to 32 characters). |
|
Entity Type |
Displays the Entity type of the printer. |
|
Zone Name |
Specify the AppleTalk zone. |
|
Network Number Set |
Select Auto or Manual. It should be set to Auto for most systems. |
|
Network Number for Manual Mode |
Specify the network number when you select Manual for Network Number Set. |
|
SUBMIT button |
Update the changes. |
|
Items |
Explanations |
|
NetBEUI |
Enable or Disable NetBEUI. |
|
NetBIOS Name |
Type the computer name (NetBIOS name) up to 15 characters. |
|
Workgroup Name |
Type the workgroup name or domain name (up to 15 characters). |
|
Device Name |
Type the device name (up to 12 characters). |
|
SUBMIT button |
Update the changes. |
You must make the following settings before setting up the printer for Internet Printing in Windows Me/2000 or using EpsonNet Internet Print in Windows 98/95/NT 4.0
|
Items |
Explanations |
|
IPP URL |
Displays the printer's URL for Internet Printing. Format: http:// the IP address of the Internal Print Server:631/ the printer name set below Example: http://192.168.100.201:631/EPSON_IPP_Printer |
|
Printer Name |
Enter the printer name to use for Internet Printing (up to 127 characters). Example: EPSON_IPP_Printer |
|
Location |
Enter the name of the printer's physical location (up to 64 characters). |
|
SUBMIT button |
Saves any changes. |
|
Items |
Explanations |
|
Community |
Displays the community name. |
|
Read Only |
The word "public" is displayed. |
|
Read/Write |
Specify the Read/Write community name (up to 32 characters). |
|
SUBMIT button |
Update the changes. |
|
Items |
Explanations |
|
Trap |
Enable or Disable the trap. |
|
Address |
Type the IP address of the server to which the trap is transmitted. |
|
Community Name |
Type the community name (up to 32 characters). |
|
SUBMIT button |
Update the changes. |
|
Items |
Explanations |
|
Trap |
Enable or Disable the trap. |
|
Address |
Type the Network Address and Node Number of the server to which the trap is transmitted. Format: Network Address: Node Number Assume that the Network Address is A7E00BB0 (hexadecimal) and Node Number is 000048930000 (hexadecimal). In this case, the address is A7E00BB0:000048930000. |
|
Community Name |
Type the community name (up to 32 characters). |
|
SUBMIT button |
Update the changes. |
You can link to the web site specified in this screen when you click Favorite (or a similar name) in the Index.
|
Items |
Explanations |
|
Administrator Name |
Type the name of the administrator. |
|
Favorite Name |
Type the link item name (up to 20 characters) which will be displayed in the Index menu. |
|
Favorite URL |
Type a URL (up to 64 characters). |
|
Description |
Input any comments concerning the URL (up to 64 characters). |
|
SUBMIT button |
Update the changes. |
| Note: |
| Links to ftp are not supported. |
You can initialize or reset the Internal Print Server.
|
Items |
Explanations |
|
RESET button |
Functions like turning the power off and on again. Click this button to make the changes effective. |
|
RETURN TO DEFAULT button |
Returns the Internal Print Server to the default settings. |
The password set here protects the settings. You will be asked for the password when you update or change the settings on each setting screen.
|
Items |
Explanations |
|
Old Password |
Input the old password. There is no default password. |
|
New Password |
Input the new password (up to 20 characters). |
|
Re-input Password |
Re-input the new password. |
|
SUBMIT button |
Update the changes. |
| Note: |
|
|
 Previous |
 Next |
| Version 1.00E, Copyright © 2001, SEIKO EPSON CORPORATION |