|

Reference Guide
|
|
How To / Installing and Removing Options
Interface Cards
 Installing an interface card
 Removing an interface card
This section describes how to install an optional interface card into the Type B interface slot.
Installing an interface card
Follow the instructions below to install an optional interface card.
 |
Caution:
|
 |
Before you install the interface card, be sure to discharge any static electricity by touching a grounded piece of metal. Otherwise, you may damage static-sensitive components.
|
 |
Turn off the printer.
|
 |
Unplug the printer's power cord from the electrical outlet.
|
 |
Unpack the interface card and remove all protective materials.
|
 |
Face the rear of the printer.
|
 |
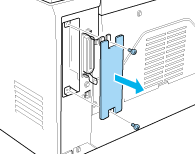
Remove the two screws that secure the interface slot cover and remove the cover.
|

 |  |
Caution
|
 |  | -
Make sure that the printer is turned off.
|
 |  | -
Remove only two screws attaching the right side cover.
|
 |  |
Warning:
|
 |  | -
Removing other screws and covers will expose high voltage areas.
|
 |  | -
Be careful when working inside the printer as some components are sharp and may cause injury.
|
 |
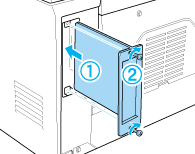
Slide the interface card into the grooves of the interface slot, as shown below. Push the card in firmly to lock it into place. Then secure the card with the two retaining screws.
|

 |
Plug the printer's power cord back into the electrical outlet.
|
 |
Turn on the printer.
|
To verify that the card is correctly installed, print a status sheet. See Printing a Status Sheet to print a status sheet.
If the installed interface is not shown on the status sheet, turn off the printer, unplug it, disconnect all interface cables, and review the steps above to make sure you installed the interface card correctly. If the installed interface still does not show up in the status sheet, contact your dealer or a qualified service representative for assistance.

[Top]
Removing an interface card
Follow the instructions below to remove the optional interface card:
 |
Turn off the printer.
|
 |
Unplug the printer's power cord from the electrical outlet.
|
 |
Face the rear of the printer.
|
 |
Remove the two screws that secure the interface card and slide the interface card out of the slot.
|
 |
Replace the interface slot cover and tighten it with its two retaining screws.
|
 |
Store the interface card in a safe place until you need to use it again.
|
 |
Plug the printer's power cord back into the electrical outlet.
|
 |
Turn on the printer.
|

[Top]
| Version 1.00E, Copyright © 2002, SEIKO EPSON CORPORATION |
Installing an interface card
Removing an interface card