|

Reference Guide
|
|
Setup & Maintenance / Installing Options
Adobe PostScript 3 Kit/P5C Emulation Kit
 Installing the ROM Module
 Removing the ROM module
The Adobe PostScript 3 Kit ROM module and P5C Emulation kit are available as an option for this printer. These modules allow your printer to print documents in the PostScript printing language and in the PCL5c printing language.
 |
Note:
|
 | |
The features provided by the Adobe PostScript 3 ROM Module cannot be used when the printer is connected to a Macintosh computer using an optional IEEE 1394 Type B Interface Card.
|
|
Installing the ROM Module
 |
Caution:
|
 | |
Before you install the ROM module, be sure to discharge any static electricity by touching a grounded piece of metal. Otherwise, you may damage static-sensitive components.
|
|
 |
Warning:
|
 | |
Be careful when working inside the printer as some components are sharp and may cause injury.
|
|
 |
Turn the printer off and unplug the power cord.
|

 |
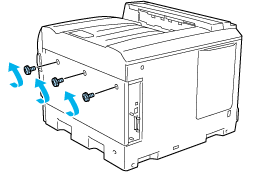
Remove the three screws from the cover on the right side of the printer.
|

 |
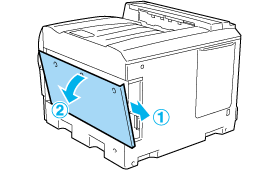
Slide the cover backward. Then tilt it toward you and remove it.
|

 |  |
Warning:
|
 |  | |
When you open the right side cover, be careful not to touch the areas surrounding the caution label on the circuit board since the areas may be very hot.
|
|
 |
Identify the ROM module slots.
|

* ROM module slots (A, B)
 |  |
Note:
|
 |  | |
There are two ROM slots, and either slot can be used to attach the ROM module.
|
|
 |
Confirm that the notch on the top edge of the ROM module matches the catch on the socket. Then insert the ROM module horizontally until it stops as shown below. If the ROM module is correctly installed, the catch on the socket fits the notch on the ROM module and the end of the socket sticks out as shown below.
|

 |  |
Caution:
|
 |  | -
Do not force the ROM module into the socket.
|
|
 |  | -
Be sure to insert the ROM module in the correct direction.
|
|
 |  | -
Never remove the ROM module installed on the standard ROM socket (P).
|
|
 |
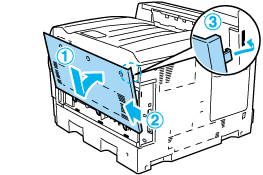
Reattach the cover to the right of the printer by inserting the three projections at the bottom of the cover to the notches on the printer, and then sliding the cover forward to firmly fit it to the printer. Make sure the projection at the top of the cover is inserted to the notch on the printer.
|

 |
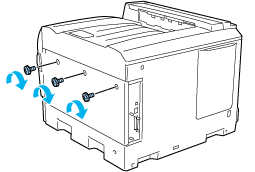
Secure the cover with the three screws.
|

 |
Reconnect the power cord and turn the printer on.
|
To confirm that the Adobe PostScript 3 ROM module or P5C emulation module is installed correctly, print a status sheet. See Printing a Status Sheet for instructions. If PS3 or P5C is not listed as an installed emulation on the status sheet, try reinstalling the module. Make sure that it is securely seated into the ROM slot on the circuit board.

[Top]
Removing the ROM module
Follow the steps below to remove the Adobe PostScript 3 ROM or P5C ROM module.
 |
Caution:
|
 | |
Before you remove the ROM module, be sure to discharge any static electricity by touching a grounded piece of metal. Otherwise, you may damage static-sensitive components.
|
|
 |
Warning:
|
 | |
Be careful when working inside the printer as some components are sharp and may cause injury.
|
|
 |
Turn the printer off and unplug the power cord.
|
 |
Perform the installation procedure in revers.
|

[Top]
| Version NPD0750-00, Copyright © 2004, SEIKO EPSON CORPORATION |
Installing the ROM Module
Removing the ROM module