|

Reference Guide
|
|
Setup & Maintenance / Installing Options
Hard Disk Drive
 Installing the Hard Disk Drive
 Removing the Hard Disk Drive
The optional Hard Disk Drive allows you to expand the printer's input buffer when the Ethernet interface is used, and gives you additional memory for graphics, form data, and faster multi-page, multi-output sorting.
Installing the Hard Disk Drive
Follow the steps below to install the Hard Disk Drive.
 |
Caution:
|
 | |
Before you install the Hard Disk Drive, be sure to discharge any static electricity by touching a grounded piece of metal. Otherwise, you may damage static-sensitive components.
|
|
 |
Warning:
|
 | |
Be careful when working inside the printer as some components are sharp and may cause injury.
|
|
 |
Turn the printer off and unplug the power cord.
|

 |
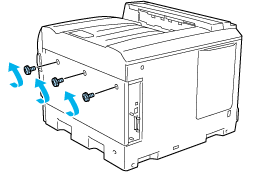
Remove the three screws from the cover on the right side of the printer.
|
 |
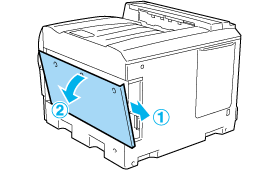
Slide the cover backward. Then tilt it toward you and remove it.
|
 |  |
Warning:
|
 |  | |
When you open the right side cover, be careful not to touch the areas surrounding the caution label on the circuit board since the areas may be very hot.
|
|
 |
Identify the connection socket for the Hard Disk Drive.
|
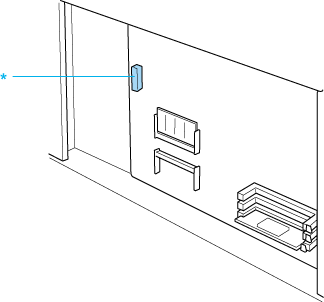
* Hard Disk Drive socket
 |
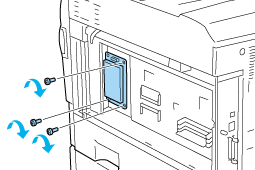
Secure the Hard Disk Drive with the three screws provided.
|
 |
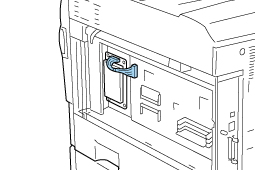
Plug the connection cable into both the socket on the HDD and that on the board as shown below.
|
 |
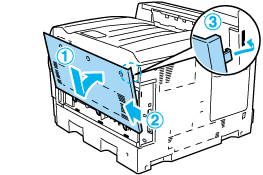
Reattach the cover to the right side of the printer by inserting the three projections at the bottom of the cover to the notches on the printer, and then sliding the cover forward to firmly fit it to the printer. Make sure the projection at the top of the cover is inserted to the notch on the printer.
|
 |
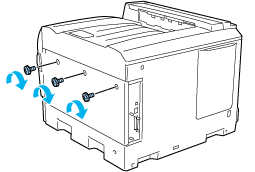
Secure the cover with the three screws.
|
 |
Reconnect the power cord and turn the printer on.
|
To confirm that the Hard Disk Drive is installed correctly, prints a status sheet. See Printing a Status Sheet. If the drive is not listed on the status sheet, try reinstalling the drive. Make sure that the connector on the Hard Disk Drive is securely connected to the socket on the circuit board.
 |
Note for Windows users:
|
 | |
If you are using Windows, and EPSON Status Monitor 3 is not installed, you have to make settings manually in the printer driver. See Making Optional Settings.
|
|
 |
Note for Macintosh users:
|
 | |
When you have attached or removed printer options, you need to delete the printer using Print Setup Utility (for Mac OS X 10.3), Print Center (for Mac OS X 10.2 or below), or Chooser (for Mac OS 9), and then re-register the printer.
|
|

[Top]
Removing the Hard Disk Drive
Follow the steps below to remove the Hard Disk Drive.
 |
Caution:
|
 | |
Before you remove the Hard Disk Drive, be sure to discharge any static electricity by touching a grounded piece of metal. Otherwise, you may damage static-sensitive components.
|
|
 |
Warning:
|
 | |
Be careful when working inside the printer as some components are sharp and may cause injury.
|
|
 |
Turn the printer off and unplug the power cord.
|
 |
Perform the installation procedure in reverse.
|

[Top]
| Version NPD0750-00, Copyright © 2004, SEIKO EPSON CORPORATION |
Installing the Hard Disk Drive
Removing the Hard Disk Drive