|

Reference Guide
|
|
How to / Using Options
Memory Module
 Installing a memory module
 Removing a memory module
Increasing the printer's memory allows you to print complex or graphics-intensive documents. You can increase printer memory up to 1 GB by installing optional Dual In-line Memory Modules (DIMMs).
This printer has two DIMM slots, but one slot has a 64 MB DIMM already installed in it at the time of manufacture. To increase printer memory to its maximum of 1 GB, you have to purchase two 512 MB DIMMs and remove the original 64 MB DIMM.
You can purchase DIMMs from various vendors. Be sure they meet the following requirements.
|
DRAM type
|
Synchronous Dynamic RAM Dual In-line Memory Module (SDRAM DIMM)
|
|
Memory size
|
64, 128, 256, or 512 MB
|
|
Type
|
168-pin type, 64 bit, with SPD*
|
|
Clock frequency
|
100 MHz or higher (10 ns or less)
|
|
CAS Latency
|
CL=2
|
|
Height
|
Less than 40 mm
|
 |
* SPD stands for Serial Presence Detect, a chip residing on the memory module that contains information about the size, speed, and other specifications of the memory as well as manufacturer information that can be retrieved by the motherboard through electronic signals.
|
 |
Note:
|
 |
The total printer memory is the standard 64 MB plus the optional DIMM. For example, if you install an optional 32 MB DIMM, the total printer memory is 96 MB.
|
Installing a memory module
Follow these steps to install an optional memory module.
 |
Caution:
|
 |
Before you install a memory module, be sure to discharge any static electricity by touching a grounded piece of metal. Otherwise, you may damage static-sensitive components.
|
 |
Warning:
|
 |
Be careful when working inside the printer as some components are sharp and may cause injury.
|
 |
Make sure the printer is not turned on, and that the power cord is unplugged.
|
 |
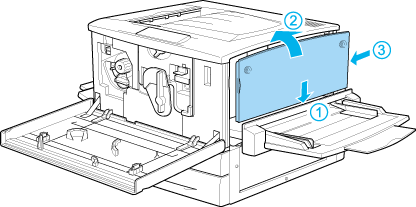
Prepare the printer as shown below to access the DIMM slots.
|


 |
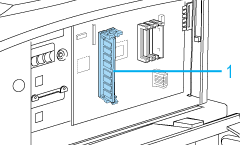
Identify the DIMM slots.
|

1. DIMM slots
 |
Insert the DIMM into either slot. The two clips lock onto the DIMM.
|


 |  |
Caution:
|
 |  | -
Do not force the DIMM into the slot.
|
 |  | -
Be sure to insert the DIMM facing the correct way.
|
 |  | -
You should not remove any modules from the circuit board. Otherwise, the printer will not work.
|
 |
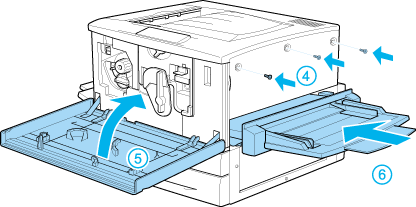
Return the printer to its original state as shown below.
|


 |
Plug the printer's power cord into an electrical outlet.
|
 |
Turn on the printer.
|

[Top]
Removing a memory module
Follow these steps to remove a memory module:
 |
Caution:
|
 |
Before you remove a memory module, be sure to discharge any static electricity by touching a grounded piece of metal. Otherwise, you may damage static-sensitive components.
|
 |
Warning:
|
 |
Be careful when working inside the printer as some components are sharp and may cause injury.
|
 |
Access the circuit board as shown below.
|


 |
Push the clips on each side of the slot outward to release the memory module.
|
 |
Grasp both sides of the memory module and pull the module out.
|
 |  |
Caution:
|
 |  |
You should not remove any other modules from the circuit board. Otherwise, the printer will not work.
|
 |
Store the memory module in an anti-static packet such as the one it came packaged in.
|
 |
Complete the procedure as shown below.
|


[Top]
| Version 1.00E, Copyright © 2002, SEIKO EPSON CORPORATION |
Installing a memory module
Removing a memory module