|

Reference Guide
|
|
How to / Using Options
Hard Disk Drive
 Installing the Hard Disk Drive
Reformatting the Hard Disk Drive
Removing the Hard Disk Drive
The optional Hard Disk Drive (C12C823921) allows you to expand the printer's receive buffer when the Ethernet interface is used, and print complex and large print jobs at high speed.
Installing the Hard Disk Drive
Follow these steps to install the optional Hard Disk Drive:
 |
Caution:
|
 |
Before you install the Hard Disk Drive, be sure to discharge any static electricity by touching a grounded piece of metal. Otherwise, you may damage static-sensitive components.
|
 |
Warning:
|
|
Be careful when working inside the printer as some components are sharp and may cause injury.
|
 |
Make sure the printer is not turned on, and that the power cord is unplugged.
|
 |
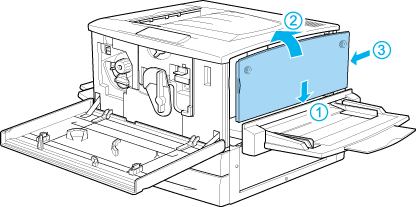
Prepare the printer as shown below to access the Hard Disk Drive socket.
|


 |
Identify the Hard Disk Drive socket.
|
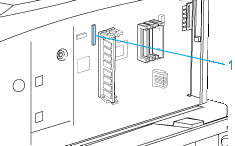
1. socket
 |
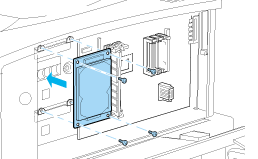
Install the Hard Disk Drive securely with the screws.
|
| |
Caution:
|
| |
You should not remove any modules from the circuit board. Otherwise, the printer will not work.
|
 |
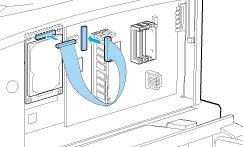
Connect the two connectors of the cable as shown below.
|
 |
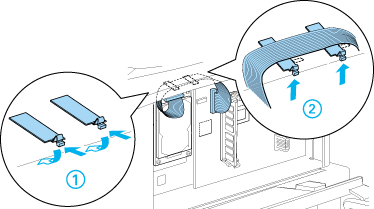
Lower the two clamps to insert the cable, then raise the clamps.
|
 |
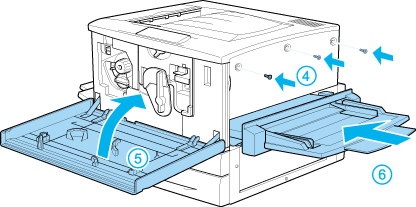
Return the printer to its original state, as shown below.
|
 |
Plug the printer's power cord into an electrical outlet.
|
 |
Turn on the printer.
|
Making Hard Disk Drive settings
If you are using Windows, follow these steps to make sure that the disk drive is correctly recognized by the printer driver.
|
|
Click the Optional Settings tab.
|
|
|
Select the Update the Printer Option Info Manually button, then click the Settings button. The Optional Settings dialog box opens.
|
|
|
Select the HDD Unit check box.
|
|
|
Click OK.
|

[Top]
Reformatting the Hard Disk Drive
To reformat the Hard Disk Drive, follow the instructions below.
|
|
Make sure the printer is off. Disconnect the all interface cables.
|
|
|
Hold down the  Down button while you turn on the printer. Down button while you turn on the printer.
|
|
|
Press the Down button a few times until HDD format appears on the LCD panel, then press the  Enter button to format the Hard Disk Drive. Enter button to format the Hard Disk Drive.
|
 |
Note:
|
| -
After reformatting the Hard Disk Drive, the printer will automatically reboot.
|
| -
When you want to erase only the fonts installed from the optional Adobe PostScript 3 (PS3), follow steps 1 through 3 above. Select PS3 HDD Init when the optional Adobe PostScript 3 Rom module is installed.
|
| -
Other fonts installed from PS3 will also be erased.
|
| -
When installing a Hard Disk Drive from a different printer, reformat it with this function.
|
[Top]
Removing the Hard Disk Drive
Follow these steps to remove the Hard Disk Drive:
|
Caution:
|
|
Before you remove the Hard Disk Drive, be sure to discharge any static electricity by touching a grounded piece of metal. Otherwise, you may damage static-sensitive components.
|
|
Warning:
|
|
Be careful when working inside the printer as some components are sharp and may cause injury.
|
|
|
Access the Hard Disk Drive as shown below.
|
|
|
Loosen and remove the retaining screws with a cross-head screwdriver, then remove the shield plate on the Hard Disk Drive.
|
|
|
Grasp both sides of the Hard Disk Drive and pull it out of the socket.
|
|
|
Reattach the shield plate to the circuit board and secure it with the retaining screws.
|
|
|
Complete the procedure as shown below.
|
[Top]
| Version 1.00E, Copyright © 2002, SEIKO EPSON CORPORATION |


