|

Reference Guide
|
|
How to / Using Options
Adobe PostScript 3 ROM Module
 Installing the Adobe PostScript 3 ROM module
 Removing the Adobe PostScript 3 ROM module
In some locations, the Adobe PostScript 3 Kit (C12C83249 ) ROM module is available as an option. This module allows your printer to print documents in the PostScript printing language.
 |
Note:
|
 |
The Adobe PostScript 3 ROM Module cannot be used for a Macintosh connected with the IEEE 1394 Type B Interface Card.
|
Installing the Adobe PostScript 3 ROM module
Follow these steps to install the optional Adobe PostScript 3 ROM module:
 |
Caution:
|
 |
Before you install the ROM module, be sure to discharge any static electricity by touching a grounded piece of metal. Otherwise, you may damage static-sensitive components.
|
 |
Warning:
|
 |
Be careful when working inside the printer as some components are sharp and may cause injury.
|
 |
Note:
|
 |
The optional ROM modules that expand your printer's features differ, depending on the country of purchase.
|
 |
Make sure the printer is not turned on, and that the power cord is unplugged.
|
 |
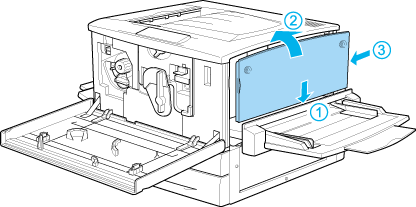
Prepare the printer as shown below.
|


 |
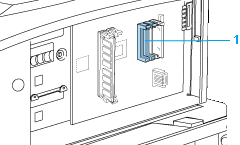
Identify the ROM slots.
|

1. ROM slots
 |
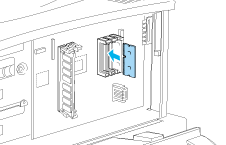
Insert the module firmly into slot A or B, as shown below.
|

 |  |
Caution:
|
 |  | -
Do not force the ROM module into the slot.
|
 |  | -
Be sure to insert the module facing the correct way.
|
 |  | -
You should not remove any modules from the circuit board. Otherwise, the printer will not work.
|
 |
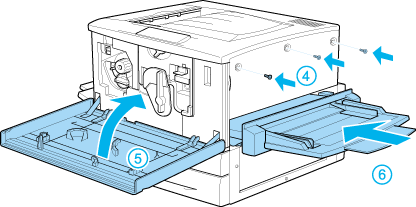
Return the printer to its original state as shown below.
|


 |
Plug the printer's power cord into an electrical outlet.
|
 |
Turn on the printer.
|

[Top]
Removing the Adobe PostScript 3 ROM module
Follow these steps to remove the Adobe PostScript 3 ROM module:
 |
Caution:
|
 |
Before you remove the ROM module, be sure to discharge any static electricity by touching a grounded piece of metal. Otherwise, you may damage static-sensitive components.
|
 |
Warning:
|
 |
Be careful when working inside the printer as some components are sharp and may cause injury.
|
 |
Access the circuit board as shown below.
|


 |
Push down on the X tab on the left of the ROM slot until the ROM module is detached from the slot.
|
 |  |
Caution:
|
 |  |
You should not remove any other modules from the circuit board. Otherwise, the printer will not work.
|
 |
Pull the ROM module out of the slot.
|
 |
Complete the procedure as shown below.
|


[Top]
| Version 1.00E, Copyright © 2002, SEIKO EPSON CORPORATION |
Installing the Adobe PostScript 3 ROM module
Removing the Adobe PostScript 3 ROM module
) ROM module is available as an option. This module allows your printer to print documents in the PostScript printing language.