|

Reference Guide
|
|
How to / Using Options
Duplex Unit
 Installing the Duplex Unit
Removing the Duplex Unit
The optional Duplex Unit (C12C813881) allows you to automatically print on both sides of paper.
The Duplex Unit consists of three components, namely, the output guide, the inverter, and the main unit. The illustration below shows all the items packed together with the Duplex Unit (except the printer).
1. output guide
2. inverter
3. main unit

|

|

|
|
screws (two)
|
connector cover
|
metal plate
|
Installing the Duplex Unit
Follow these steps to install the optional Duplex Unit:
 |
Make sure the printer is not turned on, and unplug the power cord if it is plugged into an electrical outlet.
|
 |
Remove the face-up tray from the printer.
|
 |
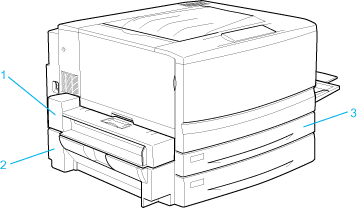
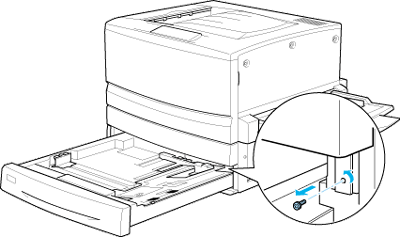
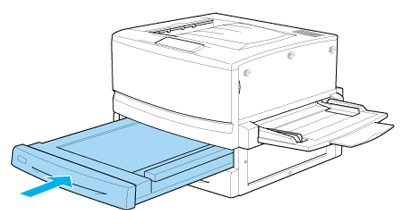
Pull out the standard lower cassette to remove the screw.
|
 |  |
Note:
|
| |
Keep the screw in a safe place as you will need it when you remove the Duplex Unit.
|
 |
Remove the Duplex Unit slot cover and push the standard lower cassette back into the printer.
|
| |
Note:
|
| |
Keep the slot cover in a safe place as you will need to reattach it when you remove the Duplex Unit.
|
 |
Remove all the items that shipped with the Duplex Unit from its package.
|
 |
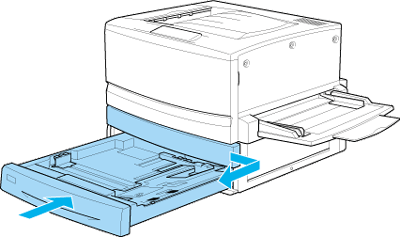
Insert the main unit all the way into the slot above the standard lower cassette.
|
 |
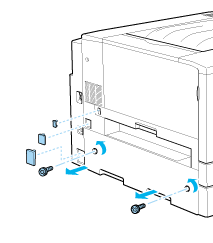
Remove the three small plastic pieces on the left side of the printer using the provided metal plate, then remove the two screws.
|
 |
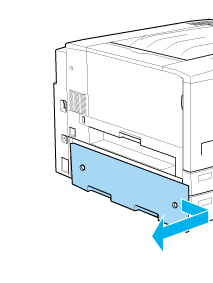
Remove the cover.
|
| |
Note:
|
| |
Keep the two smaller plastic pieces, the two screws, and the cover in a safe place.
|
 |
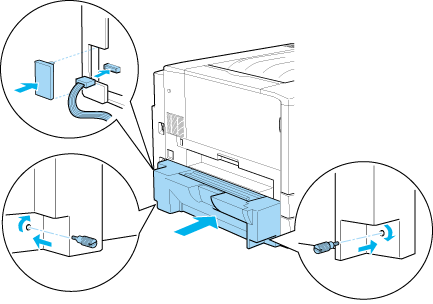
Fasten the inverter with the provided screws, then reattach the larger plastic piece removed in step 7 after attaching the cable to the connector.
|
 |
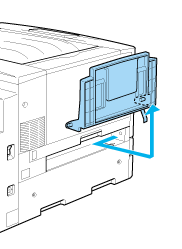
Attach the Duplex Unit output guide onto the printer as shown below, then connect the cable to the connector. Finally, conceal the connection using the provided connector cover.
|
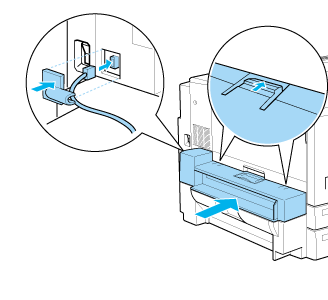
 |
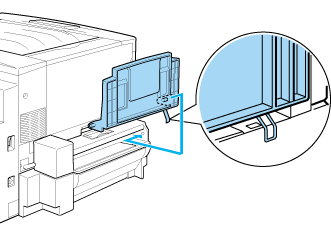
Attach the face-up tray onto the Duplex Unit output guide.
|
|  |
Caution:
|
| |
Do not insert the metal spring into the output slot or any holes in the printer case. Doing so may damage the face-up tray or your printer.
|
 |
Plug the printer's power cord into an electrical outlet.
|
 |
Turn on the printer.
|
To confirm that the Duplex Unit is installed correctly, print a status sheet. If the unit is not listed on the status sheet, make sure the electronic connectors connecting the Duplex Unit to the printer are connected securely.

[Top]
Removing the Duplex Unit
Follow these steps to remove the Duplex Unit:
|
|
Make sure the printer is not turned on, and unplug the power cord if it is plugged into an electrical outlet.
|
|
|
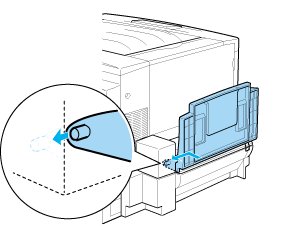
Remove the face-up tray from the Duplex Unit output guide on the left side of the printer.
|
|
|
Remove the connector cover and disconnect the cable of the Duplex Unit output guide from the connector on the printer. Then remove the Duplex Unit output guide.
|
|
|
Remove the plastic piece and disconnect the cable of the inverter from the connector on the printer. Then loosen the two screws to remove the inverter.
|
|
|
Reattach the cover (removed and stored during installation) with the screws, then reattach the three small plastic pieces.
|
|
|
Remove the main unit of the Duplex Unit from the front of the printer.
|
|
|
Reattach the Duplex Unit slot cover and fasten it with the screw removed and stored during the installation procedure.
|
| |
Note:
|
| |
You have to pull out the standard lower cassette to be able to fasten the screw.
|
|
|
Reattach the face-up tray to the left side of the printer.
|
|
|
Plug the printer's power cord into an electrical outlet.
|
|
|
Turn on the printer.
|
[Top]
| Version 1.00E, Copyright © 2002, SEIKO EPSON CORPORATION |