|

Reference Guide
|
|
How to / Using Options
Large Capacity Paper Unit
 Installing the Large Capacity Paper Unit
 Removing the Large Capacity Paper Unit
You can increase the printer's paper-feeding capacity by installing an optional lower cassette. The two optional lower cassettes that are specifically made for your printer are the 500-Sheet Paper Cassette Unit (C12C813871) and the Large Capacity Paper Unit (C12C813891). However, you can only install and use one option at a time.
-
The optional 500-Sheet Paper Cassette Unit accommodates one paper cassette and lets you load up to 500 sheets of paper.
-
The optional Large Capacity Paper Unit accommodates two paper cassettes, each holding up to 500 sheets of paper.
The following table summarizes the paper types and sizes that you can use with the Large Capacity Paper Unit and the 500-Sheet Paper Cassette Unit.
|
Paper Type
|
Paper Size
|
Capacity
|
|
Plain paper
|
A3, A4, B4, B5*
Letter (LT),
Legal (LG),
Executive (EXE)*,
Ledger (B)
|
Up to 500 sheets in each cassette
(Total thickness:
less than 26 mm for one cassette)
|
|
EPSON Color Laser Paper
|
A3, A4, Letter (LT)
|
Up to 500 sheets in each cassette
|
|
EPSON Color Laser Coated Paper**
|
A3, A4
|
Up to 500 sheets in each cassette
|
 |
* Availability varies by country.
|
 |
** This media can be fed from this paper source only when Plain is selected as the Paper Type setting in the printer driver
|
 |
Caution:
|
 |
The optional 250-Sheet Paper Cassette A3W cannot be installed into the optional Large Capacity Paper Unit or the optional 500-Sheet Paper Cassette Unit. Attempting to force it into these units will damage the paper cassette and the unit.
|
 |
Note:
|
 | -
Load the short edge first for A3, B4, Legal, and Ledger (B) size paper.
|
 | -
Load paper with the printable surface facing down.
|
Handling precautions
Always pay attention to the following handling precautions before installing the option:
-
The Large Capacity Paper Unit weighs approximately 21.2 kg (47 lbs); always lift it with two or more people.
-
The 500-Sheet Paper Cassette Unit weighs approximately 14 kg (31 lbs); always lift it with two people.
-
When installing either unit on the printer, lock all casters at the bottom of the unit.
-
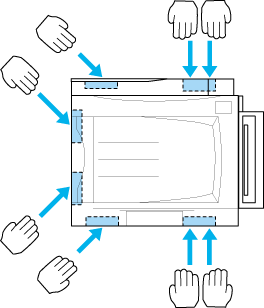
The printer weighs about 70 kg (154 lbs). One person should not lift or carry it. Four people should carry the printer, lifting it by the correct positions as shown below.
 |  |
Warning:
|
 |  |
If you lift the printer improperly, it may fall and injure you.
|
Installing the Large Capacity Paper Unit
The Large Capacity Paper Unit accommodates two paper cassettes. The installation procedure for the optional Large Capacity Paper Unit is the same as that for the 500-Sheet Paper Cassette Unit. The illustrations below show an optional Large Capacity Paper Unit with two paper cassettes.
Follow these steps to install the optional Large Capacity Paper Unit or the 500-Sheet Paper Cassette Unit:
 |
Make sure the printer is not turned on, and unplug the power cord if it is plugged into an electrical outlet.
|
 |
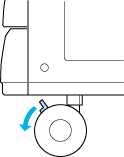
Lock all the casters at the bottom of the unit.
|
 |  |
Warning:
|
 |  |
You should lock all casters before installing the unit on the printer. Otherwise, the unit may move and cause an accident.
|
 |  |
Caution:
|
 |  |
You should remove the face-up tray located on the left side of the printer and fold up the MP tray located on the right side of the printer during the installation procedure. Otherwise, you may damage the trays.
|
 |
Lift the printer up.
|
 |  |
Warning:
|
 |  |
Four people should lift the printer by the correct positions as shown below.
|

 |
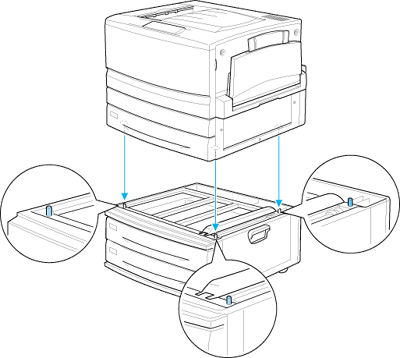
Lower the printer onto the unit. Fit the three pins into the holes in the printer.
|
 |
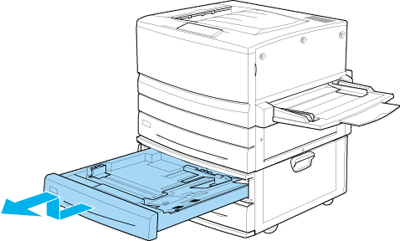
Pull out the upper paper cassette and remove it by lifting it up.
|
 |
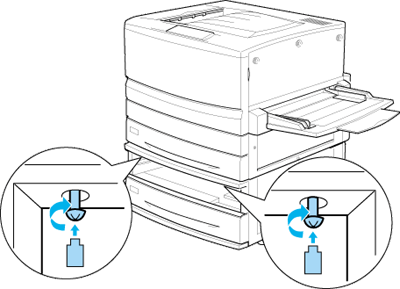
Tighten the two screws using the provided metal plate.
|
 |
Reinsert the upper paper cassette back into the unit.
|
 |
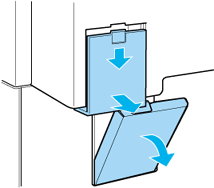
On the back of the printer, slide the upper cover down and open the lower cover.
|
 |
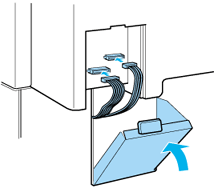
Connect the two sets of connectors respectively. Close the cover.
|
 |
Reattach the left connector cover.
|
 |
Plug the printer's power cord into an electrical outlet.
|
 |
Turn on the printer.
|
To confirm that the Large Capacity Paper Unit or the 500-Sheet Paper Cassette Unit is installed correctly, print a status sheet. If the unit is not listed on the status sheet, make sure the electronic connectors connecting the option to the printer are connected securely.

[Top]
Removing the Large Capacity Paper Unit
The removal procedure for the optional Large Capacity Paper Unit is the same as that for the 500-Sheet Paper Cassette Unit. The illustrations below show an optional Large Capacity Paper Unit with two paper cassettes.
Follow these steps to remove the Large Capacity Paper Unit or the 500-Sheet Paper Cassette Unit:
 |
Make sure the printer is not turned on, and unplug the power cord if it is plugged into an electrical outlet.
|
 |
Lock all casters at the bottom of the unit.
|
 |  |
Warning:
|
 |  |
You should lock all casters before removing the unit from the printer. Otherwise, the unit may move and cause an accident.
|
 |
Remove the left connector cover at the back of the printer by sliding it down, then open the right cover underneath.
|
 |
Disconnect the two cables from the connectors on the printer, then close the right cover and reattach the left connector cover.
|
 |
Remove the upper paper cassette from the unit.
|
 |
Loosen the two screws on the top of the slot to release the unit from the printer.
|
 |
Reinsert the upper paper cassette back into the unit.
|
 |
Gently lift up the printer until the holes on the bottom of the printer are free from the three pins on the top of the unit.
|
 |  |
Warning:
|
 |
Set the printer down on a stable and level surface.
|
 |
Reconnect all interface cables.
|
 |
Plug the printer's power cord into an electrical outlet.
|
 |
Turn on the printer.
|

[Top]
| Version 1.00E, Copyright © 2002, SEIKO EPSON CORPORATION |
Installing the Large Capacity Paper Unit
Removing the Large Capacity Paper Unit