|

Reference Guide
|
|
Setup & Maintenance / Installing Options
Interface Cards
 Removing an interface card
Your printer comes with a Type B interface slot. Various optional interface cards are available to expand your printer's interface options.
Follow these steps to install an optional interface card.
 |
Caution:
|
 | |
Before you install the interface card, be sure to discharge any static electricity by touching a grounded piece of metal. Otherwise, you may damage static-sensitive components.
|
|
 |
Turn the printer off and unplug the power cord and interface cable.
|
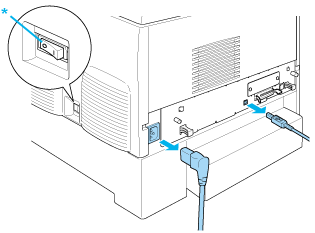
* OFF
 |
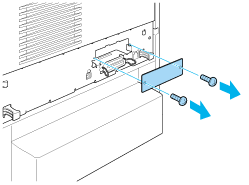
Remove the screws and the Type B interface card slot cover as shown below.
|
 |  |
Warning:
|
 |  | |
Removing screws and covers that are not described in the following instructions will expose high voltage areas.
|
|
 |  |
Note:
|
 |  | |
Keep the slot cover in a safe place. You will need to reattach it if you remove the interface card later.
|
|
 |
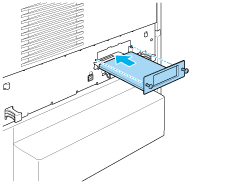
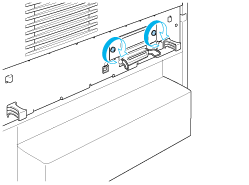
Slide and push the interface card into the slot firmly, then fasten the screw as shown below.
|
 |
Reconnect the interface cable and power cord and turn the printer on.
|
To confirm that the option is installed correctly, print a status sheet. See Printing a Status Sheet.
Removing an interface card
Follow these steps to remove an interface card:
 |
Caution:
|
 | |
Before you remove an interface card, be sure to discharge any static electricity by touching a grounded piece of metal. Otherwise, you may damage static-sensitive components.
|
|
 |
Turn the printer off and unplug the power cord.
|
 |
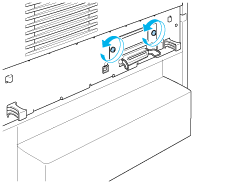
Remove the two screws securing the interface card to the back of the printer.
|
 |  |
Warning:
|
 |  | |
Removing screws that are not described in the following instructions will expose high voltage areas.
|
|
 |
Gently but firmly pull the interface card out of the socket.
|
 |
Reinstall the interface slot cover (removed and stored when the interface card was installed) over the now empty slot. Use the two screws to secure it.
|
 |
Keep the interface card in an anti-static packet such as the one it came packaged in.
|

[Top]
| Version NPD0167-01, Copyright © 2003, SEIKO EPSON CORPORATION |
Removing an interface card