|

Reference Guide
|
|
How To / Replacing Consumable Products
Developer Cartridge
According to the message on the LCD panel or the window of the EPSON Status Monitor 3 utility, replace the correct developer cartridge from the list below.
|
Developer Cartridge (Black)
Developer Cartridge (Yellow)
Developer Cartridge (Magenta)
Developer Cartridge (Cyan)
|
S050100
S050097
S050098
S050099
|
 |
Note:
|
Handling precautions
Always observe the following handling precautions when replacing developer cartridges.
-
Do not install used developer cartridges into the printer.
-
If you have moved a developer cartridge from a cool to a warm environment, wait for at least one hour before installing it to prevent damage from condensation.
 |
Warning:
|
 | -
Do not touch the toner. Keep the toner away from your eyes. If toner gets on your skin or clothes, wash it off with soap and water immediately.
|
|
 | -
Keep developer cartridges out of the reach of children.
|
|
 | -
Do not dispose of used developer cartridges in fire, as they may explode and cause injury. Dispose of them according to local regulations.
|
|
Replacing a developer cartridge
Follow these steps to replace a developer cartridge.
 |
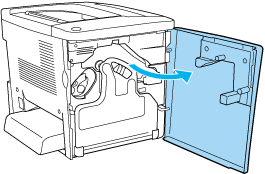
Open the front cover.
|
 |
Check the color of the developer cartridge that appears in the cartridge installment position.
|
The color displayed indicates the developer cartridge that needs to be replaced.
 |
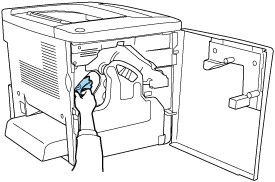
Put two fingers into the holes in front of the installed developer cartridge.
|
 |
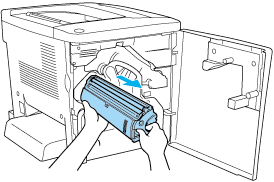
Pull the developer cartridge out of the slot.
|
 |
Take the new developer cartridge out of its package.
|

 |
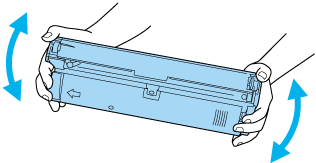
Gently shake the developer cartridge as shown below.
|
 |
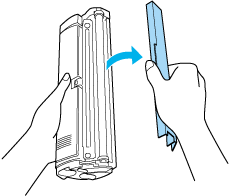
Remove the cover on the top of the new developer cartridge. Then, put the cover on the removed developer cartridge that you removed from the slot in step 4.
|
 |
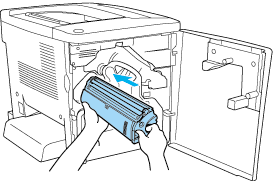
Insert the new developer cartridge all the way until it stops.
|
 |
Close the front cover.
|
If another cartridge needs to be replaced, the message Replace Toner X appears on the LCD panel after about 30 seconds. In this case, return to step1.
Replacing a developer cartridge before the end of its service life
Use the following procedure to replace a developer cartridge before the end of its service life.
 |
Make sure that Ready or Sleep is displayed in the LCD panel.
|
 |
Select Change Toner X (The letters C, M, Y, or K appear in place of X, indicating the colors Cyan, Magenta, Yellow, and Black.) in the Reset Menu on the control panel.
|
 |
While the cartridge X you selected above moves to the cartridge replacement position, Please Wait appears on the LCD panel.
|
 |
Replace Toner X appears in the LCD panel when the cartridge to be replaced reaches the cartridge replacement position.
|

[Top]
| Version 1.00E, Copyright © 2002, SEIKO EPSON CORPORATION |