|

Reference Guide
|
|
How To / Replacing Consumable Products
Photoconductor Unit
Prepare a new photoconductor unit for replacement when you see a message informing you to do so.
Handling precautions
Always observe the following handling precautions when replacing the photoconductor unit.
-
When replacing the photoconductor unit, avoid exposing it to room light any longer than necessary.
-
Be sure not to scratch the surface of the drum. Also, avoid touching the drum, since oil from your skin may permanently damage its surface and affect print quality.
-
To get the best print quality, do not store the photoconductor unit in an area subject to direct sunlight, dust, salty air, or corrosive gases (such as ammonia). Avoid locations subject to extreme or rapid changes in temperature or humidity.
 |
Warning:
|
 | -
Do not dispose of the used photoconductor unit in fire, as it may explode and cause injury. Dispose of it according to local regulations.
|
|
 | -
Keep the photoconductor unit out of the reach of children.
|
|
Replacing the photoconductor unit
Follow these steps to replace the photoconductor unit.
 |
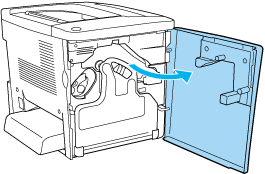
Open the front cover.
|
 |
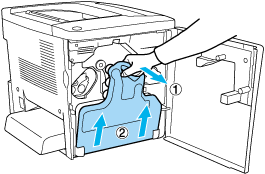
Tilt the waste toner collector and pull it out.
|
 |
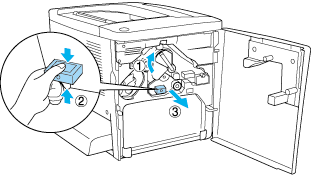
Turn the lever up to the unlocked position. Then, pull the green knob on the photoconductor unit with your finger to remove the photoconductor unit.
|
 |
Take the new photoconductor unit out of its package.
|
 |
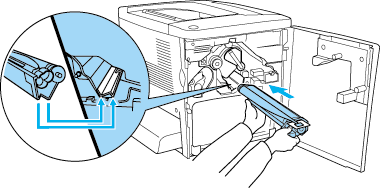
Insert the new photoconductor unit by aligning it with the guide rails.
|
 |
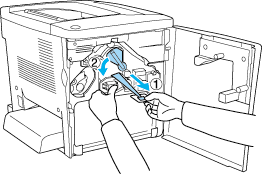
Pull out the yellow tag. Then, return the lever to the locked position.
|
 |
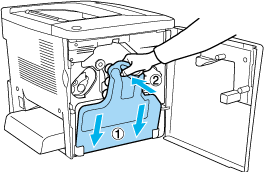
Put the removed waste toner collector back into the printer as shown below.
|
 |
Close the front cover.
|

[Top]
| Version 1.00E, Copyright © 2002, SEIKO EPSON CORPORATION |