|

Reference Guide
|
|
How to / Installing and Removing Options
Interface Card
 Installing an Interface Card
Removing an Interface Card
You can install an optional interface card to supplement your printer's built-in parallel and USB interfaces and provide added network compatibility. The EPSON interface card in the table below is compatible with your printer.
|
Model number
|
Name
|
|
C12C82391
|
Ethernet Interface Card
|
 |
Note:
|
 |
The asterisk () is a substitute for the last digit of the product number, which varies by country.
|
If you are unsure whether you need an optional interface or would like to know more about interfaces, contact your dealer.
Notes on Printing Methods Available on a Network
The following table lists the printing methods available on a network, depending on the OS used.
|
OS
|
Printing methods
|
|
Windows NT 4.0/2000
|
LPR, EpsonNet Direct Print
|
|
Windows 95/98/Me
|
EpsonNet Direct Print
|
|
Macintosh
|
AppleTalk
|
Printing is not supported on NetBEUI, IPX/SPX (NetWare), and IPP.
Use EpsonNet WebAssist to disable the NetBEUI and NetWare settings, as follows:
|
For NetBEUI:
|
Select Disable for the NetBEUI item on the NetBEUI screen.
|
|
For NetWare:
|
Select Disable for the NetWare item on the NetWare screen.
|
See "EpsonNet WebAssist" in Chapter 10 of Administrator's Manual shipped with C12C82391.
Restrictions on Using EpsonNet NDPS Gateway
EpsonNet NDPS Gateway does not come with your EPSON AcuLaser C1000 and C12C82391. However, if you already have EpsonNet NDPS Gateway, read the following restrictions.
EpsonNet NDPS Gateway creates Printer Agents automatically using EPSONPAP.NLM. These Printer Agents cannot be used. Therefore, be sure to delete them.
Printer Agents are created with the following names.
|
For IPX Printer Agent:
|
AL-C1000 and the last 6 digits of the MAC address
|
|
For LPR Printer Agent:
|
AL-C1000 and the last 6 digits of the MAC address@IP
|
See "Automatic Creation" in the EpsonNet NDPS Gateway Online Guide for more information on creating Public Access Printers automatically.
Installing an Interface Card
Follow these steps to install an optional interface card:
 |
Caution:
|
|
Before you install the interface card, be sure to discharge any static electricity by touching a grounded piece of metal. Otherwise, you may damage static-sensitive components.
|
|
Note:
|
|
Printing through a network requires more memory than other connections. Therefore, to increase the printer performance, increase the printer memory.
|
 |
Turn off the printer.
|
 |
Unplug the printer's power cord from the electrical outlet.
|
 |
Remove all interface cables from the interface connectors.
|
 |
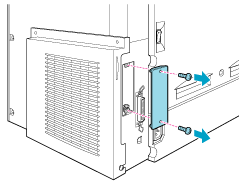
Remove the screws that secure the interface slot cover on the far left side of the printer and remove the cover.
|
| |
Note:
|
| |
Keep the slot cover in a safe place. You will need to reattach it if you remove the interface card later.
|
 |
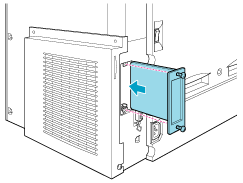
Slide and push the interface card into the slot firmly, making sure that the connector at the back of the interface card is fully inserted into the printer's internal socket.
|
 |
Secure the interface card by fastening the retaining screws.
|
 |
Reconnect all interface cables.
|
 |
Plug the printer's power cord into an electrical outlet.
|
 |
Turn on the printer.
|
To confirm that the interface card is installed correctly, print a status sheet. For details, see Printing a Status Sheet. If the interface is not listed on the status sheet, try reinstalling the card and making sure that the card is securely fastened to the socket on the printer.

[Top]
Removing an Interface Card
Follow these steps to remove an optional interface card:
|
Caution:
|
|
Before you remove an interface card, be sure to discharge any static electricity by touching a grounded piece of metal. Otherwise, you may damage static-sensitive components.
|
|
|
Turn off the printer.
|
|
|
Unplug the printer's power cord from the electrical outlet.
|
|
|
Remove all interface cables from the interface connectors.
|
|
|
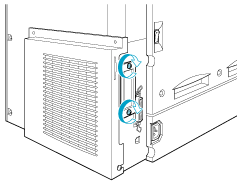
Remove the screws that secure the interface card.
|

|
|
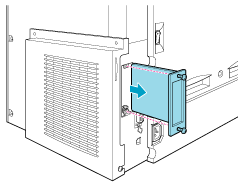
Gently but firmly pull the interface card out until it is released from the printer's internal socket.
|
|
|
Replace the interface slot cover (removed when the interface card was installed) over the now empty slot. Use the two screws to secure it.
|
|
|
Keep the interface card in an anti-static packet such as the one it came packaged in.
|
|
|
Reconnect all interface cables.
|
|
|
Plug the printer's power cord into an electrical outlet.
|
 |
Turn on the printer.
|
[Top]
| Version 1.00E, Copyright © 2002, SEIKO EPSON CORPORATION |

