|

Reference Guide
|
|
How to / Installing and Removing Options
Duplex Unit
 Installing the Duplex Unit
 Removing the Duplex Unit
The optional Duplex Unit (C813471) allows you to print on both sides of paper (A4/LT) automatically.
To install the Duplex Unit, see the following section or the manual for this option.
 |
Note:
|
 |
Duplex printing requires more memory than other types of printing. Therefore, to increase the printer performance, increase the printer memory.
|
Installing the Duplex Unit
Follow these steps to install the optional Duplex Unit:
 |
Turn off the printer.
|
 |
Unplug the printer's power cord from the electrical outlet.
|
 |
Remove all interface cables from the interface connectors.
|
 |
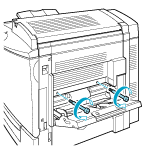
Face the right side of the printer and remove the screws on the right side cover.
|
 |
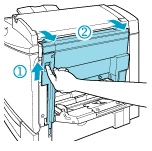
Open the printer's right cover.
|
 |
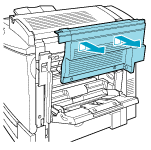
Remove the right side cover from the printer, then push in the printer's side until it clicks closed.
|
 |  |
Note:
|
 |  | -
The cover cannot be removed if the printer's right cover is closed.
|
 |  | -
Keep the right side cover and the two screws in a safe place as you will need them when you remove the Duplex Unit.
|
 |
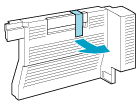
Unpack the Duplex Unit and remove the tape that keeps the cover of the unit in place.
|
 |
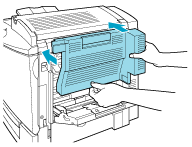
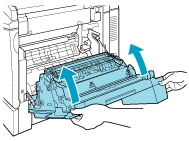
Lift the Duplex Unit with both hands and fit it onto the right side of the printer, making sure that the fit is snug and that the electronic connectors snap into place.
|
 |  |
Note:
|
 |  |
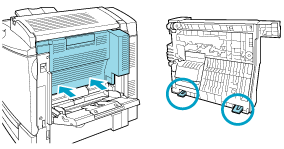
When you install the Duplex Unit, press the back of the unit firmly at the location indicated by the arrow to confirm that the hooks are fully inserted into the printer. Improper installation could cause paper jams.
|
 |
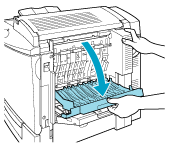
Open the cover of the unit.
|
 |  |
Caution:
|
 |  | -
Be sure to hold the unit in place with one hand while opening the cover. The unit is heavy and may slip off the side of the printer before it is fastened with screws.
|
 |  | -
The MP tray has to be open to be able to open the cover of the Duplex Unit.
|
 |
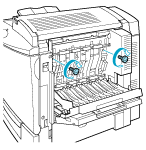
Fasten the unit with the two screws provided with the unit.
|
 |  |
Caution:
|
 |  |
The unit is heavy and may slip off the side of the printer before the screws are fastened. To be safe, have someone hold the unit in place for you while you fasten the screws.
|
 |
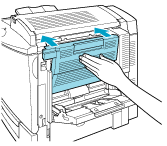
Close the cover of the unit.
|
 |
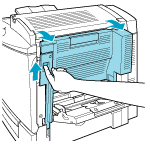
Open the printer's right cover.
|
 |
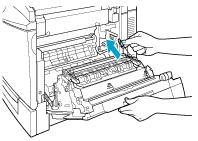
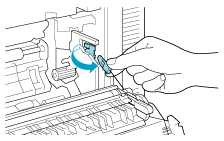
Pull out the small plastic piece that is attached to a self-retrieving string on the right side of the Duplex Unit.
|
 |
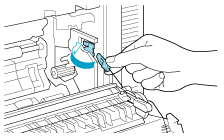
Attach the plastic piece onto the hook on the side, as shown below.
|
 |
Gently close the printer's right cover.
|
 |
Reconnect all interface cables.
|
 |
Plug the printer's power cord into an electrical outlet.
|
 |
Turn on the printer.
|
To confirm that the Duplex Unit is installed correctly, print a status sheet. For details, see Printing a Status Sheet. If the unit is not listed on the status sheet, make sure that the electronic connectors connecting the Duplex Unit to the printer are connected securely.
 |
Note:
|
 |
Keep the packaging materials in case you want to ship the Duplex Unit in the future.
|

[Top]
Removing the Duplex Unit
Follow these steps to remove the Duplex Unit:
 |
Turn off the printer.
|
 |
Unplug the printer's power cord from the electrical outlet.
|
 |
Remove all interface cables from the interface connectors.
|
 |
Open the printer's right cover.
|

 |
Unhook the plastic piece from the side of the printer, then close the right cover.
|
 |
Open the cover of the Duplex Unit.
|

 |  |
Caution:
|
 |  |
The MP tray has to be open to be able to open the cover of the Duplex Unit.
|
 |
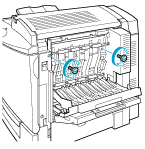
Remove the two screws.
|
 |  |
Caution:
|
 |  |
The unit is heavy and may slip off the side of the printer after the screws are removed. To be safe, have someone hold the unit in place as you remove the screws.
|
 |  |
Note:
|
 |  |
Keep the two screws with the Duplex Unit because you will need them to reinstall the unit.
|
 |
Close the cover of the Duplex Unit.
|

 |
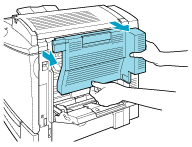
Gently pull the Duplex Unit off the side of the printer while lifting up the unit slightly, taking care not to bend the electronic connectors.
|
 |
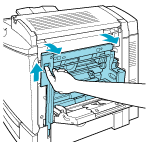
Open the printer's right cover.
|
 |
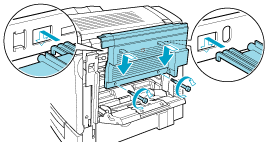
Reattach the original right side cover with the screws that came with the printer.
|
 |  |
Note:
|
 |  |
The cover cannot be attached if the printer's right cover is closed.
|
 |
Reconnect all interface cables.
|
 |
Plug the printer's power cord into an electrical outlet.
|
 |
Turn on the printer.
|

[Top]
| Version 1.00E, Copyright © 2002, SEIKO EPSON CORPORATION |
Installing the Duplex Unit
Removing the Duplex Unit