|

User's Guide
|
|
Maintenance and Transportation
Transporting the Printer
 Over a long distance
Over a short distance
Setting up the printer after transporting it
Over a long distance
If you need to transport your printer over a long distance, repack the printer using the original box and packing materials.
To repack the printer, follow the steps below.
 |
First turn off the printer and make sure the print heads are in the home (far right) position. If not, turn the printer back on, wait until the print heads move to the home position, then turn off the printer.
|
 |
Remove the following parts.
|
-
Optional Auto Take-Up Reel Unit (if installed)
-
Optional Manual Cutter Unit (if installed)
 |
Raise the ink levers.
|
You can choose whether to remove the ink cartridges. Regardless of your choice, you must keep the ink levers raised when transporting the printer; otherwise, ink may leak from the printer.
 |
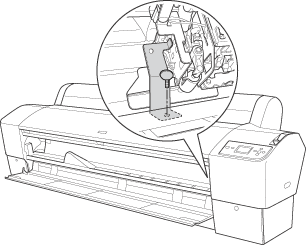
Make sure the print head is in the home (far right) position.
|
 |
Install the metal plate and tighten the screw to lock the print head.
|

[Top]
Over a short distance
When you need to move the printer a short distance, follow the steps below.
|
|
First turn off the printer and make sure the print heads are in the home (far right) position. If not, turn the printer back on, wait until the print heads move to the home position, then turn off the printer.
|
|
|
Remove the following parts:
|
-
Optional Auto Take-Up Reel Unit (if installed)
-
Optional Manual Cutter Unit (if installed)
|
|
Raise the ink levers.
|
You can choose whether to remove the ink cartridges. Regardless of your choice, you must keep the ink levers raised when transporting the printer; otherwise, ink may leak from the printer.
|
|
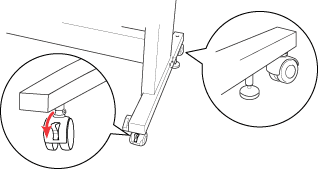
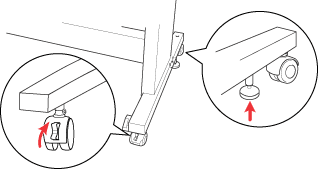
Make sure that the casters at the base unit are locked, and that the stabilizer knobs of the base unit are extended to the floor.
|
 |  |
Note:
|
| | |
Place the casters sideways and lock them so they will not move.
|
|
|
|
Remove the left and right side wing nuts. Keep them in a safe place.
|
 |
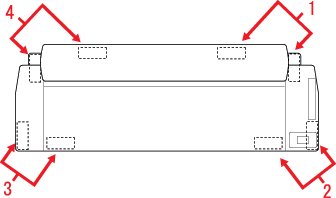
For Stylus Pro 9800/9400 users:
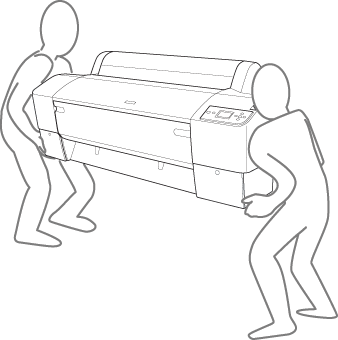
Have four or more people lift the printer unit off of the base unit, using the eight hand grips shown below. The printer unit weighs approximately 90 kg (198 lb) and should be lifted carefully.
For Stylus Pro 7800/7400 users:
Have two or more people lift the printer unit off of the base unit, using the four hand grips shown below. The printer unit weighs approximately 49 kg (107.8 lb) and should be lifted carefully.
|
for Stylus Pro 9800/9400

for Stylus Pro 7800/7400
 |
Move the printer horizontally.
|
When you set up the printer and perform a nozzle check and realign the print heads after transporting, see Setting up the printer after transporting it.
To move the printer using casters
When you want to transport the printer a very short distance such as within the same room, you can slide the printer on its casters.
 |
Caution:
|
| |
Do not slide the printer on angled or uneven surfaces.
|
|
|
|
Make sure that the power cord, interface cable, roll paper spindles and sheet media are removed, and the roll paper cover and front cover are closed.
|
| |
Note:
|
| | |
If you only need to transport your printer a very short distance using the casters, you do not need to remove the ink cartridges.
|
|
|
|
Fully insert the upper hooks and put up the lower shafts as shown below.
|
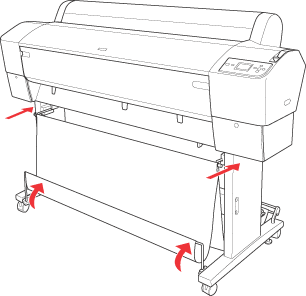
|
|
Release the front casters and retract the stabilizer knobs.
|
|
|
Move the printer to the place of use carefully. Relock the casters and extend the stabilizer knobs after moving.
|
[Top]
Setting up the printer after transporting it
The steps you need to take to set up the printer after transporting it are almost identical to the steps carried out the first time you set up the printer. When you set up the printer again, see the Unpacking and Setup Guide, and note the following points.
-
Do not forget to remove any protective materials.
-
The first time you start printing after transporting the printer, or if you have not turned on the printer for a long time, the print head nozzles may be clogged. Epson recommends that you perform a nozzle check and clean the print head, and also realign the print head to ensure print quality.
To perform a nozzle check using the control panel, see Checking the print head nozzles.
To perform a nozzle check using the printer software, see Checking the print head nozzles for Windows, Checking the print head nozzles for Mac OS 9.x, or Checking the print head nozzles for Mac OS X.
To clean the print head using the control panel, press the Menu  button for 3 seconds.
To clean the print head using the printer software, see Cleaning the print head for Windows, Cleaning the print head for Mac OS 9.x, or Cleaning the print head for Mac OS X.
To realign the print head using the control panel, see Aligning the print head.
To realign the print head using the printer software, see Aligning the print head for Windows, Aligning the print head for Mac OS 9.x, or Aligning the print head for Mac OS X.
[Top]
| Version NPD1450-00, Copyright © 2005, SEIKO EPSON CORPORATION |
