|

User's Guide
|
|
Printing with Windows
Using the Printer Utilities
 Checking the print head nozzles
 Cleaning the print head
 Aligning the print head
 Using Printer and Option Information
 Starting EPSON LFP Remote Panel
 Making the Speed & Progress settings
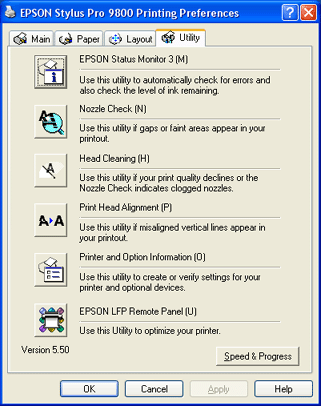
The EPSON printer utilities let you check the current printer status and perform printer maintenance from your screen.

 |
Note:
|
 | -
The letter in parentheses after the utility name indicates the shortcut key for that utility. Press ALT and the letter on the keyboard to open that utility.
|
|
 | -
Do not use the Nozzle Check, Head Cleaning, or Print Head Alignment utilities if your printer is connected to your computer through a network.
|
|
 | -
Do not use the Nozzle Check, Head Cleaning, or Print Head Alignment utilities while printing is in progress; otherwise, your printout may be marred.
|
|
EPSON Status Monitor 3
This utility provides you with printer status information, such as the amount of ink remaining, the free space of the maintenance tank, and it also checks for printer error.
 |
Note:
|
 | |
This utility is available when your system is configured to support bi-directional communication.
|
|
Nozzle Check
This utility checks the print head nozzles for clogging. Check the nozzles when you notice the print quality has declined and after cleaning to confirm that the print head nozzles have been cleaned. See Checking the print head nozzles.
If you click Auto in the Nozzle Check dialog box, or turn on AUTO CLEANING from the control panel on the printer, this utility not only checks the clogging nozzles, but also performs head cleaning automatically.
Head Cleaning
This utility cleans the print head. You may need to clean the print head if you notice the print quality has declined. Use this utility to perform head cleaning. See Cleaning the print head.
Print Head Alignment
This utility can be used to improve the print quality of your printed data. The alignment of the print head may need to be adjusted if vertical lines appear out of alignment or if white or black banding noise appear in your printed data. Use this utility to realign the print head. See Aligning the print head.
Printer and Option Information
This function enables the printer driver to check the printer configuration information. You can check or select the black ink set on the printer. See Using Printer and Option Information.
 |
Note:
|
 | |
This function is supported by EPSON Stylus Pro 9800/7800 only.
|
|
EPSON LFP Remote Panel
This utility lets you optimize your printer. See Starting EPSON LFP Remote Panel.
Checking the print head nozzles
If you find that the printed data is unexpectedly faint or dots in the printed data are missing, you may be able to identify the problem by using the Nozzle Check utility.
To use the Nozzle Check utility, follow the steps below.
 |
Note:
|
 | |
Do not start the Nozzle Check utility while printing is in progress; otherwise, your printout may be marred.
|
|
 |
Make sure paper is loaded in the printer.
|
 |
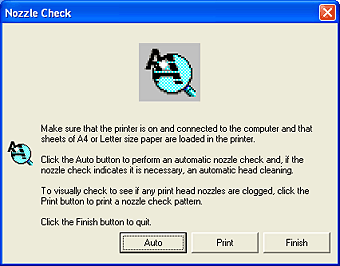
Click Nozzle Check.
|
 |
Click Print if you want to visually check if any print head nozzles are clogged, if you are using non-Epson special media, or if the width of paper you are using is less than 210 mm. Click Auto if you want to perform an automatic nozzle check, and if the nozzle check indicates it is necessary.
|

 |  |
Note:
|
 |  | |
If you turn on AUTO CLEANING from the control panel on the printer even though Print has been selected, the Nozzle Check utility not only checks for the clogged nozzles, but also performs head cleaning automatically. If you are using non-Epson special media, or if the width of paper you are using is less than 210 mm, turn off AUTO CLEANING from the control panel on the printer.
|
|
 |
Follow the on-screen instructions to print a nozzle check pattern.
|
If you find missing dots, clean the print head nozzle. See Cleaning the print head.

[Top]
Cleaning the print head
If you find that the printed data is unexpectedly faint or dots in the printed data are missing, you may be able to solve these problems by using the Head Cleaning utility to clean the print head, which ensures that the nozzles are delivering ink properly.
To use the Head Cleaning utility, follow the steps below.
 |
Note:
|
 | -
Do not start the Head Cleaning utility while printing is in progress; otherwise, your printout may be marred.
|
|
 | -
To save ink, use the Nozzle Check utility first to confirm that the print head needs to be cleaned. This is because the cleaning process consumes some ink.
|
|
 | -
When the ink check light is flashing or on, you cannot clean the print head. Replace the appropriate ink cartridge first. See Replacing Ink Cartridges.
|
|
 |
Make sure the printer is turned on and the ink check light is off.
|
 |
Click Head Cleaning.
|
 |
Follow the on-screen instructions.
|
 |
Click Print Nozzle Check Pattern in the Head Cleaning dialog box to confirm that the head is clean and to reset the cleaning cycle.
|
If you still find missing dots after cleaning, try the following solutions.
-
Select POWER CLEANING from the control panel on the printer. See POWER CLEANING.
-
Repeat this procedure four or five times, turn the printer off and leave it alone overnight, and then try head cleaning again.
-
Replace some of ink cartridges as they may be old or damaged.
If the print quality remains a problem after you have tried these solutions, contact your dealer. See Contacting Customer Support.

[Top]
Aligning the print head
If you find misaligned lines or black or white banding on the printed data, you may be able to solve these problems by using the Print Head Alignment utility to align the print head.
To use the Print Head Alignment utility, follow the steps below.
 |
Make sure paper is loaded in the printer.
|
 |
Click Print Head Alignment.
|
 |
Follow the on-screen instructions.
|

[Top]
Using Printer and Option Information
You can check or select the black ink set on the printer.
 |
Note:
|
 | |
This function is supported by EPSON Stylus Pro 9800/7800 only.
|
|
 |
Make sure the printer is turned on.
|
 |
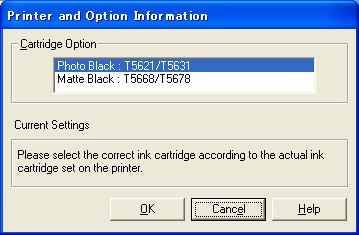
Click Printer and Option Information. The following dialog box appears.
|

The printer driver usually obtains the ink cartridge information automatically, and prints in the appropriate print mode. If this is not possible, a message appears in the Current Setting box to prompt you to select an ink cartridge. In this case, select the correct ink cartridge according to the actual ink cartridge set on the printer.
 |
Click OK.
|

[Top]
Starting EPSON LFP Remote Panel
You can optimize your printer using this utility. To start EPSON LFP Remote Panel, see the steps below.
 |
Make sure the printer is turned on.
|
 |
Click EPSON LFP Remote Panel.
|
 |
Follow the on-screen instructions. See the EPSON LFP Remote Panel online help for details.
|

[Top]
Making the Speed & Progress settings
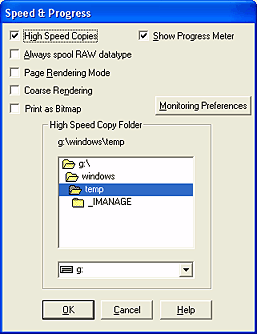
You can make settings related to print speed and progress. To make the Speed & Progress settings, click Speed & Progress on the Utility menu. The Speed & Progress dialog box appears.

 |
Note:
|
 | |
The specific features available in the printer software vary depending on the printer model and the version of Windows that you are using.
|
|
High Speed Copies
To print multiple copies of your data faster, select High Speed Copies. This speeds up printing by using your hard disk space as a cache when printing multiple copies of your data.
Show Progress Meter
To display the Progress Meter every time you print, select Show Progress Meter. Then, you can monitor the progress of your print job.
Always spool RAW datatype (for Windows XP and 2000 only)
To enable NT-based clients spool documents to use the RAW format instead of the EMF (metafile) format, select the Always Spool Raw datatype check box (Windows NT-based applications use the EMF format by default).
Try using this option if documents spooled in the EMF format do not print correctly.
Depending on the data to print, spooling RAW datatype requires fewer resources than EMF, so some problems ("Insufficient Memory/Disk Space to Print", "Slow print speed", etc) can be solved by selecting this option.
 |
Note:
|
 | |
When you spool RAW datatype, the print progress as displayed by the Progress Meter may differ from the actual printing progress.
|
|
Page Rendering Mode (for Windows XP and 2000 only)
Use this function when the print speed is extremely slow or when the print head stops for a few minutes while printing. When this check box is selected, the print speed may improve by rendering as page.
However, the following problems may occur.
-
Print progress displayed in the Progress Meter window may differ from the actual print progress.
-
Printing may take a longer time to start.
Coarse Rendering (for Windows XP and 2000 only)
Use this function if the output length (number of pixels) is limited by the application. Longer print output is made possible by reducing the resolution to restrict the number of pixels to within the application's limit.
Print as Bitmap (for Windows XP and 2000 only)
Use this function when the print speed is extremely slow or when the print head stops for a few minutes while printing. Try this option if Always spool RAW datatype and Page Rendering Mode do not solve the problem.
Monitoring Preferences
This function lets you specify the monitoring feature of EPSON Status Monitor 3.
To make settings for EPSON Status Monitor 3, follow the steps below.
 |
Click Monitoring Preference. The Monitoring Preference dialog box appears.
|

 |
Make the following settings.
|
|
Select Notification
|
Displays the current error item notification settings. Select the appropriate check boxes to specify the error types for which you wish to receive notification.
|
|
Select Shortcut Icon
|
Select the Shortcut Icon check box to display a shortcut icon in your Windows taskbar. Clicking the shortcut icon in the taskbar will open EPSON Status Monitor 3. Click the icon you prefer as shortcut icon, and you can confirm the icon at the right.
|
|
Allow Monitoring of shared printers
|
Allows monitoring of a shared printer by other computers.
|
 |
Click OK.
|

[Top]
| Version NPD1450-00, Copyright © 2005, SEIKO EPSON CORPORATION |
Checking the print head nozzles
Cleaning the print head
Aligning the print head
Using Printer and Option Information
Starting EPSON LFP Remote Panel
Making the Speed & Progress settings