|

Reference Guide
|
|
Paper Handling
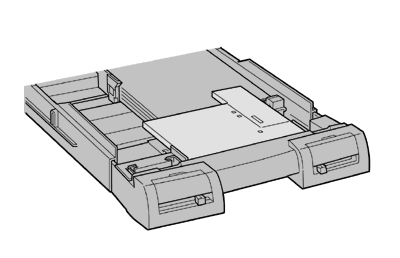
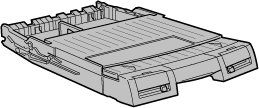
Loading Paper in a Paper Tray
 Tips on using a paper tray
Loading paper into paper tray in the printer
Loading paper into the lower paper tray in the optional Lower Paper Cassette
You can load single sheets up to Super A3/B size using the paper tray. Before you load special paper, see also Notes for Special Media and Other Media.
Tips on using a paper tray
Follow the tips below to get the best performance when printing from the paper tray.
-
Load the paper into the paper tray before sending the data to the printer. When the printer receives data from the computer, it feeds a single sheet and begins to print.
-
If the printer runs out of paper during a print job, reload the paper tray, or if the same size and type of paper is loaded in the other paper tray and the paper size and media type levers are set correctly, the printer automatically feeds from the other tray.
-
Press the Eject/Continue button if you need to eject a sheet of loaded paper.
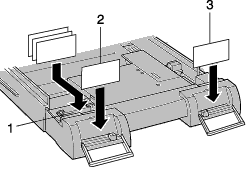
Using the paper size and media type cards
The paper size and media type cards are provided to help you identify the kind of paper you have loaded into the paper tray. Find the paper size card that matches the size of the paper you have loaded (for example, A4) and insert it into the card slot above the paper size lever, on the left. Find the media type card that matches the type of media you have loaded (for example, plain paper) and insert it into the card slot above the media type lever, on the right.
You can store unused cards in the pocket behind the paper size card slot.
|
1
|
Store unused cards here
|
|
2
|
Paper size
|
|
3
|
Media type
|

[Top]
Loading paper into paper tray in the printer
Follow the instructions below to load paper into the paper tray installed in the printer.
 |
Note:
|
 | -
Do not extend the paper tray when you load paper of Legal size or smaller.
|
| -
You can use an optional Paper Tray as a preliminary paper tray set for another size or type of media.
|
| -
If you install the optional Paper Tray in the printer, change the paper tray cover to use the front manual feed slot.
|
 |
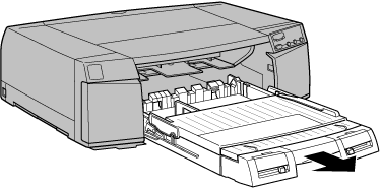
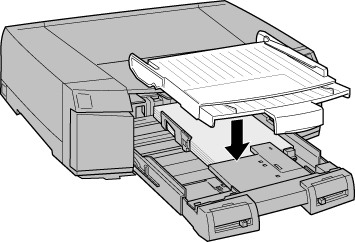
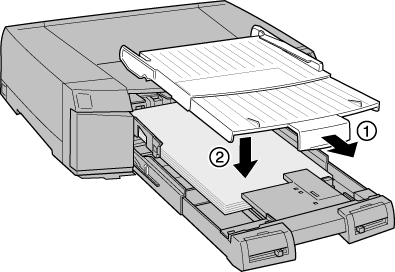
Lift the paper tray slightly up and pull it out until you feel slight resistance.
|
 |
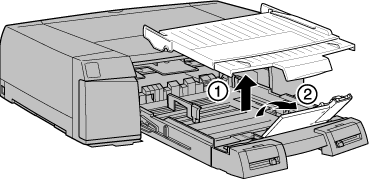
Lift up the paper tray cover and open the paper guide roller.
|
 |
If you load A3, US B, Super A3/B, or larger paper, release the extension lock and pull out the paper tray to the full length.
|
| |
Note:
|
| |
The paper tray should not be extended when loading paper of Legal size or smaller.
|
 |
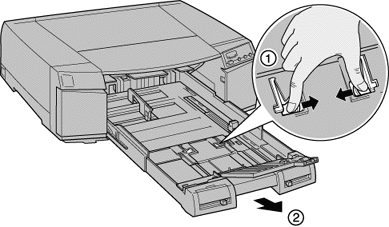
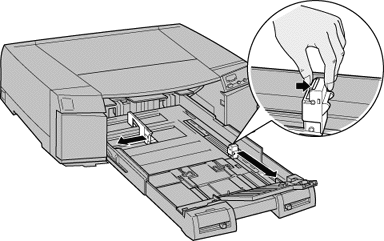
Slide both edge guides out as far as they will go.
|
 |
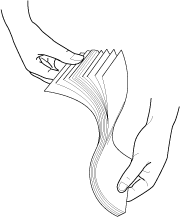
Thumb through a stack of paper, then tap it on a flat surface to even the edges.
|
 |
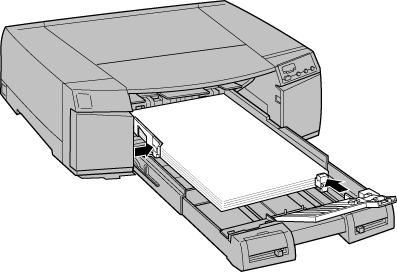
Load the stack of paper with the printable surface down and the right edge of the paper resting against the right side of the paper tray. Make sure the stack lies flat on the bottom of the tray.
|

| |
Note:
|
| | -
If your paper is curled, flatten it before you load it. If it curls excessively and jams frequently, stop using it.
|
| | -
The paper tray can hold up to 250-sheets of 17-lb. or 64g/m2 plain paper. Do not load paper above the arrow mark on the inside surface of the right edge guide. For information on the loadable capacity of EPSON special paper, see Paper Tray and Loading Capacity by Media Type.
|
| | -
When you load the stack of paper, make sure to put the edge of the paper against the right inner corner of the paper tray. Otherwise, the printing may become misaligned.
|
 |
Slide the edge guides against the edges of the paper stack.
|
 |
Slide the switch to the paper guide roller position to match the paper size you are loading.
|
 |
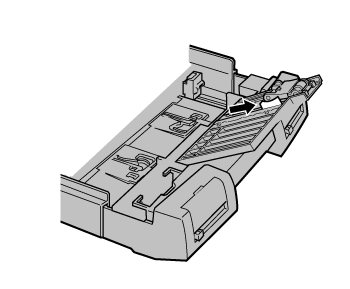
Close the paper guide roller. Confirm that the paper guide roller is on the edge of the paper.
|
 |
Attach the paper tray cover.
|
| |
Note:
|
| |
If you have extended the paper tray, first slide out the paper tray cover then attach the paper tray cover.
|
 |
Firmly slide in the paper tray until it meets resistance.
|
Paper size/media type lever settings
Set the paper size and media type levers to match the paper you loaded. Set the media type and paper size levers to the Other position if you are unsure of the correct settings.
For the installation positions of the paper size lever and media type lever, see Front view.
|
Note:
|
| -
Load the EPSON Watercolor Paper-Radiant White paper into the rear manual feed slot. No other paper path is available for this media.
|
| -
The paper size and media type lever settings you make in the paper tray can be overridden by the Paper Size and Media Type settings you make in your printer driver or application. The main purpose of this selection is to send a paper size or media type mismatch message to the printer driver in case the media loaded in the printer does not match the media you select in the software. You can turn off the notification function by selecting Other as the printer's paper size and media type settings.
|
| -
Select Other for unlisted paper sizes or media types.
|
| -
If ink smears on the paper, select Thick Paper as the media type setting.
|
| -
If you set the paper size or media type lever incorrectly, you may not get the print results you expect.
|
[Top]
Loading paper into the lower paper tray in the optional Lower Paper Cassette
The EPSON STYLUS PRO 5500 can hold two paper trays simultaneously, if you install the optional Lower Paper Cassette.
Follow the instructions below to load paper into the paper tray that comes with or installed in the optional Lower Paper Cassette. To install the optional Lower Paper Casette, see the next section.
Pull the paper tray completely out from the paper cassette.
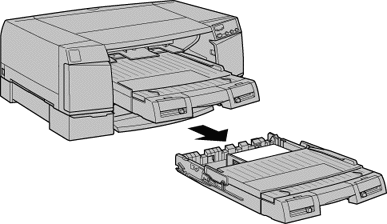
Then, follow steps 2 to 10 in Loading paper into paper tray in the printer.
Installing the optional Lower Paper Cassette
Follow the instructions below to install the optional Lower Paper Cassette in the printer.
|
|
Make sure that your printer's Operate light is off.
|
|
|
Make sure that the power cord is disconnected from the electrical outlet and no interface cable is connected to your printer.
|
|
|
Remove the paper tray from your printer if it is installed.
|
|
|
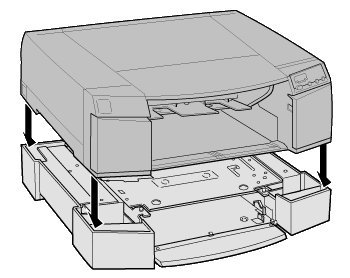
Move your printer to another stable place.
|
|  |
Warning:
|
| |
Do not try to carry the printer by yourself. Always carry the printer with another person, because it weighs approximately 22 kg (49 lb).
|
|
|
Place the Lower Paper Cassette where you want to use the printer, with the paper tray slot facing forward.
|
|
|
Place your printer on top of the paper cassette as shown below:
|
| |
Warning:
|
| |
Hold the bottom of the printer at the depression on the sides so that your fingers do not get caught between the printer and the paper cassette.
|
|
|
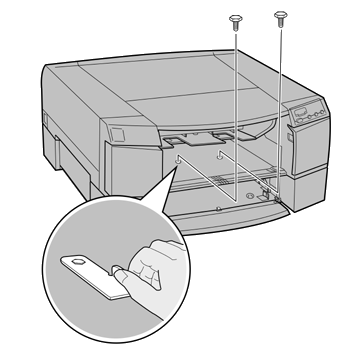
Attach the printer and paper cassette using the two screws that come with the paper cassette. Use the hexagonal wrench that comes with the paper cassette to tighten the screws.
|
| |
Warning:
|
| |
Do not try to move the paper cassette or printer without securing the screws; otherwise, the paper cassette and printer may come apart and cause injury.
|
|
|
Reattach the paper tray to the printer and install the Paper Tray that comes with the optional Lower Paper Cassette.
|
|
|
Reconnect the interface cable and the power cord.
|
If you use a Macintosh, you are finished installing the lower paper cassette.
|
|
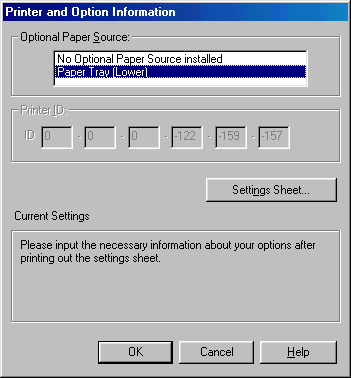
Click Printer and Option Information. You will see a Printer and Option Information dialog box similar to the one below.
|
 |
Confirm that Paper Tray (Lower) is selected in the Optional Paper Source list and click OK. If it is not selected, select Paper Tray (Lower) and click OK.
|
 |
Click OK to exit the printer driver.
|
|
Note:
|
If you remove the optional Lower Paper Cassette, make sure to select something other than Paper Tray (Lower) in the Optional Paper Source list in the Printer and Option Information dialog box.
Installing the optional Paper Tray
If you purchased the optional Paper Tray, install it in the printer or optional Lower Paper Cassette as a preliminary paper tray.
|
Note:
|
| -
The optional Paper Tray is available for both the printer and the optional Lower Paper Cassette.
|
| -
The optional Paper Tray has no edge guide. If you want to load paper into the manual feed slot while the optional Paper Tray is installed in the printer, change the paper tray cover with that of the standard paper tray.
|
| -
The forms between the optional Paper Tray and the paper tray that comes with the optional Lower Paper Cassette are the same.
|
|
|
|
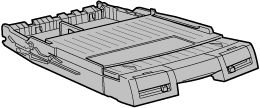
Standard paper tray
|
Optional Paper Tray
Paper tray that comes with the optional Lower Paper Cassette
|
Feeding paper from the lower paper tray
To print on the paper that is loaded in the lower paper tray, set the Paper Source setting in the printer driver to Paper Tray (Lower). If the Paper Source setting in the printer driver is set to Auto Select, and you select the paper size and media type settings in the printer driver that match the size and type of media loaded in the lower paper tray, the printer also feeds from the lower paper tray.
|
Note:
|
|
When the Paper Source setting in the printer driver is set to Auto Select and the paper tray runs out of paper, the printer automatically switches and loads paper from the lower paper tray under any of the following conditions:
|
| -
The paper size and media type lever settings are the same for both paper trays.
|
| -
The paper size and media type levers are set to Other for the lower paper tray.
|
Paper size settings between the standard paper tray and the lower paper tray
When you load different sizes of paper into the paper tray and the lower paper tray, always use the paper tray for the larger size. Otherwise, you cannot stack the output paper correctly. Set the paper sizes as follows.
Pattern 1
|
Paper tray
|
Super A3/B, US B, or A3
|
|
Lower paper tray
|
A4, Letter, or Legal
|
Pattern 2
|
Paper tray
|
A4, Letter, or Legal
|
|
Lower paper tray
|
A4, Letter, or Legal
|
Pattern 3
|
Paper tray
|
Super A3/B, US B, or A3
|
|
Lower paper tray
|
Super A3/B, US B, or A3
|
[Top]
| Version 1.00E, Copyright © 2001, SEIKO EPSON CORPORATION |

