Options and Consumables
Installing and Using Oprions
 Cut-sheet feeders
 Roll paper holder
 Interface cards
Cut-sheet feeders
Two cut-sheet feeders are available for use with your printer:
|
High capacity (bin 1)
|
Second bin (bin 2)
|
|
C80687
|
C80679
|
 |
The asterisk ( ) is a substitute for the last digit, which varies by country. Contact your local EPSON dealer for the part number in your country. ) is a substitute for the last digit, which varies by country. Contact your local EPSON dealer for the part number in your country.
|
You can install the high-capacity cut-sheet feeder by itself,
or you can assemble and install a double-bin cut-sheet feeder by combining the high-capacity and second-bin feeders. When the double-bin cut-sheet feeder is installed, the high-capacity cut-sheet feeder is used as bin 1 and the second-bin feeder is used as bin 2.
 |
Note:
|
 | -
The second-bin feeder can be used only in combination with the high-capacity feeder.
|
|
 | -
The second-bin feeder can not be detached from the high-capacity feeder after you have combined them.
|
|
Before you install a cut-sheet feeder, read the manual that comes with it. The cut-sheet feeder manual provides instructions on how to combine the two cut-sheet feeders to create the double-bin cut-sheet feeder.
You can load up to 150 single sheets of paper, 40 single-sheet multipart forms, 25 envelopes, or 50 postcards in the high-capacity cut-sheet feeder (bin 1 of the double-bin feeder). You can load an additional 50 single sheets in the second-bin cut-sheet feeder (bin 2 of the double-bin feeder). With the double-bin cut-sheet feeder, you can load two different types or sizes of paper at one time.
 |
Note:
|
 | |
For detailed paper specifications, see Paper.
|
|
Installing the cut-sheet feeder
The cut-sheet feeder comes with a paper guide for stacking printed sheets. To install the cut-sheet feeder, you need to attach both the cut-sheet feeder and the paper guide. Follow the steps below.
 |
Note:
|
 | -
The second-bin feeder can be used only in combination with the high-capacity feeder.
|
|
 | -
Install both the high capacity cut-sheet feeder and the double-bin cut-sheet feeder the same way, as described below. Before you install the double-bin cut-sheet feeder, assemble it as described in the cut-sheet feeder manual.
|
|
 |
Make sure the printer is turned off.
|
 |
Close the sprocket covers if they are open, and lock the sprocket units by pushing down the lock levers if necessary.
|
 |  |
Note:
|
 |
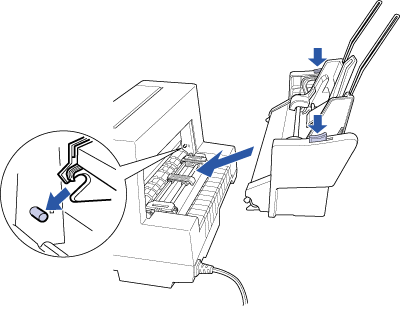
Hold the cut-sheet feeder by placing your hands on both sides of it. While holding down the buttons on both sides, fit the notches on each side of the feeder over the mounting posts on the printer. Lower the cut-sheet feeder until it rests on the printer.
|
 |
Remove the paper guide from the front of the printer. Then slide the paper guide for the cut-sheet feeder all the way onto the mounting pegs.
|
 |
Slide the edge guide all the way to the left.
|
 |
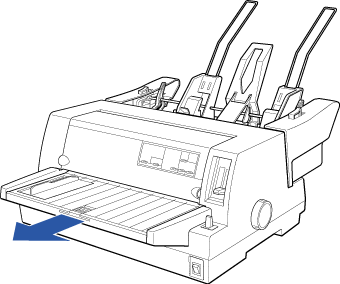
Fully extend the paper guide extension. (If you do not plan to stack the printed sheets, you do not need to perform this step.)
|
 |
If you are printing on long paper, pull out the extension flap located in the center of the paper guide.
|
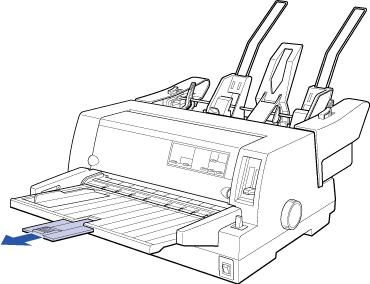
You are now ready to load paper with your cut-sheet feeder as described in the next section. To remove the cut-sheet feeder, turn off the printer and reverse the steps above.
 |
Note:
|
Loading paper from the cut-sheet feeder
This section describes how to load paper in the high-capacity and second-bin cut-sheet feeders.
 |
Note:
|
 | -
Load single-sheet multipart forms, envelopes, and postcards only in the high-capacity cut-sheet feeder (bin 1 of the double-bin cut-sheet feeder).
|
|
 | -
For single-sheet multipart forms, use only the type that are glued at the top of the forms.
|
|
 | -
To avoid paper jams, do not allow the printer to stack more than 40 printed sheets on the paper guide at one time.
|
|
 |
Caution:
|
 | |
Do not use labels in the cut-sheet feeder.
|
|
Loading paper from the high-capacity cut-sheet feeder
Load paper in the high-capacity cut-sheet feeder (bin 1 of the double-bin feeder) as follows:
 |
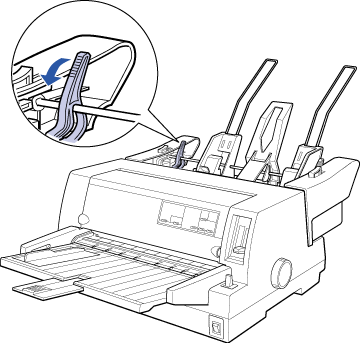
Pull both paper set levers forward until the paper guides retract to allow paper loading.
|
 |
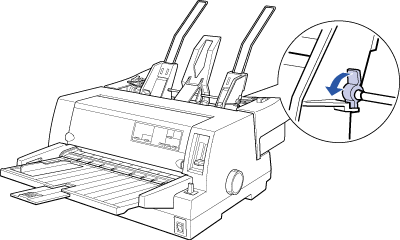
Release the paper guide lock levers by pulling them forward.
|
 |
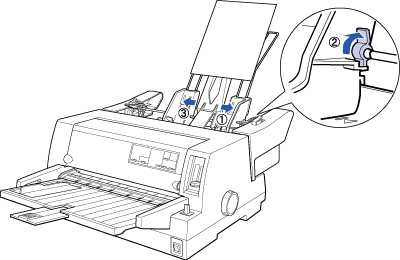
Slide the right paper guide so that its edge is even with the guide mark on the cut-sheet feeder and push back the lever to lock the paper guide in place. Next, slide the left paper guide to roughly match the width of your paper.
|
 |
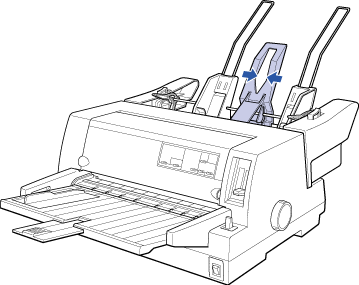
Slide the center support midway between the paper guides.
|
 |
Fan a stack of paper (up to 150 sheets); then tap the sides and bottom of the stack on a flat surface to even it up.
|
 |
Insert the paper along the right paper guide and adjust the position of the left paper guide so that it matches your paper's width. Make sure the position of the guide allows the paper to move up and down freely. Then lock the left guide in place.
|
 |  |
Note:
|
 |  | |
Load paper with the printable side up. If you are using pre-printed forms, load the forms top-down.
|
|
 |
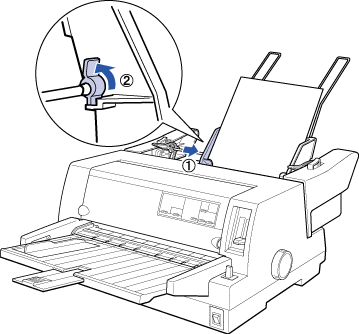
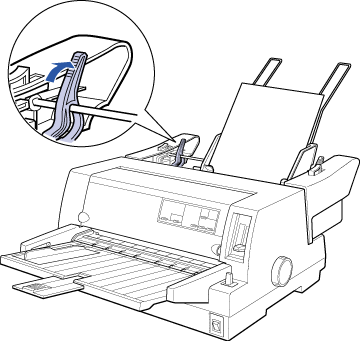
Push back the paper set levers to clamp the paper against the guide rollers.
|
 |
Before printing, make sure single sheet feeding is selected. Also adjust the thickness setting to the paper loaded in the cut-sheet feeder. See Adjusting the Paper Thickness Lever for details.
|
 |
In your printer driver software, select your paper size from the Paper Size list, and select Sheet Feeder Bin-1 from the Paper Source list. (If you are printing from a DOS application, select the bin number using the Tear Off/Bin button (LQ-680) or the Paper Source button (LQ-680Pro) on the control panel. If you use envelopes or postcards, select Card or Envelope on the control panel as described in Envelopes and Postcards.)
|
The cut-sheet feeder loads paper when you send data to the printer. You can also load paper by pressing the Load/Eject button.
Loading paper from the second-bin cut-sheet feeder
Follow the steps below to load paper in the second bin of the double-bin cut-sheet feeder.
 |
Note:
|
 | |
You cannot use the second-bin cut-sheet feeder without the high-capacity cut-sheet feeder, although the illustrations here show only the second-bin feeder.
|
|
 |
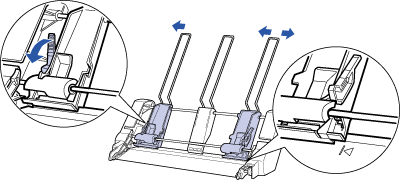
Pull both paper set levers forward, and slide the right paper guide to the guide mark and the left paper guide all the way to the left.
|
 |
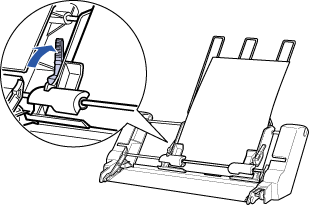
Load a fanned stack of paper (up to 50 sheets), aligning the right edge of the paper with the right paper guide. Be sure to load the paper with the printable side up. Adjust the left paper guide and center support to fit the paper, and then push back the paper set levers to lock the paper in place.
|
 |
In your printer driver software, select your paper size from the Paper Size list, and select Sheet Feeder Bin-2 from the Paper Source list. (If you are printing from a DOS application, select the bin number using the Tear Off/Bin button (LQ-680) or the Paper Source button (LQ-680Pro) on the control panel.)
|
The cut-sheet feeder loads paper when you send data to the printer. You can also load paper by pressing the Load/Eject button.
Switching between the tractor and the cut-sheet feeder
You can easily switch between continuous paper loaded from the tractor and single sheets loaded from the cut-sheet feeder without removing your continuous paper.
Switching to continuous paper
Follow the steps below to switch to continuous paper loaded from the tractor.
 |
If any single sheets are in the paper path, press the Load/Eject button to eject them.
|
 |
Make sure the paper guide's extension flap is returned to its original position, and push the paper guide extension all the way in.
|
Switching to single sheets
To switch back to single sheets loaded from the cut-sheet feeder, follow these steps:
 |
If any continuous paper remains in the printer, press the Tear Off/Bin button (LQ-680) or the Tear Off/Special Paper button (LQ-680Pro) to advance the paper to the tear-off position.
|
 |
Tear off the printed pages.
|
 |
Press the Load/Eject button. The printer feeds the paper backward to the standby position. The paper is still attached to the tractor but is no longer in the paper path.
|
 |
Pull out the paper guide extension, and pull out the extension flap if you are printing on long paper.
|
Loading paper manually from the paper guide
The cut-sheet feeder's single-sheet loading feature allows you to switch to a different type or size of paper without replacing the paper already in the cut-sheet feeder or removing the feeder. Follow these steps:
 |
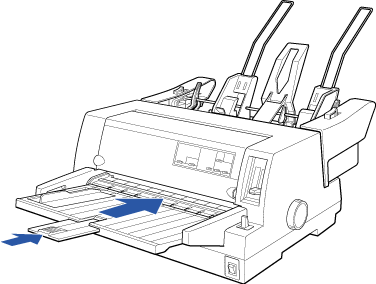
Return the paper guide's extension flap to its original position, if necessary, and push the paper guide extension all the way in.
|
 |
Slide the edge guide until it is aligned with the guide mark on the paper guide.
|
 |
Insert a sheet of paper along the edge guide until it meets resistance. Be sure to load your paper printable side up. After a few seconds, the printer automatically advances the paper to the loading position. The printer is ready to accept data from your computer and print.
|
After printing a sheet, the printer ejects the printed sheet onto the paper guide and the Paper Out and Pause lights come on. If you are printing a multiple-page document, remove the printed sheet and insert a new sheet into the paper guide. The printer automatically advances the paper and resumes printing.

[Top]
Roll paper holder
The optional roll paper holder (#8310) allows you to use your printer with 8.5-inch roll paper like that used in telex machines.
 |
Note:
|
 | |
This option is not available in some countries.
|
|
Installing the roll paper holder
To install the roll paper holder, follow the steps below.
 |
Turn off the printer.
|
 |
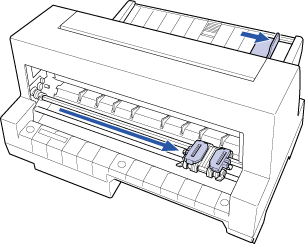
Facing the back of the printer, slide both sprocket units all the way to the right, and slide the edge guide all the way to the right.
|
 |
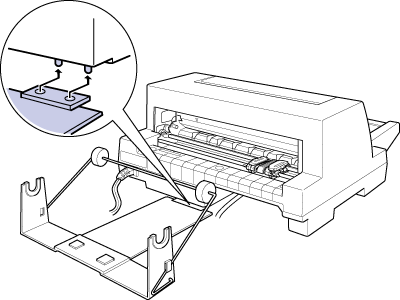
Position the roll paper holder beneath the printer as shown below. Fit the two holes in the roll paper holder base under the two positioning pegs on the bottom of the printer. Gently lower the printer so the positioning pegs slide into the holes.
|
 |
Caution:
|
 | |
Take care not to drop the roll paper holder when lifting the printer. Only the printer's weight holds it in place.
|
|
Loading a roll of paper
To load a roll of paper on the roll paper holder, follow these steps:
 |
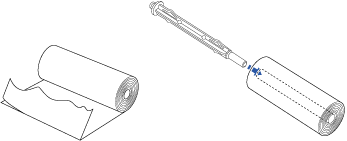
Cut the leading edge of the roll paper straight across. Slide the roll paper holder shaft through the center of the paper roll.
|
 |
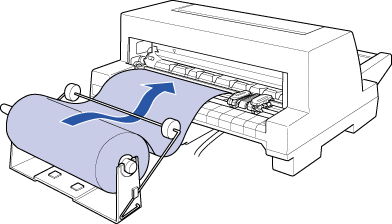
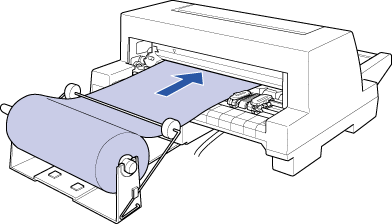
Set the shaft and paper roll onto the roll paper holder. Load the roll so the paper feeds from the top of the roll and the edge of the roll paper passes under the tension lever.
|
 |
Bring the leading edge of the paper up over the paper path guide and insert it into the printer until you feel resistance. The printer loads the roll paper automatically.
|
Removing roll paper
Roll paper cannot be fed backward. To remove roll paper, cut the paper behind where it feeds into the printer. Press the Load/Eject button to eject the remaining paper.

[Top]
Interface cards
You can install an optional interface card to supplement your printer's built-in parallel interface and provide added network compatibility. The EPSON interface cards in the table below are compatible with your printer. (Not all the interfaces in the table are available worldwide.)
|
Model number
|
Card type
|
|
C82305 /C82306 /C82306
|
Serial interface card
|
|
C82307 /C82308 /C82308
|
32KB serial interface card
|
|
C82312
|
LocalTalk interface card
|
|
C82313
|
32KB IEEE-488 interface card
|
|
C82314
|
Coax interface card
|
|
C82315
|
Twinaxial interface card
|
|
C82345
|
IEEE-1284 (Type B bidirectional) parallel interface card
|
|
C82362 /C82363 /C82363 / /
C82364
|
Ethernet interface card
|
|
C82384
|
EpsonNet 10/100 Base Tx Int. Print Server
|
 |
The asterisk ( ) is a substitute for the last digit, which varies by country. ) is a substitute for the last digit, which varies by country.
|
 |
When you use Ethernet interface card C82363 , you need to attach the optional interface adapter (C82525 , you need to attach the optional interface adapter (C82525 ) to the interface card. ) to the interface card.
|
 |
Caution:
|
 |
If you install the C82305 /C82306 /C82306 optional serial interface card, be sure to set the transfer speed to one of the following: optional serial interface card, be sure to set the transfer speed to one of the following:
|
|
 | |
300, 600, 1200, 2400, 4800, 9600, 19200 bps
|
|
If you are unsure whether you need an optional interface or would like to know more about interfaces, contact your dealer.
Installing an interface card
Follow the steps below to install an optional interface card.
 |
Make sure the printer is turned off. Unplug the printer's power cord and disconnect the interface cable.
|
 |
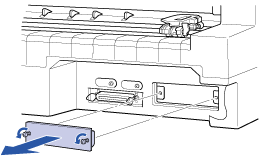
Remove the screws securing the shield plate to the back of the printer and remove the plate.
|
 |
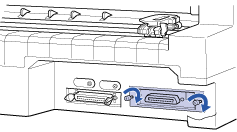
Slide the interface card along the slots on both sides of the interface compartment. Firmly push in the card to make sure the connector at the back of the card is fully inserted into the printer's internal socket. Then reinsert the screws and tighten them.
|
 |
Note:
|
 | -
Insert the card bottom face up. The bottom face is the face usually covered with metal plate.
|
|
 | -
Store the detached shield plate in a safe place; you will need to reattach it if you remove the interface card.
|
|
To remove the interface card, reverse the steps above.

[Top]
 Cut-sheet feeders
 Roll paper holder
 Interface cards
Cut-sheet feeders
Roll paper holder
Interface cards
 ) is a substitute for the last digit, which varies by country. Contact your local EPSON dealer for the part number in your country.


 ) is a substitute for the last digit, which varies by country.
 , you need to attach the optional interface adapter (C82525
 ) to the interface card.


