|

User's Guide
|
|
Options and Consumables
Installing and Using Options
 Cut-sheet feeder
 Pull tractor unit
 Roll paper holder
 Color upgrade kit
 Print server
Cut-sheet feeder
The optional single-bin cut-sheet feeder (C80637 ) handles up to 50 sheets of standard bond paper (82 g/m2 or 22 lb) without reloading.
Follow these steps to install the cut-sheet feeder:
 |
Make sure the printer is turned off. Remove the paper guide and open the paper guide cover.
|
 |
If the tractor is installed in the pull-tractor position, remove it and reinstall it in the push-tractor position.
|
 |
Make sure the paper release lever is in the single-sheet position.
|
 |
Hold the cut-sheet feeder in both hands and press on the latch levers. Fit the notches in the cut-sheet feeder over the mounting posts on the printer. Releasing the latch levers locks the cut-sheet feeder in place.
|
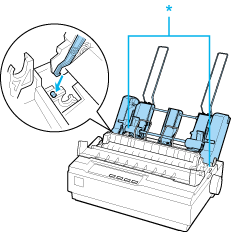
* latch lever
 |
Slide the left paper guide so it is aligned with the triangle mark. Next, slide the right paper guide to roughly match the width of your paper. Slide the paper support midway between the paper guides.
|

 |
Pull the paper set levers all the way forward until the paper guides retract and lock open to allow for paper loading.
|

 |
Take a stack of paper and fan it. Next, tap the side and bottom of the paper on a flat surface to even up the stack.
|
 |  |
Caution:
|
 |  | |
Do not use envelopes, multipart forms, carbon paper, or labels in the cut-sheet feeder.
|
|
 |
Insert up to 50 sheets of paper along the left paper guide.
|
 |
Adjust the position of the right paper guide so that it matches your paper's width. Make sure the position of the guide allows the paper to move up and down freely.
|
 |
Push the paper set levers back to clamp the paper against the guide rollers.
|
 |
Remove the paper supports from the edge guides. Insert the two stacker supports packed with the cut-sheet feeder into the holes on the edge guides.
|
 |
Attach the paper guide to the cut-sheet feeder as shown below.
|
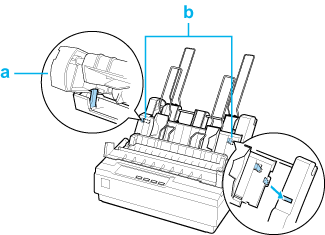
a. View from above
b. Release tab
 |
Slide the left edge guide to the center until it stops at the guide mark. Then slide the right edge guide to fit the size of paper you will use.
|
 |  |
Note:
|
 |  | -
To remove the paper guide from the cut-sheet feeder, press both release tabs and pull out the paper guide.
|
|
 |  | -
Make sure the paper guide cover is open when you print.
|
|
You can easily switch between continuous paper and cut-sheet feeder operation. See Switching back to single sheets for details.
 |
Note:
|
 | |
When you print several pages of continuous paper, fold the first printed page forward at the perforation after the perforation emerges from below the printer cover. This helps the printer feed the printed pages properly and prevents paper jams.
|
|

[Top]
Pull tractor unit
An additional pull tractor (C80030 ) is available as an option.
You can improve the performance of continuous paper handling by using two tractors at the same time. This is especially useful with continuous pre-printed forms and multipart forms.
Follow these steps to install and load paper on a standard and an additional pull tractor:
 |
Make sure the paper release lever is pulled forward to the continuous-paper position. Install the included tractor in the push-tractor position.
|
 |
Turn on the printer. Hold down the LF/FF button to feed paper in one page.
|
 |
Release the sprocket lock levers of the pull tractor and adjust the sprocket units to match the width of the paper. Be sure that the sprocket units on both tractors are aligned so that the paper is not crooked.
|
 |
Open the sprocket covers. Fit the holes of the paper over the tractor pins of the sprocket units and adjust the sprocket units as necessary. (See Printing on Continuous Paper.) Close the sprocket covers.
|
 |
If there is slack in the paper between the push and pull tractors, push in and turn the paper feed knob on the right side of the pull tractor to remove the slack.
|

 |
See that the paper is not crooked or wrinkled and lock the sprocket units in place.
|
 |
Re-install the printer cover and the paper guide.
|

[Top]
Roll paper holder
The optional roll paper holder (#8310) allows you to use your printer with 216 mm (8.5 inch) roll paper like that used with telex machines. This option is not available in all countries.
Follow these steps to install and use the roll paper holder:
 |
Turn off the printer and remove the paper guide.
|
 |
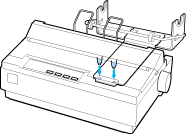
Position the roll paper holder beneath the printer as shown below. Fit the two holes in the base onto the two positioning pegs on the bottom of the printer.
|
 |  |
Caution:
|
 |  | |
Be careful to avoid dropping the roll paper holder when lifting the printer. Only the printer's weight holds it in place.
|
|
 |
Push the paper release lever to the single-sheet position.
|
 |
Cut the leading edge of the roll paper straight across. Slide the roll paper holder shaft through the center of the paper roll.
|

 |
Set the shaft and paper roll onto the roll paper holder. Orient the roll so that paper feeds from the bottom of the roll. Then turn on the printer.
|
 |
Bring the leading edge of the paper up over the paper path guide for single sheets and insert it into the printer path for single sheets until you feel resistance.
|
 |
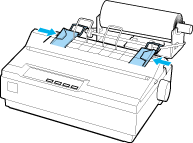
Install the paper guide. Slide the left edge guide to the center until it stops at the guide mark. Then slide the right edge guide to the opposite guide mark.
|

[Top]
Color upgrade kit
The optional color upgrade kit (C83211 ) includes a color ribbon cartridge and a motor unit.
Follow these steps to install the kit:
 |
Turn off the printer and remove the printer cover and paper tension unit. Slide the connector cover on the printer and pull it out as shown below.
|

 |
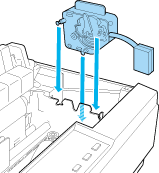
Install the motor unit in the right hand corner of the printer, with the gear facing the center of the printer. Push it down firmly to fit the metal pins into the slots.
|
 |
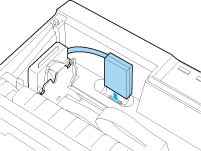
Insert the motor unit plug into the connector on the printer.
|
 |
Slide the print head to the middle of the printer; then slide the plastic part on the color ribbon to the center of the cartridge.
|
 |
Turn the ribbon-tightening knob in the direction of the arrow to remove any slack in the ribbon.
|

 |
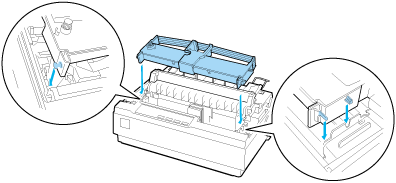
Insert the ribbon cartridge into the printer as shown; then press both sides of the cartridge firmly to fit the plastic hooks into the printer slots.
|
 |
While holding down the Load/Eject and Pause buttons, turn on the printer. The printer prints the instructions on how to adjust the print position.
|
 |
Follow the printed instructions to adjust the print position.
|
 |  |
Note:
|
 |  | |
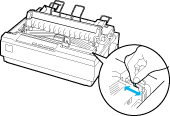
If you are instructed to move the color ribbon adjustment lever, move the lever as shown below.
|
|
 |
When you finish adjusting the print position, turn off the printer.
|
 |
Note:
|
 | |
When you print using the color ribbon, the print speed is reduced.
|
|
To switch to the black ribbon, remove the color ribbon as shown in the manual that comes with the optional color upgrade kit; then install the black ribbon as described under Replacing the ribbon cartridge.
You do not have to remove the motor unit.

[Top]
Print server
You can use this printer as a network printer by installing the EpsonNet 802.11b/g Wireless and 10/100 Base Tx Ext. Print Server (C82437 ) in the printer's parallel interface port. See the Administrator's Manual packaged with this option for instructions on installation and use.

[Top]
| Version BPS0003-00, Copyright © 2007, SEIKO EPSON CORPORATION |
Cut-sheet feeder
Pull tractor unit
Roll paper holder
Color upgrade kit
Print server
) handles up to 50 sheets of standard bond paper (82 g/m2 or 22 lb) without reloading.
) is available as an option.
) includes a color ribbon cartridge and a motor unit.
) in the printer's parallel interface port. See the Administrator's Manual packaged with this option for instructions on installation and use.