Paper Handling
Loading Single Sheets
 Available paper types
 Using the paper guide
 Loading paper in the paper guide
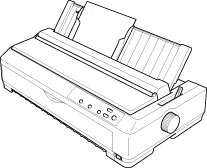
As shown below, you can load ordinary single sheets and envelopes one at a time from the top of the printer, using the paper guide.

You can also load single-sheet paper using an optional cut-sheet feeder, front sheet guide, or front paper guide. See Cut-Sheet Feeder or Front Sheet Guide and Front Paper Guide for more information.
Available paper types
The table below shows the types of paper you can load and the paper slots you can use with each paper type. See Adjusting the Paper-Thickness Lever for instructions on how to adjust the paper-thickness lever.
|
Paper type
|
Available paper slot(s)
|
|
Ordinary paper
|
front and rear
|
|
Multipart forms (carbonless)
2 parts (original and one copy)
3 parts (original and two copies)
4 parts (original and three copies)
5 parts (original and four copies)
|
front
|
|
Envelopes
|
rear
|
 |
Note:
|
 | -
When the temperature is 5°C (41°F) or lower, or 35°C (95°F) or higher, set the paper-thickness lever one position lower to improve print quality.
|
|
 | -
Do not load paper that is curled or has been folded.
|
|

[Top]
Using the paper guide
Using the paper guide that comes with your printer, you can load one single sheet or envelope at a time from the top of the printer. Your single-sheet paper can be up to 257 mm (10.1 inches) wide on the FX-875 and 420 mm (16.5 inches) wide on the FX-2175. (See Printer Specifications for detailed paper specifications.)
 |
Caution:
|
 | |
Do not load multipart forms, carbon paper, or labels in the paper guide.
|
|

[Top]
Loading paper in the paper guide
Follow these steps to load paper in the paper guide:
 |
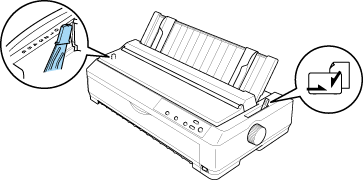
Make sure the paper guide is in the upright position. Then set the paper-thickness lever (located under the printer cover) to 0 if you are using ordinary single-sheet paper. (If you are using envelopes, see Envelopes for instructions on setting the paper-thickness lever.) Also move the paper release lever to the single-sheet position.
|

 |
Turn on the printer, if necessary.
|
 |
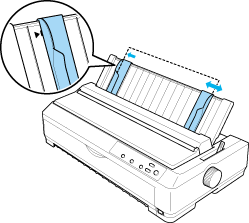
Slide the left edge guide until it locks in place next to the triangle mark on the paper guide. Then, adjust the right edge guide to match the width of your paper.
|

 |
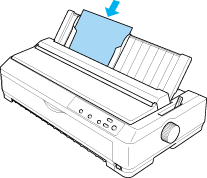
Insert a sheet of paper with the printable side down between the edge guides until it meets resistance. The printer feeds the paper automatically and is ready to print.
|

 |  |
Note:
|
 |  | |
For your safety, Epson recommends operating the printer with the printer cover closed. The printer will function with the printer cover open or removed, but maximum safety is achieved when the cover is closed.
|
|
If the first printed line on your page appears too high or low, you can use the Micro Adjust function to adjust the top-of-form position. See Adjusting the top-of-form position for more information.

[Top]
 Available paper types
 Using the paper guide
 Loading paper in the paper guide
Available paper types
Using the paper guide
Loading paper in the paper guide


