Options and Consumables
Cut-Sheet Feeder
 Installing the cut-sheet feeder
 Loading paper in the single-bin cut-sheet feeder
 Loading paper in the high-capacity cut-sheet feeder
 Assembling the double-bin cut-sheet feeder
 Selecting the paper path (bin 1 or bin 2)
Two types of optional cut-sheet feeders are available for use with your printer as shown below:
|
the single-bin cut-sheet feeder:
|
FX-875: C80637
FX-2175: C80369
|
|
the high-capacity cut-sheet feeder:
|
FX-875: C80638
FX-2175: C80640
|
You can use either one of these separately, or you can use both feeders together as a double-bin cut-sheet feeder to automatically load two different types of single-sheet paper.
The single-bin cut-sheet feeder holds up to 50 single sheets. The high-capacity cut-sheet feeder holds up to 150 single sheets or up to 25 envelopes.
 |
Caution:
|
 | |
Do not load multipart forms, carbon paper, or labels in the cut-sheet feeder.
|
|
To install the single-bin, high-capacity, or double-bin cut-sheet feeder, see Installing the cut-sheet feeder. However, you must assemble the double-bin cut-sheet feeder before installing it. To load paper in a bin, see Loading paper in the single-bin cut-sheet feeder, or Loading paper in the high-capacity cut-sheet feeder.
 |
Note:
|
 | |
You cannot install and use the optional cut-sheet feeders when the tractor unit is installed in the pull position. See Removing the tractor from the pull position for instructions on removing the tractor from the pull position.
|
|
Installing the cut-sheet feeder
The installation procedure is the same for the single-bin, high-capacity, and double-bin cut-sheet feeders.
Follow these steps to install the cut-sheet feeder:
 |
Note:
|
 |
Make sure the printer is turned off. Then open the paper guide cover by pulling its back edge toward.
|
 |
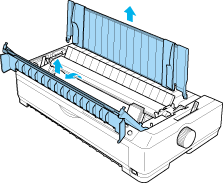
Remove the paper guide by moving it to the upright position and pulling it straight up. Lift the printer cover by its back edge and then pull it straight up and off the printer.
|
 |
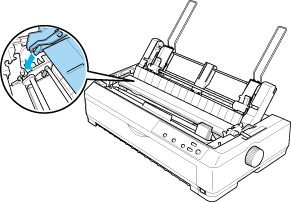
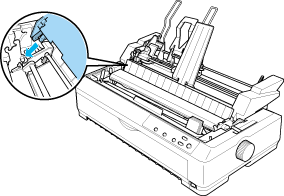
Holding the cut-sheet feeder in both hands, press down on the latch levers and fit the notches over the printer's mounting posts, as shown below. Release the latch levers to lock the feeder in place. If you are installing the high-capacity or double-bin cut-sheet feeder, see the following illustration.
|
single-bin cut-sheet feeder
high-capacity cut-sheet feeder
 |
To replace the printer cover, first insert the front tabs into the slots on the printer, then lower the cover into place.
|
If you installed the double-bin cut-sheet feeder, you need to select your paper path (bin 1 or bin 2). See Selecting the paper path (bin 1 or bin 2) for more information.
You are now ready to load paper in your single-bin, high-capacity, or double-bin cut-sheet feeder. For instructions, see Loading paper in the single-bin cut-sheet feeder or Loading paper in the high-capacity cut-sheet feeder.

[Top]
Loading paper in the single-bin cut-sheet feeder
The single-bin cut-sheet feeder holds up to 50 sheets of paper. When it is installed, you still can use the paper guide to load single sheets and envelopes one at a time.
Follow these steps to load paper in the single-bin cut-sheet feeder:
 |
Caution:
|
 | |
Do not load multipart forms, carbon paper, envelopes, or labels in the single-bin cut-sheet feeder.
|
|
 |
Make sure the paper guide is removed, and set the paper release lever to the single-sheet position. Also make sure the paper-thickness lever (located under the printer cover) is set to 0 and the paper guide cover is open.
|
 |
Slide the left paper guide of the cut-sheet feeder so it is aligned with the triangle mark. Next, slide the right paper guide to roughly match the width of your paper. Slide the paper support midway between the paper guides.
|
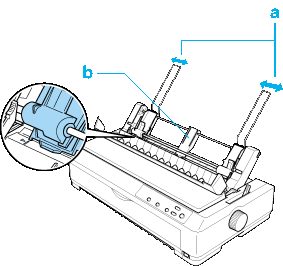
a. Paper guides
b. Paper support
 |
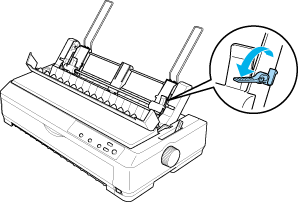
Pull both paper set levers forward until the paper guides retract and lock open to allow paper loading.
|
 |
Take a stack of paper (up to 50 sheets) and fan it. Next, tap the side and bottom edges of the paper on a flat surface to even up the stack.
|
 |
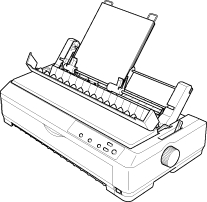
Insert the paper stack printable side down along the left paper guide.
|
 |
Adjust the right paper guide so that it matches your paper's width. Make sure the position of the guide allows the paper to move up and down freely.
|
 |
Push back the paper set levers to clamp the paper against the guide rollers.
|
 |
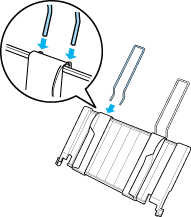
Attach the stacker-support wires to the paper guide as shown below, if necessary.
|
 |
Install the paper guide with the attached stacker-support by fitting the notches on the paper guide straight down over the mounting posts on the printer. Slide the edge guides to the middle of your paper.
|
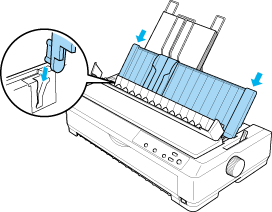
The cut-sheet feeder automatically loads paper when the printer receives data.
If the first line on your page appears too high or low, you can adjust its position using the Micro Adjust function. See Adjusting the top-of-form position.

[Top]
Loading paper in the high-capacity cut-sheet feeder
The high-capacity cut-sheet feeder holds up to 150 sheets of paper or up to 25 envelopes.
Follow these steps to load paper in the high-capacity cut-sheet feeder:
 |
Caution:
|
 | |
Do not load multipart forms, carbon paper, or labels in the high-capacity cut-sheet feeder.
|
|
 |
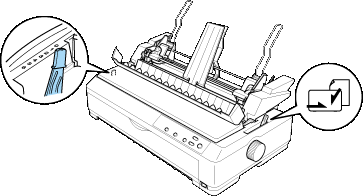
Set the paper release lever to the single-sheet position. Also make sure the paper-thickness lever (located under the printer cover) is set to 0 if you are using ordinary single-sheet paper. (If you are using envelopes, see Envelopes for instructions on setting the paper-thickness lever.) Then open the paper guide cover.
|
 |
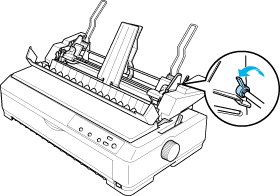
Pull the lock levers on the edge guides forward to release them.
|
 |
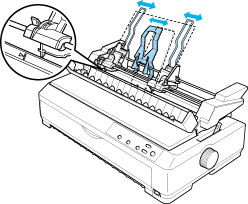
Slide the left paper guide until it is aligned with the triangle mark; then lock it in place by pushing back its lock lever. Next, slide the right paper guide to roughly match the width of your paper. Slide the paper support to midway between the paper guides.
|
 |
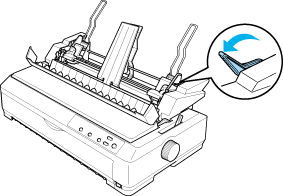
Pull both paper set levers forward until the paper guides retract and lock open to allow paper loading.
|
 |
Take a stack of paper (up to 150 sheets) and fan it. Next, tap the side and bottom edges of the paper on a flat surface to even up the stack.
|
 |
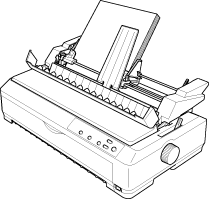
Insert the paper stack printable side down along the left paper guide.
|
 |
Adjust the right paper guide so that it matches your paper's width and lock it in place. Make sure the position of the guide allows the paper to move up and down freely.
|
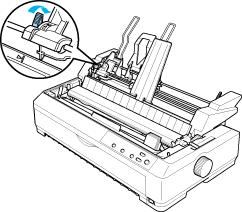
If you are loading envelopes, push back the envelope levers as shown below.
 |
Push back the paper set levers to clamp the paper or envelopes against the guide rollers.
|
The cut-sheet feeder automatically loads paper when the printer receives data.
If the first line on your page appears too high or low, you can adjust its position using the Micro Adjust function. See Adjusting the top-of-form position for more information.

[Top]
Assembling the double-bin cut-sheet feeder
Using the double-bin cut-sheet feeder allows you to load two types of single-sheet paper in the printer at the same time and easily switch between them. Before you install the double-bin cut-sheet feeder, you need to connect the single-bin cut-sheet feeder (C80637 /C80639
 ) to the high-capacity cut-sheet feeder (C80638
 /C80640
 ).
).
Follow these steps to assemble the double-bin cut-sheet feeder:
 |
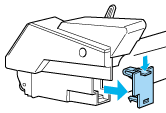
Remove the gear cover from the back of the high-capacity cut-sheet feeder by pressing down the tab and pulling the cover backward. Store it in a safe place.
|
 |
Hold the single-bin cut-sheet feeder in both hands. Fit the notches in the single-bin cut-sheet feeder over the mounting posts on the back of the high-capacity cut-sheet feeder.
|
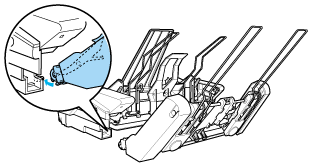
 |
Lock the two cut-sheet feeders together by pushing firmly on the tab locks.
|
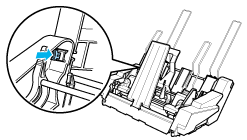
To install the double-bin cut-sheet feeder on your printer, see Installing the cut-sheet feeder.

[Top]
Selecting the paper path (bin 1 or bin 2)
When the double-bin cut-sheet feeder is installed, the high-capacity cut-sheet feeder becomes bin 1 and the single-bin cut-sheet feeder becomes bin 2 for paper path selection purposes.
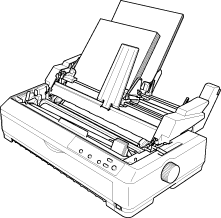
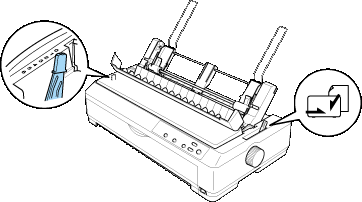
It is best to select the paper path in your application program because software settings usually override the printer's control panel settings. However, if you cannot select the paper path in your application, select a path by pressing the Tear Off/Bin button until the light indicates the bin you want as shown below.
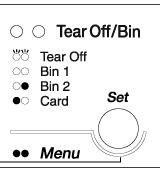
 =On
=On  =Off
=Off  =Flashing
The cut-sheet feeder you selected automatically loads paper when the printer receives data.

[Top]
 Installing the cut-sheet feeder
 Loading paper in the single-bin cut-sheet feeder
 Loading paper in the high-capacity cut-sheet feeder
 Assembling the double-bin cut-sheet feeder
 Selecting the paper path (bin 1 or bin 2)
Installing the cut-sheet feeder
Loading paper in the single-bin cut-sheet feeder
Loading paper in the high-capacity cut-sheet feeder
Assembling the double-bin cut-sheet feeder
Selecting the paper path (bin 1 or bin 2)


 /C80639
 ) to the high-capacity cut-sheet feeder (C80638
 /C80640
 ).
).


 =On
=On  =Off
=Off  =Flashing

