Printer Software
Using EPSON Status Monitor 3
 Setting up EPSON Status Monitor 3
 Accessing EPSON Status Monitor 3
 Installing EPSON Status Monitor 3
EPSON Status Monitor 3 is available for Windows XP, Me, 98, 95, 2000, and Windows NT 4.0. It allows you to monitor your printer's status, alerts you when printer errors occur, and provides troubleshooting instructions when needed.
EPSON Status Monitor 3 is available only when:
-
The printer is connected directly to the host computer via the parallel port [LPT1] or the USB port.
-
Your system is configured to support bidirectional communication.
EPSON Status Monitor 3 is installed when you install the printer driver as described in the Start Here.
 |
Note:
|
 | |
If you install the driver using the "Point and Print" method, EPSON Status Monitor 3 may not function properly. If you want to use EPSON Status Monitor 3, reinstall the driver as described in the Start Here.
|
|
Before using EPSON Status Monitor 3, be sure to read the README file on the User CD-ROM. This file contains the latest information on the utility.
Setting up EPSON Status Monitor 3
Follow these steps to set up EPSON Status Monitor 3:
 |
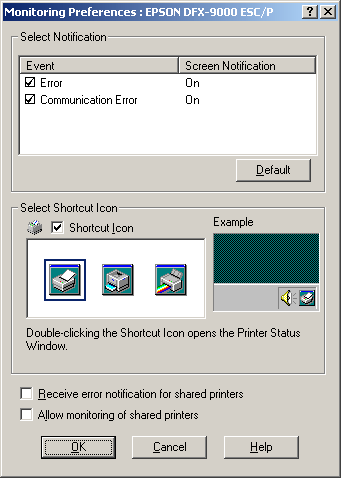
Click the Monitoring Preferences button. The Monitoring Preferences dialog box appears.
|

 |
The following settings are available:
|
|
Select Notification
|
Displays the error item check box On/Off status.
Turn on this check box to display the selected error notification.
|
|
Select Shortcut Icon
|
The selected icon is displayed on the taskbar. The setting's example is shown on the right window. By clicking the shortcut icon, you can access the Monitoring Preferences dialog box easily.
|
|
Receive error notification for shared printers
|
Error notification for a shared printer can be received when this check box is selected.
|
|
Allow monitoring of shared printer
|
When this check box is selected, a shared printer can be monitored by other PCs.
|
 |  |
Note:
|
 |  | |
Click the Default button to revert all items to the default settings.
|
|

[Top]
Accessing EPSON Status Monitor 3
Do one of the following to access EPSON Status Monitor 3;
-
Double-click the printer-shaped shortcut icon on the taskbar. To add a shortcut icon to the taskbar, go to the Utility menu and follow the instructions.
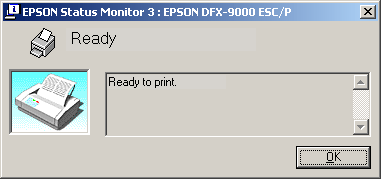
When you access EPSON Status Monitor 3 as described above, the following printer status window appears.

You can view printer status information in this window.

[Top]
Installing EPSON Status Monitor 3
Follow the steps below to install EPSON Status Monitor 3.
 |
Make sure that the printer is off and that Windows is running on your computer.
|
 |
Insert the printer software CD-ROM in the CD-ROM drive.
|
 |  |
Note:
|
 |  | -
If the language selection window appears, select your country.
|
|
 |  | -
If the EPSON Installation Program screen does not appear automatically, double-click the My Computer icon, right-click the CD-ROM icon, click OPEN in the menu that appears, then double-click Epsetup.exe.
|
|
 |
Click Continue. When the software license agreement screen appears, read the statement, then click Agree.
|
 |
Click Custom.
|
 |
Select the EPSON Status Monitor 3 check box, then click Install.
|
 |
In the dialog box that appears, make sure that your printer icon is selected, and click OK. Then follow the on-screen instructions.
|
 |
When the installation is complete, click OK.
|

[Top]
 Setting up EPSON Status Monitor 3
 Accessing EPSON Status Monitor 3
 Installing EPSON Status Monitor 3
Setting up EPSON Status Monitor 3
Accessing EPSON Status Monitor 3
Installing EPSON Status Monitor 3


