|
 The Edges of Your Document Are Not Scanned The Edges of Your Document Are Not Scanned
 You See Only a Few Dots in Your Scanned Image You See Only a Few Dots in Your Scanned Image
 A Line of Dots Always Appears in Your Scanned Images A Line of Dots Always Appears in Your Scanned Images
 Straight Lines in Your Image Come Out Crooked Straight Lines in Your Image Come Out Crooked
 Your Image Is Distorted or Blurred Your Image Is Distorted or Blurred
 Colors Are Patchy or Distorted at the Edges of Your Image Colors Are Patchy or Distorted at the Edges of Your Image
 Your Scanned Image Is Too Dark Your Scanned Image Is Too Dark
 An Image on the Back of Your Original Appears in Your Scanned Image An Image on the Back of Your Original Appears in Your Scanned Image
 Ripple Patterns Appear in Your Scanned Image Ripple Patterns Appear in Your Scanned Image
 Characters Are Not Recognized Well When Converted into Editable Text (OCR) Characters Are Not Recognized Well When Converted into Editable Text (OCR)
 Scanned Colors Differ from the Original Colors Scanned Colors Differ from the Original Colors
 You Have Trouble Adjusting the Scan Area in the Thumbnail Preview You Have Trouble Adjusting the Scan Area in the Thumbnail Preview
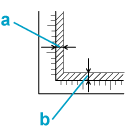
The Edges of Your Document Are Not Scanned
Move the document about 3 mm (0.12 inches) away from the horizontal and vertical edges of the document table to avoid cropping.

a, b. Maximum unreadable area of 3 mm (0.12 inches)
You See Only a Few Dots in Your Scanned Image
A Line of Dots Always Appears in Your Scanned Images
The document table or transparency unit window may be dusty or scratched. Clean the document table and transparency unit window as described in Cleaning the Scanner. If you still have the problem, contact your dealer.
Straight Lines in Your Image Come Out Crooked
Make sure the document lies perfectly straight on the document table. Align the vertical and horizontal lines with the scales at the top and side of the document table.
Your Image Is Distorted or Blurred

You can also select Color Control and Continuous auto exposure in the Configuration window, or select the Color tab and click the Recommended Value button to return the Auto Exposure setting to the default. See Epson Scan Help for details.
Colors Are Patchy or Distorted at the Edges of Your Image

If your document is very thick or curled at the edges, cover the edges with paper to block external light as you scan.
Your Scanned Image Is Too Dark

You can also select Color Control and Continuous auto exposure in the Configuration window, or select the Color tab and click the Recommended Value button to return the Auto Exposure setting to the default. See Epson Scan Help for details.
An Image on the Back of Your Original Appears in Your Scanned Image
If your original is printed on thin paper, images on the back may be visible to the scanner and appear in your scanned image. Try scanning the original with a piece of black paper placed on the back of it. Also make sure the Document Type and Image Type settings are correct for your original. See Selecting Basic Settings for details.
Ripple Patterns Appear in Your Scanned Image
A ripple or cross-hatch pattern (called moiré) may appear in a scanned image of a printed document. It is caused by interference from the differing pitches in the scanner’s screen and the halftone screen in your original.
|
Original image
|
Descreening Filter applied
|
|

|

|
-
Select the Descreening check box in Epson Scan’s Home or Professional Mode window. In Professional Mode, set the Screen Ruling of the Descreening setting to an appropriate setting for your document and deselect the Unsharp Mask setting. See Adjusting the Color and Other Image Settings for instructions.
 |
Note: |
 |
|
You cannot remove ripple patterns when you are scanning film or monochrome images, or scanning using a resolution higher than 601 dpi.
|
|
Characters Are Not Recognized Well When Converted into Editable Text (OCR)
Scanned Colors Differ from the Original Colors
-
Try selecting the following settings in the configuration window: Color Control, Continuous auto exposure, and Recommended Value (on the Color tab). Also try turning off the Fast Preview setting. See Epson Scan Help for details.
-
Check the color matching and color management capabilities of your computer, display adapter, and software. Some computers can change the palette of colors on your screen. See your software and hardware manuals for details.
-
Use the color management system for your computer: ICM for Windows or ColorSync for Mac OS X. With Windows, add a color profile that matches your monitor to improve on-screen color matching. (Exact color matching is very difficult. Check your software and monitor documentation for information on color matching and calibration.)
-
Printed colors can never exactly match the colors on your monitor because printers and monitors use different color systems: monitors use RGB (red, green, and blue) and printers typically use CMYK (cyan, magenta, yellow, and black).
You Have Trouble Adjusting the Scan Area in the Thumbnail Preview
| 


 The Edges of Your Document Are Not Scanned
 Top
Top

