|

Online Reference Guide
|
|
Setting up the Scanner Server PC
Setting the Scanner Server PC's IP Address
 Assigning an IP address to a scanner server PC on Windows Millennium Edition/98/95
 Assigning an IP address to a scanner server PC on Windows 2000
 Assigning an IP address to a scanner server PC on Windows NT 4.0
To use EPSON scanners in a network environment, you need to assign IP addresses to the scanner server PC and client PCs.
If EPSON scanners are installed in an internal LAN (Local Area Network), that is, isolated from the Internet, the following IP addresses can be assigned to the scanner server PC.
 |
Note:
|
 |
If you use IP addresses from these ranges, you will not be able to connect this LAN to the Internet in the future, otherwise there will be IP address conflicts.
|
10.0.0.0 - 10.255.255.255
172.16.0.0 - 172.31.255.255
192.168.0.0 - 192.168.255.255
If you plan to use a scanner server PC in a network connected to the Internet, you should acquire a formal IP address for the scanner server PC from the Internet organization of your country.
Assigning an IP address to a scanner server PC on Windows Millennium Edition/98/95
 |
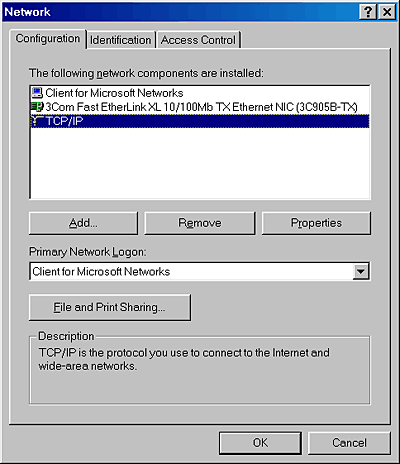
Click the Start button on the Windows task bar and point to Settings, then select Control Panel and double-click the Network icon to open the Network dialog box.
|
The Network dialog box appears with Configuration tab on the top.
 |
Select TCP/IP in the list box and click Properties.
|
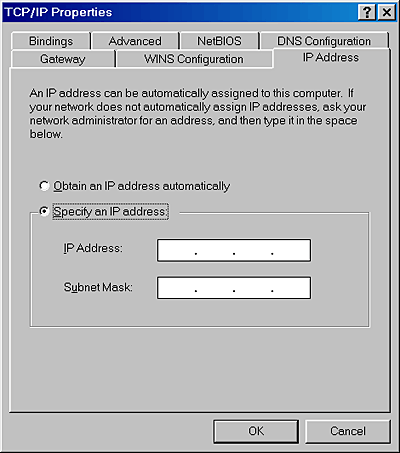
The TCP/IP Properties dialog box appears.
 |
Click the IP Address tab.
|
 |
If you are using a DHCP server on the network, you can assign an IP address to the scanner server PC automatically by selecting Obtain an IP address automatically and clicking OK. To manually assign an IP address, select Specify an IP address and then enter the IP Address and Subnet Mask. Click OK.
|

[Top]
Assigning an IP address to a scanner server PC on Windows 2000
 |
Right-click the My Network Places icon, then select Properties and double-click Local Area Connection.
|
 |
Click Properties.
|
 |
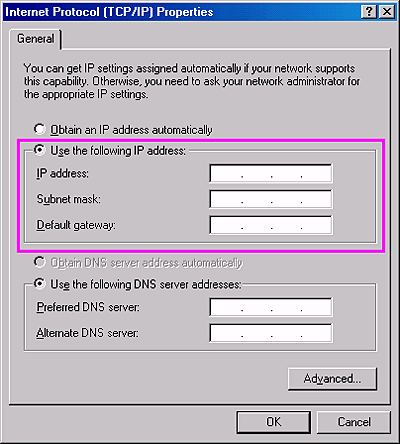
Select Internet Protocol (TCP/IP) in the list box, and then click Properties.
|

 |
Select Use the following IP address, then enter the IP address. Click OK to close the dialog box.
|
 |  |
Note:
|
 |  | -
Make the settings appropriate for your network.
|
 |  | -
Confirm the IP address and other network settings with your network administrator.
|
 |
Click OK to close the Local Area Connection Properties dialog box, then click Close to close the Local Area Connection Status dialog box.
|

[Top]
Assigning an IP address to a scanner server PC on Windows NT 4.0
 |
Click the Start button and point to Settings, then select Control Panel and double-click the Network icon in Control Panel.
|
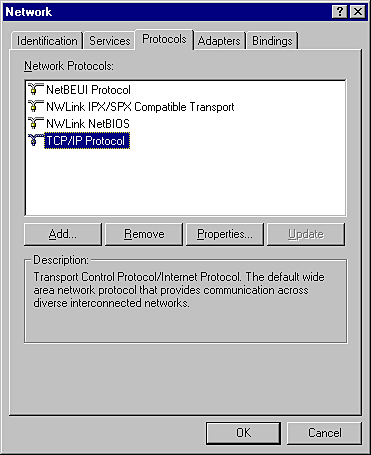
The Network dialog box appears with the Identification tab on the top.
 |
Click the Protocols tab.
|
 |
Select TCP/IP Protocol in the list box and click Properties....
|
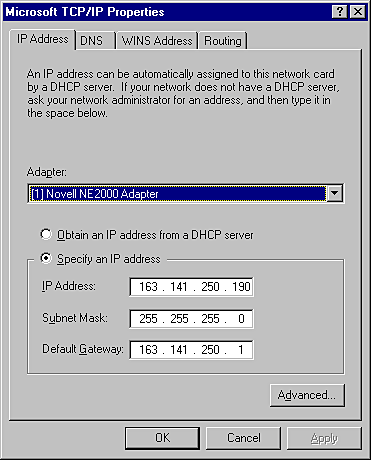
The Microsoft TCP/IP Properties dialog box appears.
 |
If you are using a DHCP server in your network, you can assign an IP address to your scanner server PC by selecting Obtain an IP address from a DHCP server and clicking OK. To manually assign an IP address, select Specify an IP address then enter the IP Address, Subnet Mask and Default Gateway. Click OK.
|

[Top]
| Version 1.00E, Copyright © 2001, SEIKO EPSON CORPORATION |
Assigning an IP address to a scanner server PC on Windows Millennium Edition/98/95
Assigning an IP address to a scanner server PC on Windows 2000
Assigning an IP address to a scanner server PC on Windows NT 4.0