|

Online Reference Guide
|
|
Maintenance and Troubleshooting
Changing USB Connections Ports
If you want to connect the scanner to a different USB port on your computer or hub, you may need to remove your scanner from your system first, depending on the version of Windows 98 installed on your computer. If Windows 98 Second Edition is installed on your computer, you can change the USB port without removing the scanner from the system. If your version of Windows 98 is not the Second Edition, you need to remove and then reinstall the scanner software in your computer as described in Changing the USB port. For instructions on checking your Windows 98 version, see Checking your Windows 98 version.
Checking your Windows 98 version
Follow the steps below to check your Windows 98 version.
 |
Right-click the My Computer icon on your desktop, and select Properties.
|
 |
In the General menu, read the description under System.
|
If you see 4.10.1998, your version of Windows 98 is not the Second Edition, and you must follow the steps in Changing the USB port when changing the USB port.
If the description does not include 4.10.1998, you can change the USB port without following the steps below.
Changing the USB port
 |
Connect the scanner to your computer.
|
 |
Turn on the scanner and then your computer.
|
 |  |
Note:
|
 |  | -
Before turning on your computer, if you have any other scanners, in addition to EPSON Expression 1640XL, or cameras listed in the Control Panel's Scanner and Cameras Properties dialog box, be sure to connect them to your computer or hub and turn them on.
|
 |  | -
If you do not follow these steps, your scanner or computer may not operate correctly.
|
 |
Click the Start menu, point to Settings and click Control Panel, then double-click the Scanners and Cameras icon.
|
 |
Select EPSON Expression1640XL and click Remove.
|
 |  |
Note:
|
 |  | -
Be sure you have selected the correct device to remove. Since there is no Cancel button, there is no way to stop removal of a device once you click the Remove button.
|
 |  | -
If other devices listed in the Scanners and Cameras Properties dialog box are not connected to the computer when you remove the scanner, you may not be able to properly remove them at a later time. Be sure to connect and turn on all the devices listed in the Scanners and Cameras Properties dialog box before turning on your computer and removing the scanner.
|
 |
Click OK to close the dialog box, then close the Control Panel.
|
 |
Shut down Windows and turn off your computer, but leave the scanner on.
|
 |
Connect the USB cable to the new USB port.
|
 |
Turn on your computer.
|
 |
When the dialog box below appears, insert your scanner software CD into your CD-ROM drive, then click OK to reinstall EPSON TWAIN Pro.
|

 |  |
Note:
|
 |  |
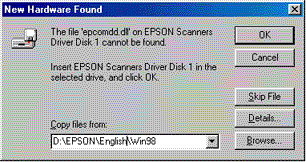
If the following dialog box appears, browse the CD-ROM for EPSON\language\Win98, then click OK.
|


[Top]
| Version 1.00E, Copyright © 2001, SEIKO EPSON CORPORATION |